# Netze

# Onliner

# VPN, Online-Services

Wireguard, Tunneling, SSH,

# Bitwarden im eigenen VPN

Hallo   
  
ich habe vor einiger Zeit Bitwarden/Vaultwarden für mich entdeckt und wollte dies **nur** über meinen internen VPN ohne Portfreigabe benutzen. Leider, ist dies Zwecks https Zwang gar nicht so einfach. Leider findet man im Internet nicht wirklich gute bzw. einfache Lösungen. Nach stundenlanger Recherche und rum probieren habe ich mit Hilfe eines netten Discord Users, die für mich perfekte Lösung gefunden und würde diese gerne mit euch teilen   
  
Ich gehe davon aus das bei allen Docker installiert ist:  
  
Falls ihr OMV benutzt müsst ihr noch den Port 80 auf einen anderen Port umlegen, da nginx den Port 80 benötigt.  
  
**1. nginx installieren**  
Als erstes installieren wir nginx in unserem Docker, ich habe dies über Stacks getan, hier mal der Auszug mit Erklärungen

<div class="bbCodeBlock bbCodeBlock--screenLimited bbCodeBlock--code" id="bkmrk-code%3A"><div class="bbCodeBlock bbCodeBlock--screenLimited bbCodeBlock--code"><div class="bbCodeBlock-title">Code:</div><div class="bbCodeBlock-content" dir="ltr">  
</div></div></div>```general
version: '3'
services:
  app:
    image: 'jc21/nginx-proxy-manager:latest'
    restart: unless-stopped
    ports:
      - '80:80' #zwingend Port 80 für http Seiten
      - '511:81'
      - '443:443'#zwingend Port 443 für https Seiten
    volumes:
    - eurerSpeicherpfad:/data
    - eurerSpeicherpfad:/etc/letsencrypt
```

  
Ihr könnt natürlich auch einen anderen Port benutzen, dann müsst ihr bei eurer gewünschten Seite den Port mit angeben *(zum Beispiel paddy0293.local.de:6555)*, was eigentlich nicht Sinn der Sache ist.  
  
  
**2. vaultwarden installieren**

<div class="bbCodeBlock bbCodeBlock--screenLimited bbCodeBlock--code" id="bkmrk-code%3A-0"><div class="bbCodeBlock bbCodeBlock--screenLimited bbCodeBlock--code"><div class="bbCodeBlock-title">Code:</div><div class="bbCodeBlock-content" dir="ltr">  
</div></div></div>```general
version: '3'

services:
  vaultwarden:
    image: vaultwarden/server:latest
    container_name: vaultwarden
    restart: always
    ports:
    3000:80 # könnt 3000, wie euch beliebt
    environment:
      - WEBSOCKET_ENABLED=true # Enable WebSocket notifications.
      - ADMIN_TOKEN={{ADMIN_TOKEN}} # Passwort setzen für das Admin Panel
      - SIGNUPS_ALLOWED=false
    volumes:
      - ./vw-data:/data
```

  
Jetzt kommt das Problem weshalb ich den ganzen Aufwand überhaupt betrieben habe:

[![grafik.png](https://bst.wkmimnl.de/uploads/images/gallery/2024-12/scaled-1680-/XAxgrafik.png)
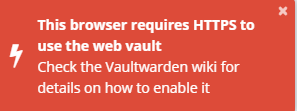
](https://bst.wkmimnl.de/uploads/images/gallery/2024-12/XAxgrafik.png)


Jetzt gibt es 2 Varianten, eine kostenlose und eine kostenpflichtige (2,50€ im Jahr)  
Ich erläutere erst einmal nur die kostenpflichtige Variante wenn Bedarf besteht auch gerne die kostenlose   
  
Ich habe mir eine Domain gekauft über netcup gekauft, über die ich meine Bitwarden Domain ansteuern möchte.  
Ich kann ab hier nur noch von Netcup sprechen.  
Sobald ihr die Domain gekauft habt müsst ihr euch eine API erstellen, die ist zwingend notwendig für das Letsencrypt Zertifikat.  
Die macht ihr im Netcup Controlpanel unter Stammdaten -&gt; API  
Nun erstellt ihr ein API Passwort und ein API Key

[![grafik.png](https://bst.wkmimnl.de/uploads/images/gallery/2024-12/scaled-1680-/pEZgrafik.png)](https://bst.wkmimnl.de/uploads/images/gallery/2024-12/pEZgrafik.png)


Jetzt lassen wir via nginx ein letsencrypt Zertifikat erstellen

[![grafik.png](https://bst.wkmimnl.de/uploads/images/gallery/2024-12/scaled-1680-/GYxgrafik.png)](https://bst.wkmimnl.de/uploads/images/gallery/2024-12/GYxgrafik.png)

[![grafik.png](https://bst.wkmimnl.de/uploads/images/gallery/2024-12/scaled-1680-/Z35grafik.png)
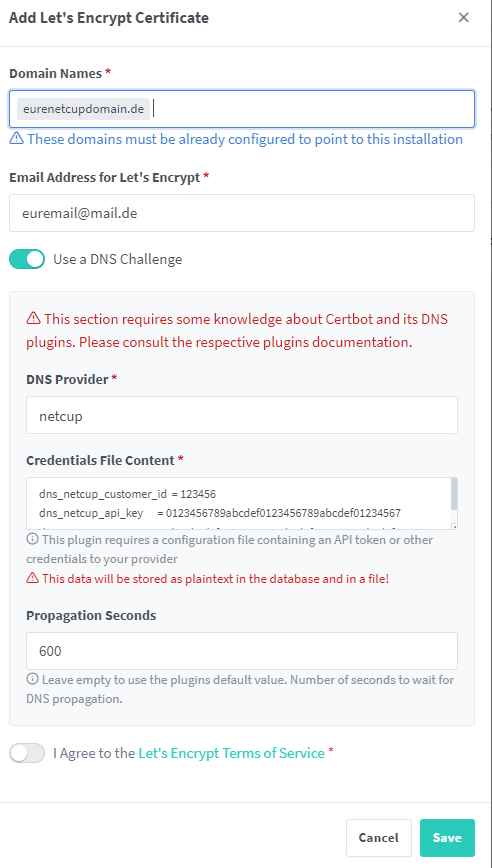
](https://bst.wkmimnl.de/uploads/images/gallery/2024-12/Z35grafik.png)


dns\_netcup\_customer\_id = eure Login ID  
dns\_netcup\_api\_key = euren Netcup API Key  
dns\_netcup\_api\_password = euer Netcup API Password  
Propagation Seconds = 600 #wird von netcup empfohlen  
  
Dann auf Save und einen Kaffee trinken gehen, dies dauert einen kleinen Moment   
  
So jetzt haben wir erfolgreich schon mal unser Cert erstellt ohne das wir einen Port öffnen mussten  
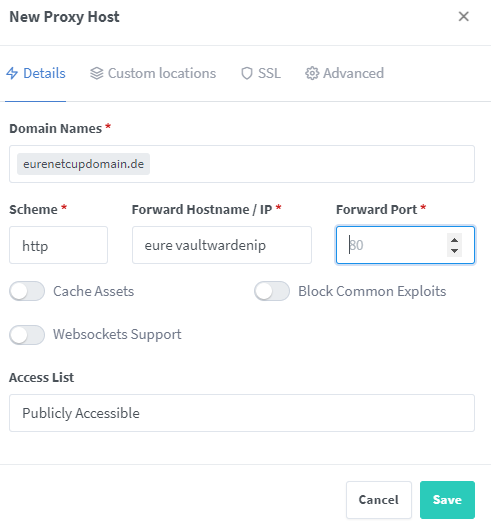
Jetzt müssen wir nur noch ein Proxhost erstellen.

[![grafik.png](https://bst.wkmimnl.de/uploads/images/gallery/2024-12/scaled-1680-/vBMgrafik.png)](https://bst.wkmimnl.de/uploads/images/gallery/2024-12/vBMgrafik.png)

[![grafik.png](https://bst.wkmimnl.de/uploads/images/gallery/2024-12/scaled-1680-/Ga1grafik.png)](https://bst.wkmimnl.de/uploads/images/gallery/2024-12/Ga1grafik.png)


Unter SSL, euer grad erstelltes Cert auswählen

[![grafik.png](https://bst.wkmimnl.de/uploads/images/gallery/2024-12/scaled-1680-/Y1fgrafik.png)
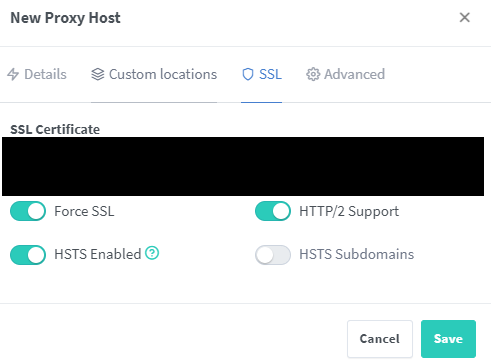
](https://bst.wkmimnl.de/uploads/images/gallery/2024-12/Y1fgrafik.png)


Speichern, schon habt ihr eine erfolgreiche Umleitung auf euren Vault via Https.  
Jetzt kommt es darauf an, ob ihr über einen DNS Server verfügt oder nicht.  
Wenn ja, dann bitte die Domain mit eurer IP im DNS verknüpfen.  
Wenn Nein, dann bleibt euch nur die Möglichkeit die Domain über die Hostdatei einzufügen, diese findet ihr unter:  
  
*System32\\drivers\\etc\\hosts*  
  
Diese Datei editieren und am Zeilenende folgendes schreiben.  
  
eure Valtwarden IP und eure Domain  
  
Bsp. 192.168.0.0 netcupdomain.de  
  
Speichern, in cmd noch ipconfig /flushdns -&gt; löscht den Cache  
Eure Netcup Domain ansurfen und glücklich sein   
  
Wenn ihr via Handy draufzugreifen wollt müsst ihr nur eure lokale IP eingeben, diese benötigt keine Https und somit müsst ihr auch keine Host Datei anpassen.  
  
Ich hoffe das kleine Tutorial hilft euch   
Bei Fragen oder Feedback einfach hier melden.  
Viele Grüße  
  
Paddy

# Wireguard Client

WIKI: [Wiki Debian](https://wiki.debian.org/WireGuard "Wiki Debian")

#### Listing:

 apt-get install openresolv

ip link add wg type wireguard  
 wg show  
 nano /etc/wireguard/wg.conf  
 wg-quick up wg  
 ip address  
 ping 10.8.0.2  
 wg show

- Service:
- <span class="enlighter-text">systemctl enable [wg-quick@wg](mailto:wg-quick@wg)</span>
- <span class="enlighter-text">systemctl daemon-reload</span>
- <span class="enlighter-text">systemctl start [wg-quick@wg](mailto:wg-quick@wg)</span>

<span class="enlighter-text">=&gt;systemctl list-units|grep wg</span>

<span class="enlighter-text">Routing:</span>

```
sysctl net.ipv4.ip_forward=1
```

\-----------------------------------------------------------------------------------------------------------------------------------

# [WireGuard Site to Site VPN – Zwei Netzwerke sicher verbinden](https://schroederdennis.de/allgemein/wireguard-site-to-site-vpn-zwei-netzwerke-sicher-verbinden/)

WireGuard ist der “neue” VPN Server von Heute! Nicht das er als Open Source sowieso schon bei mir gewonnen hat, sondern er ist auch ein Leichtgewicht. Der schlanke SourceCode bringt ihm zusätzlich Performance, sodass wir alles an Board haben was wir brauchen.

Zusammengefasst, WireGuard ist ein sehr **einfacher**, sehr **sicherer** und sehr **schneller** VPN Server für alle möglichen **Plattformen** und **Betriebssystemen**.

<div class="post-content" id="bkmrk--24"><figure class="wp-block-image alignwide size-large is-style-default">![](https://schroederdennis.de/wp-content/uploads/2021/01/WG-site-to-site-1024x413.png)</figure></div>Im letzten Video habe ich euch gezeigt wie man eine Client to Site Verbindung herstellt und habe euch die Konfiguration dazu hier im Blog aufgeschlüsselt. ([WireGuard Client VPN](https://schroederdennis.de/tutorial-howto/wireguard-vpn-server-installieren-client-to-server/))  
Jetzt zeige ich euch wie man eine Site-to-Site VPN Verbindung herstellt und dann die Netzwerke auf der gegenüberliegenden Seite erreicht

<iframe allow="accelerometer; autoplay; clipboard-write; encrypted-media; gyroscope; picture-in-picture; web-share" allowfullscreen="allowfullscreen" data-origheight="380" data-origwidth="676" frameborder="0" height="380" src="https://www.youtube.com/embed/uV2NRmdCR0k?feature=oembed" style="width: 1015.2px; height: 570.675px;" title="WireGuard Site to Site VPN einrichten - Netzwerke sicher verbinden !! #VPN #SiteToSite" width="676"></iframe>

## Anleitung: WireGuard Site-to-Site VPN Server

### Schritt 1: Auf dem SERVER1 und SERVER2 ausführen

<div class="post-content" id="bkmrk-%3F-1-2-3-4-sh--c-%22ech"><div class="wp-block-syntaxhighlighter-code "><div><div class="syntaxhighlighter  bash" id="bkmrk-%3F-1-2-3-4-sh--c-%22ech-1"><div class="toolbar">[?](https://schroederdennis.de/allgemein/wireguard-site-to-site-vpn-zwei-netzwerke-sicher-verbinden/)</div><table border="0" cellpadding="0" cellspacing="0"><tbody><tr><td class="gutter"><div class="line number1 index0 alt2">1</div><div class="line number2 index1 alt1">2</div><div class="line number3 index2 alt2">3</div><div class="line number4 index3 alt1">4</div></td><td class="code"><div class="container"><div class="line number1 index0 alt2">`sh -c ``"echo 'deb <a href="http://deb.debian.org/debian">http://deb.debian.org/debian</a> buster-backports main contrib non-free' > /etc/apt/sources.list.d/buster-backports.list"`</div><div class="line number2 index1 alt1">`apt update`</div><div class="line number3 index2 alt2">`apt ``install` `linux-headers-$(``uname` `--kernel-release)`</div><div class="line number4 index3 alt1">`apt ``install` `wireguard`</div></div></td></tr></tbody></table>

</div></div></div><div class="wp-block-syntaxhighlighter-code "><div><div class="syntaxhighlighter  bash" id="bkmrk-%3F-1-2-3-nano-%2Fetc%2Fsy"><div class="toolbar">[?](https://schroederdennis.de/allgemein/wireguard-site-to-site-vpn-zwei-netzwerke-sicher-verbinden/)</div><table border="0" cellpadding="0" cellspacing="0"><tbody><tr><td class="gutter"><div class="line number1 index0 alt2">1</div><div class="line number2 index1 alt1">2</div><div class="line number3 index2 alt2">3</div></td><td class="code"><div class="container"><div class="line number1 index0 alt2">`nano ``/etc/sysctl``.conf`</div><div class="line number2 index1 alt1">`# <- entfernen bei der Zeile "net.ipv4.ip_forward=1" und speichern`</div><div class="line number3 index2 alt2">`sysctl -p `</div></div></td></tr></tbody></table>

</div></div></div><div class="wp-block-syntaxhighlighter-code "><div><div class="syntaxhighlighter  bash" id="bkmrk-%3F-1-2-3-4-5-cd-%2Fetc%2F"><div class="toolbar">[?](https://schroederdennis.de/allgemein/wireguard-site-to-site-vpn-zwei-netzwerke-sicher-verbinden/)</div><table border="0" cellpadding="0" cellspacing="0"><tbody><tr><td class="gutter"><div class="line number1 index0 alt2">1</div><div class="line number2 index1 alt1">2</div><div class="line number3 index2 alt2">3</div><div class="line number4 index3 alt1">4</div><div class="line number5 index4 alt2">5</div></td><td class="code"><div class="container"><div class="line number1 index0 alt2">`cd` `/etc/wireguard/`</div><div class="line number2 index1 alt1">`umask` `077; wg genkey | ``tee` `privatekey | wg pubkey > publickey`</div><div class="line number3 index2 alt2">`cat` `privatekey`</div><div class="line number4 index3 alt1">`cat` `publickey`</div><div class="line number5 index4 alt2">`chmod` `600 ``/etc/wireguard/privatekey`</div></div></td></tr></tbody></table>

</div></div></div>Schritt 2: **Nur** auf SERVER1 ausführen</div>Konfigurationsdatei anlegen  
**nano /etc/wireguard/wg0.conf**

```
<strong>[Interface] </strong>
<strong>PrivateKey = <Dein privater Schlüssel [privatekey SERVER 1]> </strong>
<strong>Address = 172.31.0.1/</strong>24
<strong>SaveConfig = true </strong>
<strong>PostUp = iptables -A FORWARD -i wg0 -j ACCEPT; iptables -t nat -A POSTROUTING -o eth0 -j MASQUERADE</strong>
<strong>PostDown = iptables -D FORWARD -i wg0 -j ACCEPT; iptables -t nat -D POSTROUTING -o eth0 -j MASQUERADE</strong>
<strong>ListenPort = 51820</strong>

[Peer]
 PublicKey = <strong><Öffentlicher Schlüssel von [SERVER 2]></strong>
 AllowedIPs = 192.168.0.0/24, 172.31.0.0/24
 PersistentKeepalive = 25
```

In den Zeilen **PostUP &amp; PostDown** das Interface anpassen wie es zu eurem System passt. Hier steht jetzt **eth0**, das kann aber bei euch anders sein. Prüfen könnt Ihr das mit “**ip a**“

### Schritt 3: **Nur** auf SERVER2 ausführen

Konfigurationsdatei anlegen  
**nano /etc/wireguard/wg0.conf**

```
<strong>[Interface] 
PrivateKey = <Dein privater Schlüssel [privatekey SERVER 2]> 
Address = 172.31.0.2/24 
SaveConfig = true 
PostUp = iptables -A FORWARD -i wg0 -j ACCEPT; iptables -t nat -A POSTROUTING -o eth0 -j MASQUERADE
PostDown = iptables -D FORWARD -i wg0 -j ACCEPT; iptables -t nat -D POSTROUTING -o eth0 -j MASQUERADE

[Peer] 
PublicKey = <Öffentlicher Schlüssel von [SERVER 1]> 
Endpoint = <ServerIP oder Domain/FQDN>:51820 
AllowedIPs = 10.0.0.0/8, 172.31.0.0/24</strong>
PersistentKeepalive = 25
```

### Schritt 4: Auf SERVER1 und SERVER2 ausführen

<div class="post-content" id="bkmrk-%3F-1-2-3-wg-quick-up-"><div class="wp-block-syntaxhighlighter-code "><div><div class="syntaxhighlighter  bash" id="bkmrk-%3F-1-2-3-wg-quick-up--1"><div class="toolbar">[?](https://schroederdennis.de/allgemein/wireguard-site-to-site-vpn-zwei-netzwerke-sicher-verbinden/)</div><table border="0" cellpadding="0" cellspacing="0"><tbody><tr><td class="gutter"><div class="line number1 index0 alt2">1</div><div class="line number2 index1 alt1">2</div><div class="line number3 index2 alt2">3</div></td><td class="code"><div class="container"><div class="line number1 index0 alt2">`wg-quick up wg0`</div><div class="line number2 index1 alt1">`wg`</div><div class="line number3 index2 alt2">`##Das zeigt dir den Status der Verbindung an`</div></div></td></tr></tbody></table>

</div></div></div></div>Das wg-quick Kommando startet die Wireguard Verbindung mit der entsprechend hinterlegten Konfiguration, welche wir im vorherigen Schritt erstellt haben. Wenn eure Konfigurationsdatei anders heißen sollte, müsst Ihr den Befehl natürlich anpassen. wg0 ist hier nur als Beispiel genommen.

### Schritt 5: Autostart (Server1 &amp; Server2)

Wenn **WireGuard** automatisch mit dem System starten soll, dann folgenden Befehl absetzen.

<div class="post-content" id="bkmrk-%3F-1-systemctl-enable"><div class="wp-block-syntaxhighlighter-code "><div><div class="syntaxhighlighter  bash" id="bkmrk-%3F-1-systemctl-enable-1"><div class="toolbar">[?](https://schroederdennis.de/allgemein/wireguard-site-to-site-vpn-zwei-netzwerke-sicher-verbinden/)</div><table border="0" cellpadding="0" cellspacing="0"><tbody><tr><td class="gutter"><div class="line number1 index0 alt2">1</div></td><td class="code"><div class="container"><div class="line number1 index0 alt2">`systemctl ``enable` `wg-quick@wg0`</div></div></td></tr></tbody></table>

</div></div></div><div class="aawp"><div class="aawp-product aawp-product--list aawp-product--ribbon aawp-product--sale aawp-product--css-adjust-image-large aawp-product--bestseller" data-aawp-click-tracking="title" data-aawp-product-asin="B0BKPXZDCY" data-aawp-product-id="12254" data-aawp-product-title="Synology DS923+ 4 Bay Desktop NAS Ryzen R1600 Dual-Core" data-aawp-tracking-id="schrodennplugin-21">  
</div></div></div>### Schritt 6: Routing

Ihr müsst natürlich auf beiden Seiten für das Routing sorgen. Hier ein Auszug aus dem Video wie das Routing in der Fritzbox aussehen könnte.

<div class="post-content" id="bkmrk-fritzbox-routing"><figure class="wp-block-image size-large is-style-default">![](https://schroederdennis.de/wp-content/uploads/2021/01/image.png)<figcaption>Fritzbox Routing</figcaption></figure>--------------------------------------------------------------------------</div><div class="post-content" id="bkmrk-wireguard-netzwerk-m"><article class="post-1229 post type-post status-publish format-standard hentry category-allgemein tag-wireguard" id="bkmrk-wireguard-netzwerk-m-1"><header class="entry-header"># Wireguard Netzwerk mit Routing einrichten

<div class="entry-meta"><span class="entry-date">[<time class="entry-date published" datetime="2019-11-28T10:40:12+01:00">28. November 2019</time>](https://www.edvpfau.de/wireguard-netzwerk-mit-routing-einrichten/)</span> by <span class="author vcard">[Sascha Pfau](https://www.edvpfau.de/author/sascha/)</span><span class="sep">·</span><span class="comments-link">[Keine Kommentare](https://www.edvpfau.de/wireguard-netzwerk-mit-routing-einrichten/#respond)</span></div></header># Wireguard Netzwerk

Die prinzipielle Einrichtung von Wireguard habe ich in dem Artikel [Wireguard](https://www.edvpfau.de/wireguard/) beschrieben. Es ging um die die Point to Point Einrichtung mehrerer Clients die auf einen PC, der als Server fungiert, zugreifen. Die Clients konnten sich untereinander nicht sehen.

Im folgenden möchte ich beschreiben, wie man ein VPN Netz aufbaut in dem sich die Clients untereinander verbinden können. Damit Clients in dem privaten Netzwerk sich über Hostname ansprechen können, wird ein zentraler DNS Server eingerichtet. Hierfür verwende ich einen vorhandenen OpenWRT Router.

## Aufbau des Netzwerkes

Das Netzwerk ist auf mehrere Standorte verteilt. Es gibt einen zentralen Linux PC der die Rolle des Wireguard Servers einnimmt. Die Rolle einnimmt, weil es per se keinen Wireguard Server gibt. Es ist die Konfiguration die ihn zur Zentrale werden lässt. Damit dieser erreichbar ist, ist ein DynDNS Dienst oder eine feste IP Adresse von Nöten. Dieses ist aber nicht Bestandteil dieses Artikels. Hier verwaise ich zum Beipsiel auf den Artikel [DynDNS mit Duck DNS](https://www.edvpfau.de/dyndns-mit-duckdns/).

Der Server bekommt in dem VPN die Adresse 10.0.0.1. Der Server ist für das Routing unter den Clients verantwortlich. Das heißt er leitet eingehende Pakete an die anderen Clients weiter. Hierfür muss das IP Forwarding aktiviert und einfache Regeln für die **FORWARD** Chain von IPTABLES angelegt werden.

Die Clients stellen eine Reihe von Laptops, Workstations und weiteren Servern da. Die Client erhalten durchnummerierte IP Adressen beginnend mit 10.0.0.2/32. In meinem Setup sind es aktuell 6 weitere PCs die in dem VPN vorhanden sind.

## Konfiguration von Wireguard

Im Folgenden werde ich das Schema wie Clients und der Server einzurichten sind erläutern. Wenn das Schema bekannt ist, dann ist es leicht weitere Clients hinzuzufügen.

### Einrichtung auf dem Server

Das Schema ist eigentlich recht einfach. Es muss allerdings auf die Subnetzmaske bei der Angabe der IP Adressen genau geachtet werden. Die Server Adresse ist mit /24 und die Clients mit /32 anzugeben.

```
[Interface]
PrivateKey = PrivateKeyDesServers
ListenPort = 32768
Address = 10.0.0.1/24

# Allow routing between clients
PostUp = iptables -A FORWARD -i %i -j ACCEPT; iptables -A FORWARD -o %i -j ACCEPT
PostDown = iptables -D FORWARD -i %i -j ACCEPT; iptables -D FORWARD -o %i -j ACCEPT

#
# Client 1
#
[Peer]
PublicKey = PublicKeyDesClient
AllowedIPs = 10.0.0.2/32

#
# Client 2
#
[Peer]
PublicKey = PublicKeyDesClient
AllowedIPs = 10.0.0.3/32

#
# Client 3
#
[Peer]
PublicKey = PublicKeyDesClient
AllowedIPs = 10.0.0.4/32

.
.
.

#
# Client 7
#
[Peer]
PublicKey = PublicKeyDesClient
AllowedIPs = 10.0.0.7/32

```

### Einrichtung der Clients

Es ist hierbei wichtig zu wissen, dass nur ein Client das gesamte Subnetz beanspruchen darf! Sonst funktioniert das ganze nicht. Das heißt auf den Clients sind explizit die Adresse einzutragen mit denen der Client kommunizieren darf. Dieses macht aber nur bei kleineren Netzen einen Sinn.

```
[Interface]
PrivateKey = PrivateKeyDesClients
Address = 10.0.0.3/24
DNS = 10.0.0.7

[Peer]
PublicKey = PublicKeyDesServers
AllowedIPs = 10.0.0.1/32, 10.0.0.2/32, 10.0.0.5/32, 10.0.0.6/32, 10.0.0.7/32
EndPoint = myname.dyndns.org:32222
PersistentKeepalive = 25

```

Wichtig ist das alle Clients mit **10.0.0.X/32** angegeben werden.

## IP Forwarding Aktivierung

Das allgemeine IP Forwarding bzw. auf Geräteebene aktivieren habe ich bereits in dem [Wireguard](https://www.edvpfau.de/wireguard/) Artikel beschreiben.

## Firewall Regeln

Damit die Pakete nun auch an die Client weitergeleitet werden, muss in der **FORWARD** Chain das In-/Output auf dem Wireguard Interface zulassen. Dieses kann mit dem **PostUp** in der Konfiguration automatisch nach dem Starten der Verbindung durchgeführt werden.

```
PostUp = iptables -A FORWARD -i %i -j ACCEPT; iptables -A FORWARD -o %i -j ACCEPT

```

## Verbindungsaufbau

Für den automatischen Verbindungsaufbau muss die Option **PersistentKeepalive** gesetzt werden, damit ein Paket Verbindung öffnet.

## Einrichtung von DNS

Auf dem Client habe ich die Konfiguration mit dem KDE NetworkManager durchgeführt. Bei der Wireguard Konfiguration habe ich nun die Adresse des DNS Servers eingetragen, der für das interne Netzt zuständig ist. Die [Konfiguration der statische Hostnames](https://www.edvpfau.de/statische-dns-eintraege-per-ssh-auf-openwrt-verwalten/) beschriebt ein andere Artikel.

### Testen der Namesauflösung

Auf http://openwrt/cgi-bin/luci/admin/network/dhcp unter *Local Server* mit **/XXXX.duckdns.org/** Anfrage an die Domain nach außen unterbinden, da diese sonst von DuckDNS beantwortet werden würden und somit die IPV6 Adresse genommen wird, was zu Fehlern führt.

<div class="tags-links">[Wireguard](https://www.edvpfau.de/tag/wireguard/)</div></article>---

</div>

# Wireguard Server Installation ganz einfach!

<header class="entry-header" id="bkmrk-wireguard-server-ins" style="font-family: 'Roboto Condensed', sans-serif; line-height: 1.6; font-size: 16px; font-style: normal; font-variant-ligatures: normal; font-variant-caps: normal; font-weight: 400; letter-spacing: normal; orphans: 2; text-align: start; text-indent: 0px; text-transform: none; white-space: normal; widows: 2; word-spacing: 0px; -webkit-text-stroke-width: 0px; text-decoration-thickness: initial; text-decoration-style: initial; text-decoration-color: initial;"># [Wireguard Server Installation ganz einfach!](https://vpntester.org/vpn-anbieter/anleitung-vpn/eigener-wireguard-server-installation/ "Quelle")

</header>Wer einen eigenen Wireguard Server betreiben möchte steht meistens vor der Herausforderung einige Fachkentnisse mitzubringen. Daher haben wir eine Lösung entwickelt mit der es ganz einfach auch für Anfänger wird. In unserer Anleitung zeigen wir Dir den Weg und beschrieben jedes Detail des Vorganges. Mit dieser Anleitung sollten daher auch Neueinsteiger zu Recht kommen und in wenigen Minuten Ihren eigenen Wireguard Server in Betrieb haben.

Inhaltsverzeichnis

## <span class="ez-toc-section" id="bkmrk--3" style="font-family: 'Roboto Condensed', sans-serif; line-height: 1.6; border: 0px; margin: 0px; padding: 0px;"></span>Der eigene Wireguard VPN Server.

In dieser Anleitung zeigen wir wie man einen VPN Server mit Wireguard selbst aufsetzt, dabei einen virtuellen Cloud Server verwendet mit einer statischen IP Adresse und diesen für verschiedene Anwendungen verwenden kann. Das ganze basiert auf dem Betriebssystem Ubuntu 20.04.xx und der Software und die Codebasis, welche Jason A. Donenfeld (Entwickler von Wireguard) veröffentlicht hat. Es ist aber auch möglich, allerdings nicht von uns getestet, andere Linux Betriebssysteme damit zu verwenden. Änderungen können in diesem Fall dazu notwendig sein. Ebenso können bei der Verwendung anderer Cloud Server Hostern eventuell andere Vorgehensweisen notwendig werden.

## <span class="ez-toc-section" id="bkmrk--4" style="font-family: 'Roboto Condensed', sans-serif; line-height: 1.6; border: 0px; margin: 0px; padding: 0px;"></span>Wireguard Server mit grafischer Benutzeroberfläche (GUI)

Du hast bei der Bedienung der Wireguard Servers anschließend eine grafische Benutzeropberfläche zur Verfügung und musst keine Programmierkentnisse mitbringen.

Verbinden kannst Du dich mit den Geräten über die Verwendung der Wireguard Clients. Diese kannst Du in den Appstores, oder auch auf der Wireguard Projektseite finden und laden:[Wireguard Download](https://www.wireguard.com/install/ "Wireguard Download"). Es gibt die Clients für viele Gerätearten und Betriebssysteme auch für Windows, MacOS, Android, Apple iOS, Linux usw.

Der Wireguard Client auf Deinem Gerät baut dann einen verschlüsselten VPN Tunnel zum VPN Server auf und fortan werden alle Daten des Gerätes über diese VPN Verbindung gesendet und empfangen. Bei der Nutzung des internets erscheint nun die Server IP Adresse und nicht mehr die des verwendeten und verbunden Gerätes.

Dieser Wireguard Server unterscheidet sich in der Sicherheit und auch Ausführung nicht von den Servern die auch bei den meisten VPN Provider verwenden werden.

**Wenn Du Dir nicht ganz sicher bist, dann Folge exakt unserer Anleitung, diese wird dich sicher zum Erfolg führen!**

> Der ganze Vorgang um einen Wireguard Server selbst betreiben zu können ist sehr einfach und auch für Anfänger der Materie leicht durchführbar.

<div class="entry-content" id="bkmrk-der-eigene-wireguard-0" itemprop="text" style="font-family: 'Roboto Condensed', sans-serif; line-height: 1.6; border: 0px; margin: 2em 0px 0px; padding: 0px; color: rgb(17, 17, 17); font-size: 16px; font-style: normal; font-variant-ligatures: normal; font-variant-caps: normal; font-weight: 400; letter-spacing: normal; orphans: 2; text-align: start; text-indent: 0px; text-transform: none; white-space: normal; widows: 2; word-spacing: 0px; -webkit-text-stroke-width: 0px; background-color: rgb(255, 255, 255); text-decoration-thickness: initial; text-decoration-style: initial; text-decoration-color: initial;"><div class="entry-content" itemprop="text" style="font-family: 'Roboto Condensed', sans-serif; line-height: 1.6; border: 0px; margin: 2em 0px 0px; padding: 0px; color: rgb(17, 17, 17); font-size: 16px; font-style: normal; font-variant-ligatures: normal; font-variant-caps: normal; font-weight: 400; letter-spacing: normal; orphans: 2; text-align: start; text-indent: 0px; text-transform: none; white-space: normal; widows: 2; word-spacing: 0px; -webkit-text-stroke-width: 0px; background-color: rgb(255, 255, 255); text-decoration-thickness: initial; text-decoration-style: initial; text-decoration-color: initial;"><figure aria-describedby="caption-attachment-33522" class="wp-caption aligncenter" id="bkmrk-der-eigene-wireguard-1" style="font-family: 'Roboto Condensed', sans-serif; line-height: 1.6; display: block; margin: 0px auto 1.5em; clear: both; max-width: 100%; position: relative; width: 790px;"><figcaption class="wp-caption-text" id="bkmrk-der-eigene-wireguard-2" style="font-family: 'Roboto Condensed', sans-serif; line-height: 1.6; display: block; font-size: 12px; padding-top: 5px; opacity: 0.8;">[![image.png](https://bst.wkmimnl.de/uploads/images/gallery/2024-11/scaled-1680-/24oimage.png)](https://bst.wkmimnl.de/uploads/images/gallery/2024-11/24oimage.png)

Der eigene Wireguard Server ganz ohne Programmierkentnisse</figcaption></figure></div></div>## <span class="ez-toc-section" id="bkmrk--5" style="font-family: 'Roboto Condensed', sans-serif; line-height: 1.6; border: 0px; margin: 0px; padding: 0px;"></span>Vor- und Nachteile eines eigenen Wireguard Servers

### Vorteile eines eigenen Wireguard Servers:

<div class="entry-content" id="bkmrk-einfach-zu-installie" itemprop="text" style="font-family: 'Roboto Condensed', sans-serif; line-height: 1.6; border: 0px; margin: 2em 0px 0px; padding: 0px; color: rgb(17, 17, 17); font-size: 16px; font-style: normal; font-variant-ligatures: normal; font-variant-caps: normal; font-weight: 400; letter-spacing: normal; orphans: 2; text-align: start; text-indent: 0px; text-transform: none; white-space: normal; widows: 2; word-spacing: 0px; -webkit-text-stroke-width: 0px; background-color: rgb(255, 255, 255); text-decoration-thickness: initial; text-decoration-style: initial; text-decoration-color: initial;"><div class="entry-content" itemprop="text" style="font-family: 'Roboto Condensed', sans-serif; line-height: 1.6; border: 0px; margin: 2em 0px 0px; padding: 0px; color: rgb(17, 17, 17); font-size: 16px; font-style: normal; font-variant-ligatures: normal; font-variant-caps: normal; font-weight: 400; letter-spacing: normal; orphans: 2; text-align: start; text-indent: 0px; text-transform: none; white-space: normal; widows: 2; word-spacing: 0px; -webkit-text-stroke-width: 0px; background-color: rgb(255, 255, 255); text-decoration-thickness: initial; text-decoration-style: initial; text-decoration-color: initial;"><div class="wc-shortcodes-row wc-shortcodes-item wc-shortcodes-clearfix" style="font-family: 'Roboto Condensed', sans-serif; line-height: 1.6; border: 0px; margin: 1.5em 0px; padding: 0px; zoom: 1; display: block; width: 922.5px;"><div class="wc-shortcodes-column wc-shortcodes-content wc-shortcodes-one-half wc-shortcodes-column-first " style="font-family: 'Roboto Condensed', sans-serif; line-height: 1.6; border: 0px; padding: 0px; width: 442.797px; position: relative; float: left; box-sizing: border-box; clear: left; margin: 0px 0px 0px 0px !important;">- <span style="color: rgb(35, 111, 161);">Einfach zu installieren</span>
- <span style="color: rgb(35, 111, 161);">Super schnelle Übertragungen</span>
- <span style="color: rgb(35, 111, 161);">Eine statische IP Adresse verwenden</span>
- <span style="color: rgb(35, 111, 161);">Geringe Kosten und keine Bindung</span>
- <span style="color: rgb(35, 111, 161);">Wireguard Clients sind für alle geräte verfügbar: Windows, Mac, Android, iOS, Linux, VPN Router</span>
- <span style="color: rgb(35, 111, 161);">Du kannst damit lokale Internetsperren umgehen</span>
- <span style="color: rgb(35, 111, 161);">100% Sicherheit vor Überwachung durch den Internetanbieter</span>

</div><div class="wc-shortcodes-column wc-shortcodes-content wc-shortcodes-one-half wc-shortcodes-column-last " style="font-family: 'Roboto Condensed', sans-serif; line-height: 1.6; border: 0px; margin: 0px 0px 0px 36.8906px; padding: 0px; width: 442.797px; position: relative; float: left; box-sizing: border-box;">  
</div></div></div></div>### Nicht geeignet ist ein eigener Wireguard Server für:

<div class="entry-content" id="bkmrk-umgehung-von-geograf" itemprop="text" style="font-family: 'Roboto Condensed', sans-serif; line-height: 1.6; border: 0px; margin: 2em 0px 0px; padding: 0px; color: rgb(17, 17, 17); font-size: 16px; font-style: normal; font-variant-ligatures: normal; font-variant-caps: normal; font-weight: 400; letter-spacing: normal; orphans: 2; text-align: start; text-indent: 0px; text-transform: none; white-space: normal; widows: 2; word-spacing: 0px; -webkit-text-stroke-width: 0px; background-color: rgb(255, 255, 255); text-decoration-thickness: initial; text-decoration-style: initial; text-decoration-color: initial;"><div class="entry-content" itemprop="text" style="font-family: 'Roboto Condensed', sans-serif; line-height: 1.6; border: 0px; margin: 2em 0px 0px; padding: 0px; color: rgb(17, 17, 17); font-size: 16px; font-style: normal; font-variant-ligatures: normal; font-variant-caps: normal; font-weight: 400; letter-spacing: normal; orphans: 2; text-align: start; text-indent: 0px; text-transform: none; white-space: normal; widows: 2; word-spacing: 0px; -webkit-text-stroke-width: 0px; background-color: rgb(255, 255, 255); text-decoration-thickness: initial; text-decoration-style: initial; text-decoration-color: initial;"><div class="wc-shortcodes-row wc-shortcodes-item wc-shortcodes-clearfix" style="font-family: 'Roboto Condensed', sans-serif; line-height: 1.6; border: 0px; margin: 1.5em 0px; padding: 0px; zoom: 1; display: block; width: 922.5px;"><div class="wc-shortcodes-column wc-shortcodes-content wc-shortcodes-one-half wc-shortcodes-column-last " style="font-family: 'Roboto Condensed', sans-serif; line-height: 1.6; border: 0px; margin: 0px 0px 0px 36.8906px; padding: 0px; width: 442.797px; position: relative; float: left; box-sizing: border-box;">- <span style="color: rgb(35, 111, 161);">Umgehung von geografischen Sperren bei Streaming Diensten ist nur sehr begrenzt möglich.</span>
- <span style="color: rgb(35, 111, 161);">Anonymität und Schutz vor einer Ausforschung sind technisch bedingt nicht gegeben. Daher keine Torrent Nutzung damit.</span>
- <span style="color: rgb(35, 111, 161);">KillSwitch und andere sicherheitsrelevante Funktionen sind nicht direkt vorhanden und müssen wenn dann über manuelle Einstellungen am Client umgesetzt werden.</span>

</div></div></div></div>### Tipps

<div class="entry-content" id="bkmrk-m%C3%B6chtest-du-wireguar" itemprop="text" style="font-family: 'Roboto Condensed', sans-serif; line-height: 1.6; border: 0px; margin: 2em 0px 0px; padding: 0px; color: rgb(17, 17, 17); font-size: 16px; font-style: normal; font-variant-ligatures: normal; font-variant-caps: normal; font-weight: 400; letter-spacing: normal; orphans: 2; text-align: start; text-indent: 0px; text-transform: none; white-space: normal; widows: 2; word-spacing: 0px; -webkit-text-stroke-width: 0px; background-color: rgb(255, 255, 255); text-decoration-thickness: initial; text-decoration-style: initial; text-decoration-color: initial;"><div class="entry-content" itemprop="text" style="font-family: 'Roboto Condensed', sans-serif; line-height: 1.6; border: 0px; margin: 2em 0px 0px; padding: 0px; color: rgb(17, 17, 17); font-size: 16px; font-style: normal; font-variant-ligatures: normal; font-variant-caps: normal; font-weight: 400; letter-spacing: normal; orphans: 2; text-align: start; text-indent: 0px; text-transform: none; white-space: normal; widows: 2; word-spacing: 0px; -webkit-text-stroke-width: 0px; background-color: rgb(255, 255, 255); text-decoration-thickness: initial; text-decoration-style: initial; text-decoration-color: initial;">- Möchtest Du Wireguard aber mit einem professionellen VPN Dienst verwenden, dann empfehlen wir Dir die [„nativen“ Wireguard VPN Anbieter](https://vpntester.org/vpn-anbieter/was-ist-vpn-wissen/native-standard-wireguard-vpn-anbieter/ "Wireguard VPN Anbieter") zu verwenden.
- Möchtest Du Dich noch informieren, was Wireguard ist, dann haben wir einen entsprechenden Artikel der Dir dabei helfen wird: [Was ist Wireguard?](https://vpntester.org/vpn-anbieter/was-ist-vpn-wissen/wireguard-vpn-was-du-wissen-solltest/ "Was ist Wireguard?")

</div></div>Wir helfen darüber hinaus mit vielen weiteren Berichten zu diesem Thema, verwende dazu einfach unsere Suche auf der Webseite.

## <span class="ez-toc-section" id="bkmrk--6" style="font-family: 'Roboto Condensed', sans-serif; line-height: 1.6; border: 0px; margin: 0px; padding: 0px;"></span>Vorbereitungen für den eigenen VPN Server

Es sind nur wenige Dinge notwendig und Du kannst den eigenen Server verwenden. Diese Anleitung ist so einfach wie möglich gehalten und Du brauchst dazu nur wenige Anwendungen, wie zum Beispiel eine gültige EMail Adresse, eine Rufnummer für den Erhalt von SMS Nachrichten und auf Deinem PC/Mac eine Terminalanwendung.(Windows Konsole, Terminal)

### Terminalanwendung

<div class="entry-content" id="bkmrk-die-windows-konsole-" itemprop="text" style="font-family: 'Roboto Condensed', sans-serif; line-height: 1.6; border: 0px; margin: 2em 0px 0px; padding: 0px; color: rgb(17, 17, 17); font-size: 16px; font-style: normal; font-variant-ligatures: normal; font-variant-caps: normal; font-weight: 400; letter-spacing: normal; orphans: 2; text-align: start; text-indent: 0px; text-transform: none; white-space: normal; widows: 2; word-spacing: 0px; -webkit-text-stroke-width: 0px; background-color: rgb(255, 255, 255); text-decoration-thickness: initial; text-decoration-style: initial; text-decoration-color: initial;"><div class="entry-content" itemprop="text" style="font-family: 'Roboto Condensed', sans-serif; line-height: 1.6; border: 0px; margin: 2em 0px 0px; padding: 0px; color: rgb(17, 17, 17); font-size: 16px; font-style: normal; font-variant-ligatures: normal; font-variant-caps: normal; font-weight: 400; letter-spacing: normal; orphans: 2; text-align: start; text-indent: 0px; text-transform: none; white-space: normal; widows: 2; word-spacing: 0px; -webkit-text-stroke-width: 0px; background-color: rgb(255, 255, 255); text-decoration-thickness: initial; text-decoration-style: initial; text-decoration-color: initial;">- Die Windows Konsole startest Du einfach mit der Tastenkombination Windowstaste+R öffnet sich „Ausführen“.
- Auf MacOS findest Du „Terminal“ im Zubehör unter den „Programmen“.

<figure aria-describedby="caption-attachment-33494" class="wp-caption aligncenter" id="bkmrk-%E2%80%9Eterminal%E2%80%9C-im-zubeh%C3%B6" style="font-family: 'Roboto Condensed', sans-serif; line-height: 1.6; display: block; margin: 0px auto 1.5em; clear: both; max-width: 100%; position: relative; width: 540px;">!["Terminal" im Zubehör unter den "Programmen"](https://vpntester.org/wp-content/uploads/2022/02/terminal-01-550x265.png "Wireguard Server Installation ganz einfach! 1")<figcaption class="wp-caption-text" id="bkmrk-%E2%80%9Eterminal%E2%80%9C-im-zubeh%C3%B6-0" style="font-family: 'Roboto Condensed', sans-serif; line-height: 1.6; display: block; font-size: 12px; padding-top: 5px; opacity: 0.8;">„Terminal“ im Zubehör unter den „Programmen“</figcaption></figure></div></div>### vServer bestellen

Du benötigst auf jeden Fall ein G-Core Labs Konto um die Prozedur umzusetzen. vServer sind dort auf täglicher oder monatlicher Basis PREPAID zu mieten. Die Kosten betragen weniger als €3,25 Euro pro Monat. Inkludiert ist eine statische IPv4 und eine IPv6 Adresse. Die Server haben mehr als 99,99% Betriebslaufzeit und sind nicht nur zuverlässig sondern dank SSD Speichern auch sehr schnell.

<div class="entry-content" id="bkmrk-gcore-labs-virtuelle" itemprop="text" style="font-family: 'Roboto Condensed', sans-serif; line-height: 1.6; border: 0px; margin: 2em 0px 0px; padding: 0px; color: rgb(17, 17, 17); font-size: 16px; font-style: normal; font-variant-ligatures: normal; font-variant-caps: normal; font-weight: 400; letter-spacing: normal; orphans: 2; text-align: start; text-indent: 0px; text-transform: none; white-space: normal; widows: 2; word-spacing: 0px; -webkit-text-stroke-width: 0px; background-color: rgb(255, 255, 255); text-decoration-thickness: initial; text-decoration-style: initial; text-decoration-color: initial;"><div class="entry-content" itemprop="text" style="font-family: 'Roboto Condensed', sans-serif; line-height: 1.6; border: 0px; margin: 2em 0px 0px; padding: 0px; color: rgb(17, 17, 17); font-size: 16px; font-style: normal; font-variant-ligatures: normal; font-variant-caps: normal; font-weight: 400; letter-spacing: normal; orphans: 2; text-align: start; text-indent: 0px; text-transform: none; white-space: normal; widows: 2; word-spacing: 0px; -webkit-text-stroke-width: 0px; background-color: rgb(255, 255, 255); text-decoration-thickness: initial; text-decoration-style: initial; text-decoration-color: initial;"><figure aria-describedby="caption-attachment-33568" class="wp-caption aligncenter" id="bkmrk-gcore-labs-virtuelle-0" style="font-family: 'Roboto Condensed', sans-serif; line-height: 1.6; display: block; margin: 0px auto 1.5em; clear: both; max-width: 100%; position: relative; width: 790px;"><figcaption class="wp-caption-text" id="bkmrk-gcore-labs-virtuelle-1" style="font-family: 'Roboto Condensed', sans-serif; line-height: 1.6; display: block; font-size: 12px; padding-top: 5px; opacity: 0.8;">[![image.png](https://bst.wkmimnl.de/uploads/images/gallery/2024-11/scaled-1680-/ZyJimage.png)](https://bst.wkmimnl.de/uploads/images/gallery/2024-11/ZyJimage.png)

GCore Labs Virtuelle Server bestellen</figcaption></figure></div></div>[G-Core Labs Konto erstellen](https://gcorelabs.com/hosting/?from=9793821)

## <span class="ez-toc-section" id="bkmrk--7" style="font-family: 'Roboto Condensed', sans-serif; line-height: 1.6; border: 0px; margin: 0px; padding: 0px;"></span>[Videoanleitung: Wireguard Server Installation](https://youtu.be/WcyH_K1pdhQ "Video")

<div class="entry-content" id="bkmrk-" itemprop="text" style="font-family: 'Roboto Condensed', sans-serif; line-height: 1.6; border: 0px; margin: 2em 0px 0px; padding: 0px; color: rgb(17, 17, 17); font-size: 16px; font-style: normal; font-variant-ligatures: normal; font-variant-caps: normal; font-weight: 400; letter-spacing: normal; orphans: 2; text-align: start; text-indent: 0px; text-transform: none; white-space: normal; widows: 2; word-spacing: 0px; -webkit-text-stroke-width: 0px; background-color: rgb(255, 255, 255); text-decoration-thickness: initial; text-decoration-style: initial; text-decoration-color: initial;"><div class="entry-content" itemprop="text" style="font-family: 'Roboto Condensed', sans-serif; line-height: 1.6; border: 0px; margin: 2em 0px 0px; padding: 0px; color: rgb(17, 17, 17); font-size: 16px; font-style: normal; font-variant-ligatures: normal; font-variant-caps: normal; font-weight: 400; letter-spacing: normal; orphans: 2; text-align: start; text-indent: 0px; text-transform: none; white-space: normal; widows: 2; word-spacing: 0px; -webkit-text-stroke-width: 0px; background-color: rgb(255, 255, 255); text-decoration-thickness: initial; text-decoration-style: initial; text-decoration-color: initial;"><div class="k8_yt-wrr" style="font-family: 'Roboto Condensed', sans-serif; line-height: 1.6; border: 0px; margin: 0px auto; padding: 0px; position: relative; font-size: 0px; clear: both; max-width: 600px;">  
</div></div></div>## <span class="ez-toc-section" id="bkmrk--8" style="font-family: 'Roboto Condensed', sans-serif; line-height: 1.6; border: 0px; margin: 0px; padding: 0px;"></span>Detaillierte Schritt für Schritt Anleitung

Es ist ganz einfach unserer Anleitung zu folgen. Verwende die in der Anleitung vorhandenen Links um zu den richtigen Ressourcen zu springen.

## <span class="ez-toc-section" id="bkmrk--9" style="font-family: 'Roboto Condensed', sans-serif; line-height: 1.6; border: 0px; margin: 0px; padding: 0px;"></span>Anleitung: Wireguard Server Installation

<div class="entry-content" id="bkmrk-in-dieser-anleitung--0" itemprop="text" style="font-family: 'Roboto Condensed', sans-serif; line-height: 1.6; border: 0px; margin: 2em 0px 0px; padding: 0px; color: rgb(17, 17, 17); font-size: 16px; font-style: normal; font-variant-ligatures: normal; font-variant-caps: normal; font-weight: 400; letter-spacing: normal; orphans: 2; text-align: start; text-indent: 0px; text-transform: none; white-space: normal; widows: 2; word-spacing: 0px; -webkit-text-stroke-width: 0px; background-color: rgb(255, 255, 255); text-decoration-thickness: initial; text-decoration-style: initial; text-decoration-color: initial;"><div class="entry-content" itemprop="text" style="font-family: 'Roboto Condensed', sans-serif; line-height: 1.6; border: 0px; margin: 2em 0px 0px; padding: 0px; color: rgb(17, 17, 17); font-size: 16px; font-style: normal; font-variant-ligatures: normal; font-variant-caps: normal; font-weight: 400; letter-spacing: normal; orphans: 2; text-align: start; text-indent: 0px; text-transform: none; white-space: normal; widows: 2; word-spacing: 0px; -webkit-text-stroke-width: 0px; background-color: rgb(255, 255, 255); text-decoration-thickness: initial; text-decoration-style: initial; text-decoration-color: initial;"><div class="k8howto__wrr clearfix" style="font-family: 'Roboto Condensed', sans-serif; line-height: 1.6; border: 0px; margin: 0px; padding: 30px; background-color: rgb(238, 238, 238); clear: both;"><div class="clearfix" style="font-family: 'Roboto Condensed', sans-serif; line-height: 1.6; border: 0px; margin: 0px; padding: 0px;">In dieser Anleitung zeigen wir Dir Schritt für schritt, wie Du einen eigenen Wireguard Server erstellen kannst und Geräte die Du damit verbinden möchtest verwaltest. Die Anleitung enthält Beispieldaten die Du durch Deine eigenen daten des vServers den Du erstellen wirst austauschen solltest. (IP Adresse des Server und Deine Passwörter). Jeder andere Schritt sollte einfach umzusetzen sein.</div><div class="k8howto__item" style="font-family: 'Roboto Condensed', sans-serif; line-height: 1.6; border: 0px; margin: 15px 0px 25px; padding: 0px; background: rgb(255, 255, 255);"><div class="k8howto__txt clearfix" style="font-family: 'Roboto Condensed', sans-serif; line-height: 1.6; border: 0px; margin: 0px; padding: 0px; background-color: rgb(51, 204, 153); color: rgb(255, 255, 255);"><div class="clearfix" style="font-family: 'Roboto Condensed', sans-serif; line-height: 1.6; border: 0px; margin: 0px; padding: 0px;"><div class="k8howto__num" style="font-family: 'Roboto Condensed', sans-serif; line-height: 1.6; border: 0px; margin: 0px 15px 10px 0px; padding: 0px; background-color: rgb(0, 178, 226); font-size: 30px; font-weight: bold; float: left; display: flex; align-items: center; justify-content: center; width: 60px; height: 60px;">1</div><div class="k8howto__head" style="font-family: 'Roboto Condensed', sans-serif; line-height: 1.6; border: 0px; margin: 0px; padding: 10px; font-size: 20px; font-weight: bold; font-style: italic;">G-Core Labs Konto erstellen</div></div><div class="k8howto__txt2" style="font-family: 'Roboto Condensed', sans-serif; line-height: 1.6; border: 0px; margin: 0px; padding: 5px 15px;">  
</div></div></div></div></div></div>Erstelle ein G-Core Labs Konto indem Du diesem Link folgst: [G-Core Labs](https://vpntester.org/link/gcoreserver)

<div class="entry-content" id="bkmrk-2-erstelle-einen-vir" itemprop="text" style="font-family: 'Roboto Condensed', sans-serif; line-height: 1.6; border: 0px; margin: 2em 0px 0px; padding: 0px; color: rgb(17, 17, 17); font-size: 16px; font-style: normal; font-variant-ligatures: normal; font-variant-caps: normal; font-weight: 400; letter-spacing: normal; orphans: 2; text-align: start; text-indent: 0px; text-transform: none; white-space: normal; widows: 2; word-spacing: 0px; -webkit-text-stroke-width: 0px; background-color: rgb(255, 255, 255); text-decoration-thickness: initial; text-decoration-style: initial; text-decoration-color: initial;"><div class="entry-content" itemprop="text" style="font-family: 'Roboto Condensed', sans-serif; line-height: 1.6; border: 0px; margin: 2em 0px 0px; padding: 0px; color: rgb(17, 17, 17); font-size: 16px; font-style: normal; font-variant-ligatures: normal; font-variant-caps: normal; font-weight: 400; letter-spacing: normal; orphans: 2; text-align: start; text-indent: 0px; text-transform: none; white-space: normal; widows: 2; word-spacing: 0px; -webkit-text-stroke-width: 0px; background-color: rgb(255, 255, 255); text-decoration-thickness: initial; text-decoration-style: initial; text-decoration-color: initial;"><div class="k8howto__wrr clearfix" style="font-family: 'Roboto Condensed', sans-serif; line-height: 1.6; border: 0px; margin: 0px; padding: 30px; background-color: rgb(238, 238, 238); clear: both;"><div class="k8howto__item" id="bkmrk--10" style="font-family: 'Roboto Condensed', sans-serif; line-height: 1.6; border: 0px; margin: 15px 0px 25px; padding: 0px; background: rgb(255, 255, 255);"><div class="k8howto__txt clearfix" style="font-family: 'Roboto Condensed', sans-serif; line-height: 1.6; border: 0px; margin: 0px; padding: 0px; background-color: rgb(51, 204, 153); color: rgb(255, 255, 255);"><div class="k8howto__txt2" style="font-family: 'Roboto Condensed', sans-serif; line-height: 1.6; border: 0px; margin: 0px; padding: 5px 15px;">  
</div></div><div class="k8howto__img k8-lg__wrr" style="font-family: 'Roboto Condensed', sans-serif; line-height: 1.6; border: 0px; margin: 0px; padding: 0px; text-align: center; font-size: 0px;">[![G-Core Labs Konto erstellen](https://vpntester.org/wp-content/uploads/2022/02/wireguard-server-anleitung-00-650x467.png "G Core Labs Konto erstellen")](https://vpntester.org/wp-content/uploads/2022/02/wireguard-server-anleitung-00.png)</div></div><div class="k8howto__item" style="font-family: 'Roboto Condensed', sans-serif; line-height: 1.6; border: 0px; margin: 15px 0px 25px; padding: 0px; background: rgb(255, 255, 255);"><div class="k8howto__txt clearfix" style="font-family: 'Roboto Condensed', sans-serif; line-height: 1.6; border: 0px; margin: 0px; padding: 0px; background-color: rgb(51, 204, 153); color: rgb(255, 255, 255);"><div class="clearfix" style="font-family: 'Roboto Condensed', sans-serif; line-height: 1.6; border: 0px; margin: 0px; padding: 0px;"><div class="k8howto__num" style="font-family: 'Roboto Condensed', sans-serif; line-height: 1.6; border: 0px; margin: 0px 15px 10px 0px; padding: 0px; background-color: rgb(0, 178, 226); font-size: 30px; font-weight: bold; float: left; display: flex; align-items: center; justify-content: center; width: 60px; height: 60px;">2</div><div class="k8howto__head" style="font-family: 'Roboto Condensed', sans-serif; line-height: 1.6; border: 0px; margin: 0px; padding: 10px; font-size: 20px; font-weight: bold; font-style: italic;">Erstelle einen virtuellen Server</div></div><div class="k8howto__txt2" style="font-family: 'Roboto Condensed', sans-serif; line-height: 1.6; border: 0px; margin: 0px; padding: 5px 15px;">  
</div></div></div></div></div></div>Im Kundenbereich kannst Du einen „virtuellen Server erstellen“. Das führt Dich zu dieser Seite: [vServer erstellen](https://hosting.gcorelabs.com/billmgr#/vds/order/list/basic)

<div class="entry-content" id="bkmrk-3-standort-und-gr%C3%B6%C3%9Fe" itemprop="text" style="font-family: 'Roboto Condensed', sans-serif; line-height: 1.6; border: 0px; margin: 2em 0px 0px; padding: 0px; color: rgb(17, 17, 17); font-size: 16px; font-style: normal; font-variant-ligatures: normal; font-variant-caps: normal; font-weight: 400; letter-spacing: normal; orphans: 2; text-align: start; text-indent: 0px; text-transform: none; white-space: normal; widows: 2; word-spacing: 0px; -webkit-text-stroke-width: 0px; background-color: rgb(255, 255, 255); text-decoration-thickness: initial; text-decoration-style: initial; text-decoration-color: initial;"><div class="entry-content" itemprop="text" style="font-family: 'Roboto Condensed', sans-serif; line-height: 1.6; border: 0px; margin: 2em 0px 0px; padding: 0px; color: rgb(17, 17, 17); font-size: 16px; font-style: normal; font-variant-ligatures: normal; font-variant-caps: normal; font-weight: 400; letter-spacing: normal; orphans: 2; text-align: start; text-indent: 0px; text-transform: none; white-space: normal; widows: 2; word-spacing: 0px; -webkit-text-stroke-width: 0px; background-color: rgb(255, 255, 255); text-decoration-thickness: initial; text-decoration-style: initial; text-decoration-color: initial;"><div class="k8howto__wrr clearfix" style="font-family: 'Roboto Condensed', sans-serif; line-height: 1.6; border: 0px; margin: 0px; padding: 30px; background-color: rgb(238, 238, 238); clear: both;"><div class="k8howto__item" id="bkmrk--11" style="font-family: 'Roboto Condensed', sans-serif; line-height: 1.6; border: 0px; margin: 15px 0px 25px; padding: 0px; background: rgb(255, 255, 255);"><div class="k8howto__txt clearfix" style="font-family: 'Roboto Condensed', sans-serif; line-height: 1.6; border: 0px; margin: 0px; padding: 0px; background-color: rgb(51, 204, 153); color: rgb(255, 255, 255);"><div class="k8howto__txt2" style="font-family: 'Roboto Condensed', sans-serif; line-height: 1.6; border: 0px; margin: 0px; padding: 5px 15px;">  
</div></div><div class="k8howto__img k8-lg__wrr" style="font-family: 'Roboto Condensed', sans-serif; line-height: 1.6; border: 0px; margin: 0px; padding: 0px; text-align: center; font-size: 0px;">[![Erstelle einen virtuellen Server](https://vpntester.org/wp-content/uploads/2022/02/wireguard-server-anleitung-001-650x626.png "Erstelle einen virtuellen Server")](https://vpntester.org/wp-content/uploads/2022/02/wireguard-server-anleitung-001.png)</div></div><div class="k8howto__item" style="font-family: 'Roboto Condensed', sans-serif; line-height: 1.6; border: 0px; margin: 15px 0px 25px; padding: 0px; background: rgb(255, 255, 255);"><div class="k8howto__txt clearfix" style="font-family: 'Roboto Condensed', sans-serif; line-height: 1.6; border: 0px; margin: 0px; padding: 0px; background-color: rgb(51, 204, 153); color: rgb(255, 255, 255);"><div class="clearfix" style="font-family: 'Roboto Condensed', sans-serif; line-height: 1.6; border: 0px; margin: 0px; padding: 0px;"><div class="k8howto__num" style="font-family: 'Roboto Condensed', sans-serif; line-height: 1.6; border: 0px; margin: 0px 15px 10px 0px; padding: 0px; background-color: rgb(0, 178, 226); font-size: 30px; font-weight: bold; float: left; display: flex; align-items: center; justify-content: center; width: 60px; height: 60px;">3</div><div class="k8howto__head" style="font-family: 'Roboto Condensed', sans-serif; line-height: 1.6; border: 0px; margin: 0px; padding: 10px; font-size: 20px; font-weight: bold; font-style: italic;">Standort und Größe wählen</div></div><div class="k8howto__txt2" style="font-family: 'Roboto Condensed', sans-serif; line-height: 1.6; border: 0px; margin: 0px; padding: 5px 15px;">  
</div></div></div></div></div></div>Wähle den für die passenden Standort und die Größe des vServers aus. Du benötigst die folgenden minimum Anforderungen:

<div class="entry-content" id="bkmrk-512-mb-ram-1-core-mi" itemprop="text" style="font-family: 'Roboto Condensed', sans-serif; line-height: 1.6; border: 0px; margin: 2em 0px 0px; padding: 0px; color: rgb(17, 17, 17); font-size: 16px; font-style: normal; font-variant-ligatures: normal; font-variant-caps: normal; font-weight: 400; letter-spacing: normal; orphans: 2; text-align: start; text-indent: 0px; text-transform: none; white-space: normal; widows: 2; word-spacing: 0px; -webkit-text-stroke-width: 0px; background-color: rgb(255, 255, 255); text-decoration-thickness: initial; text-decoration-style: initial; text-decoration-color: initial;"><div class="entry-content" itemprop="text" style="font-family: 'Roboto Condensed', sans-serif; line-height: 1.6; border: 0px; margin: 2em 0px 0px; padding: 0px; color: rgb(17, 17, 17); font-size: 16px; font-style: normal; font-variant-ligatures: normal; font-variant-caps: normal; font-weight: 400; letter-spacing: normal; orphans: 2; text-align: start; text-indent: 0px; text-transform: none; white-space: normal; widows: 2; word-spacing: 0px; -webkit-text-stroke-width: 0px; background-color: rgb(255, 255, 255); text-decoration-thickness: initial; text-decoration-style: initial; text-decoration-color: initial;"><div class="k8howto__wrr clearfix" style="font-family: 'Roboto Condensed', sans-serif; line-height: 1.6; border: 0px; margin: 0px; padding: 30px; background-color: rgb(238, 238, 238); clear: both;"><div class="k8howto__item" style="font-family: 'Roboto Condensed', sans-serif; line-height: 1.6; border: 0px; margin: 15px 0px 25px; padding: 0px; background: rgb(255, 255, 255);"><div class="k8howto__txt clearfix" style="font-family: 'Roboto Condensed', sans-serif; line-height: 1.6; border: 0px; margin: 0px; padding: 0px; background-color: rgb(51, 204, 153); color: rgb(255, 255, 255);"><div class="k8howto__txt2" style="font-family: 'Roboto Condensed', sans-serif; line-height: 1.6; border: 0px; margin: 0px; padding: 5px 15px;">- 512 MB Ram
- 1 Core
- mindestens 5GB SSD Speicher

</div></div></div></div></div></div>**Info:** Du brauchst im weiteren Schritt keine zusätzliche IP Adresse auswählen. Eine ist IPv4 und eine IPv6 ist immer inkludiert.

Du kannst in dem folgenden Schritt auch die Zahlungsweise auswählen.

<div class="entry-content" id="bkmrk-4-bestellvorgang" itemprop="text" style="font-family: 'Roboto Condensed', sans-serif; line-height: 1.6; border: 0px; margin: 2em 0px 0px; padding: 0px; color: rgb(17, 17, 17); font-size: 16px; font-style: normal; font-variant-ligatures: normal; font-variant-caps: normal; font-weight: 400; letter-spacing: normal; orphans: 2; text-align: start; text-indent: 0px; text-transform: none; white-space: normal; widows: 2; word-spacing: 0px; -webkit-text-stroke-width: 0px; background-color: rgb(255, 255, 255); text-decoration-thickness: initial; text-decoration-style: initial; text-decoration-color: initial;"><div class="entry-content" itemprop="text" style="font-family: 'Roboto Condensed', sans-serif; line-height: 1.6; border: 0px; margin: 2em 0px 0px; padding: 0px; color: rgb(17, 17, 17); font-size: 16px; font-style: normal; font-variant-ligatures: normal; font-variant-caps: normal; font-weight: 400; letter-spacing: normal; orphans: 2; text-align: start; text-indent: 0px; text-transform: none; white-space: normal; widows: 2; word-spacing: 0px; -webkit-text-stroke-width: 0px; background-color: rgb(255, 255, 255); text-decoration-thickness: initial; text-decoration-style: initial; text-decoration-color: initial;"><div class="k8howto__wrr clearfix" style="font-family: 'Roboto Condensed', sans-serif; line-height: 1.6; border: 0px; margin: 0px; padding: 30px; background-color: rgb(238, 238, 238); clear: both;"><div class="k8howto__item" id="bkmrk--12" style="font-family: 'Roboto Condensed', sans-serif; line-height: 1.6; border: 0px; margin: 15px 0px 25px; padding: 0px; background: rgb(255, 255, 255);"><div class="k8howto__txt clearfix" style="font-family: 'Roboto Condensed', sans-serif; line-height: 1.6; border: 0px; margin: 0px; padding: 0px; background-color: rgb(51, 204, 153); color: rgb(255, 255, 255);"><div class="k8howto__txt2" style="font-family: 'Roboto Condensed', sans-serif; line-height: 1.6; border: 0px; margin: 0px; padding: 5px 15px;">  
</div></div><div class="k8howto__img k8-lg__wrr" style="font-family: 'Roboto Condensed', sans-serif; line-height: 1.6; border: 0px; margin: 0px; padding: 0px; text-align: center; font-size: 0px;">[![Standort und Größe wählen](https://vpntester.org/wp-content/uploads/2022/02/wireguard-server-anleitung-002-650x546.png "Standort und Größe wählen")](https://vpntester.org/wp-content/uploads/2022/02/wireguard-server-anleitung-002.png)</div></div><div class="k8howto__item" style="font-family: 'Roboto Condensed', sans-serif; line-height: 1.6; border: 0px; margin: 15px 0px 25px; padding: 0px; background: rgb(255, 255, 255);"><div class="k8howto__txt clearfix" style="font-family: 'Roboto Condensed', sans-serif; line-height: 1.6; border: 0px; margin: 0px; padding: 0px; background-color: rgb(51, 204, 153); color: rgb(255, 255, 255);"><div class="clearfix" style="font-family: 'Roboto Condensed', sans-serif; line-height: 1.6; border: 0px; margin: 0px; padding: 0px;"><div class="k8howto__num" style="font-family: 'Roboto Condensed', sans-serif; line-height: 1.6; border: 0px; margin: 0px 15px 10px 0px; padding: 0px; background-color: rgb(0, 178, 226); font-size: 30px; font-weight: bold; float: left; display: flex; align-items: center; justify-content: center; width: 60px; height: 60px;">4</div><div class="k8howto__head" style="font-family: 'Roboto Condensed', sans-serif; line-height: 1.6; border: 0px; margin: 0px; padding: 10px; font-size: 20px; font-weight: bold; font-style: italic;">Bestellvorgang</div></div><div class="k8howto__txt2" style="font-family: 'Roboto Condensed', sans-serif; line-height: 1.6; border: 0px; margin: 0px; padding: 5px 15px;">  
</div></div></div></div></div></div>Die Konfiguration des Servers sollte auf „Ubuntu 20.xx“ geändert werden. Bei IOv4 und IPv6 braucht es keine Änderungen. Es muss auch keine Domain die statt der IP Adresse verwendet werden kann eingegeben werden.

<div class="entry-content" id="bkmrk-5-warte-bis-der-serv" itemprop="text" style="font-family: 'Roboto Condensed', sans-serif; line-height: 1.6; border: 0px; margin: 2em 0px 0px; padding: 0px; color: rgb(17, 17, 17); font-size: 16px; font-style: normal; font-variant-ligatures: normal; font-variant-caps: normal; font-weight: 400; letter-spacing: normal; orphans: 2; text-align: start; text-indent: 0px; text-transform: none; white-space: normal; widows: 2; word-spacing: 0px; -webkit-text-stroke-width: 0px; background-color: rgb(255, 255, 255); text-decoration-thickness: initial; text-decoration-style: initial; text-decoration-color: initial;"><div class="entry-content" itemprop="text" style="font-family: 'Roboto Condensed', sans-serif; line-height: 1.6; border: 0px; margin: 2em 0px 0px; padding: 0px; color: rgb(17, 17, 17); font-size: 16px; font-style: normal; font-variant-ligatures: normal; font-variant-caps: normal; font-weight: 400; letter-spacing: normal; orphans: 2; text-align: start; text-indent: 0px; text-transform: none; white-space: normal; widows: 2; word-spacing: 0px; -webkit-text-stroke-width: 0px; background-color: rgb(255, 255, 255); text-decoration-thickness: initial; text-decoration-style: initial; text-decoration-color: initial;"><div class="k8howto__wrr clearfix" style="font-family: 'Roboto Condensed', sans-serif; line-height: 1.6; border: 0px; margin: 0px; padding: 30px; background-color: rgb(238, 238, 238); clear: both;"><div class="k8howto__item" id="bkmrk--13" style="font-family: 'Roboto Condensed', sans-serif; line-height: 1.6; border: 0px; margin: 15px 0px 25px; padding: 0px; background: rgb(255, 255, 255);"><div class="k8howto__txt clearfix" style="font-family: 'Roboto Condensed', sans-serif; line-height: 1.6; border: 0px; margin: 0px; padding: 0px; background-color: rgb(51, 204, 153); color: rgb(255, 255, 255);"><div class="k8howto__txt2" style="font-family: 'Roboto Condensed', sans-serif; line-height: 1.6; border: 0px; margin: 0px; padding: 5px 15px;">  
</div></div><div class="k8howto__img k8-lg__wrr" style="font-family: 'Roboto Condensed', sans-serif; line-height: 1.6; border: 0px; margin: 0px; padding: 0px; text-align: center; font-size: 0px;">[![Server Bestellvorgang](https://vpntester.org/wp-content/uploads/2022/02/wireguard-server-bestellvorgang-650x563.png "Server Bestellvorgang")](https://vpntester.org/wp-content/uploads/2022/02/wireguard-server-bestellvorgang.png)</div></div><div class="k8howto__item" style="font-family: 'Roboto Condensed', sans-serif; line-height: 1.6; border: 0px; margin: 15px 0px 25px; padding: 0px; background: rgb(255, 255, 255);"><div class="k8howto__txt clearfix" style="font-family: 'Roboto Condensed', sans-serif; line-height: 1.6; border: 0px; margin: 0px; padding: 0px; background-color: rgb(51, 204, 153); color: rgb(255, 255, 255);"><div class="clearfix" style="font-family: 'Roboto Condensed', sans-serif; line-height: 1.6; border: 0px; margin: 0px; padding: 0px;"><div class="k8howto__num" style="font-family: 'Roboto Condensed', sans-serif; line-height: 1.6; border: 0px; margin: 0px 15px 10px 0px; padding: 0px; background-color: rgb(0, 178, 226); font-size: 30px; font-weight: bold; float: left; display: flex; align-items: center; justify-content: center; width: 60px; height: 60px;">5</div><div class="k8howto__head" style="font-family: 'Roboto Condensed', sans-serif; line-height: 1.6; border: 0px; margin: 0px; padding: 10px; font-size: 20px; font-weight: bold; font-style: italic;">Warte bis der Server aktiv ist</div></div><div class="k8howto__txt2" style="font-family: 'Roboto Condensed', sans-serif; line-height: 1.6; border: 0px; margin: 0px; padding: 5px 15px;">  
</div></div></div></div></div></div>Nun wird der Server erstellt. Dieser Vorgang kann bis zu 10 Minuten dauern. Setze den Vorgang fort, wenn der Server mit „Active“ gekennzeichnet ist.

<div class="entry-content" id="bkmrk-6-server-konfigurati" itemprop="text" style="font-family: 'Roboto Condensed', sans-serif; line-height: 1.6; border: 0px; margin: 2em 0px 0px; padding: 0px; color: rgb(17, 17, 17); font-size: 16px; font-style: normal; font-variant-ligatures: normal; font-variant-caps: normal; font-weight: 400; letter-spacing: normal; orphans: 2; text-align: start; text-indent: 0px; text-transform: none; white-space: normal; widows: 2; word-spacing: 0px; -webkit-text-stroke-width: 0px; background-color: rgb(255, 255, 255); text-decoration-thickness: initial; text-decoration-style: initial; text-decoration-color: initial;"><div class="entry-content" itemprop="text" style="font-family: 'Roboto Condensed', sans-serif; line-height: 1.6; border: 0px; margin: 2em 0px 0px; padding: 0px; color: rgb(17, 17, 17); font-size: 16px; font-style: normal; font-variant-ligatures: normal; font-variant-caps: normal; font-weight: 400; letter-spacing: normal; orphans: 2; text-align: start; text-indent: 0px; text-transform: none; white-space: normal; widows: 2; word-spacing: 0px; -webkit-text-stroke-width: 0px; background-color: rgb(255, 255, 255); text-decoration-thickness: initial; text-decoration-style: initial; text-decoration-color: initial;"><div class="k8howto__wrr clearfix" style="font-family: 'Roboto Condensed', sans-serif; line-height: 1.6; border: 0px; margin: 0px; padding: 30px; background-color: rgb(238, 238, 238); clear: both;"><div class="k8howto__item" id="bkmrk--14" style="font-family: 'Roboto Condensed', sans-serif; line-height: 1.6; border: 0px; margin: 15px 0px 25px; padding: 0px; background: rgb(255, 255, 255);"><div class="k8howto__txt clearfix" style="font-family: 'Roboto Condensed', sans-serif; line-height: 1.6; border: 0px; margin: 0px; padding: 0px; background-color: rgb(51, 204, 153); color: rgb(255, 255, 255);"><div class="k8howto__txt2" style="font-family: 'Roboto Condensed', sans-serif; line-height: 1.6; border: 0px; margin: 0px; padding: 5px 15px;">  
</div></div><div class="k8howto__img k8-lg__wrr" style="font-family: 'Roboto Condensed', sans-serif; line-height: 1.6; border: 0px; margin: 0px; padding: 0px; text-align: center; font-size: 0px;">[![Virtueller Server angelegt](https://vpntester.org/wp-content/uploads/2022/02/wireguard-server-anleitung-01-650x302.png "Virtueller Server angelegt")](https://vpntester.org/wp-content/uploads/2022/02/wireguard-server-anleitung-01.png)</div></div><div class="k8howto__item" style="font-family: 'Roboto Condensed', sans-serif; line-height: 1.6; border: 0px; margin: 15px 0px 25px; padding: 0px; background: rgb(255, 255, 255);"><div class="k8howto__txt clearfix" style="font-family: 'Roboto Condensed', sans-serif; line-height: 1.6; border: 0px; margin: 0px; padding: 0px; background-color: rgb(51, 204, 153); color: rgb(255, 255, 255);"><div class="clearfix" style="font-family: 'Roboto Condensed', sans-serif; line-height: 1.6; border: 0px; margin: 0px; padding: 0px;"><div class="k8howto__num" style="font-family: 'Roboto Condensed', sans-serif; line-height: 1.6; border: 0px; margin: 0px 15px 10px 0px; padding: 0px; background-color: rgb(0, 178, 226); font-size: 30px; font-weight: bold; float: left; display: flex; align-items: center; justify-content: center; width: 60px; height: 60px;">6</div><div class="k8howto__head" style="font-family: 'Roboto Condensed', sans-serif; line-height: 1.6; border: 0px; margin: 0px; padding: 10px; font-size: 20px; font-weight: bold; font-style: italic;">Server Konfigurationsdaten</div></div><div class="k8howto__txt2" style="font-family: 'Roboto Condensed', sans-serif; line-height: 1.6; border: 0px; margin: 0px; padding: 5px 15px;">  
</div></div></div></div></div></div>Du kannst nun auch die Server Konfigurationsdaten einsehen. Du wirst im Anschluß der nächsten Schritte, die IP Adresse des Server als auch das Passwort benötigen.

<div class="entry-content" id="bkmrk-7-%C3%96ffne-ein-terminal" itemprop="text" style="font-family: 'Roboto Condensed', sans-serif; line-height: 1.6; border: 0px; margin: 2em 0px 0px; padding: 0px; color: rgb(17, 17, 17); font-size: 16px; font-style: normal; font-variant-ligatures: normal; font-variant-caps: normal; font-weight: 400; letter-spacing: normal; orphans: 2; text-align: start; text-indent: 0px; text-transform: none; white-space: normal; widows: 2; word-spacing: 0px; -webkit-text-stroke-width: 0px; background-color: rgb(255, 255, 255); text-decoration-thickness: initial; text-decoration-style: initial; text-decoration-color: initial;"><div class="entry-content" itemprop="text" style="font-family: 'Roboto Condensed', sans-serif; line-height: 1.6; border: 0px; margin: 2em 0px 0px; padding: 0px; color: rgb(17, 17, 17); font-size: 16px; font-style: normal; font-variant-ligatures: normal; font-variant-caps: normal; font-weight: 400; letter-spacing: normal; orphans: 2; text-align: start; text-indent: 0px; text-transform: none; white-space: normal; widows: 2; word-spacing: 0px; -webkit-text-stroke-width: 0px; background-color: rgb(255, 255, 255); text-decoration-thickness: initial; text-decoration-style: initial; text-decoration-color: initial;"><div class="k8howto__wrr clearfix" style="font-family: 'Roboto Condensed', sans-serif; line-height: 1.6; border: 0px; margin: 0px; padding: 30px; background-color: rgb(238, 238, 238); clear: both;"><div class="k8howto__item" id="bkmrk--15" style="font-family: 'Roboto Condensed', sans-serif; line-height: 1.6; border: 0px; margin: 15px 0px 25px; padding: 0px; background: rgb(255, 255, 255);"><div class="k8howto__txt clearfix" style="font-family: 'Roboto Condensed', sans-serif; line-height: 1.6; border: 0px; margin: 0px; padding: 0px; background-color: rgb(51, 204, 153); color: rgb(255, 255, 255);"><div class="k8howto__txt2" style="font-family: 'Roboto Condensed', sans-serif; line-height: 1.6; border: 0px; margin: 0px; padding: 5px 15px;">  
</div></div><div class="k8howto__img k8-lg__wrr" style="font-family: 'Roboto Condensed', sans-serif; line-height: 1.6; border: 0px; margin: 0px; padding: 0px; text-align: center; font-size: 0px;">[![Server Konfigurationsdaten](https://vpntester.org/wp-content/uploads/2022/02/server-konfigurationsdaten-650x563.png "Server Konfigurationsdaten")](https://vpntester.org/wp-content/uploads/2022/02/server-konfigurationsdaten.png)</div></div><div class="k8howto__item" style="font-family: 'Roboto Condensed', sans-serif; line-height: 1.6; border: 0px; margin: 15px 0px 25px; padding: 0px; background: rgb(255, 255, 255);"><div class="k8howto__txt clearfix" style="font-family: 'Roboto Condensed', sans-serif; line-height: 1.6; border: 0px; margin: 0px; padding: 0px; background-color: rgb(51, 204, 153); color: rgb(255, 255, 255);"><div class="clearfix" style="font-family: 'Roboto Condensed', sans-serif; line-height: 1.6; border: 0px; margin: 0px; padding: 0px;"><div class="k8howto__num" style="font-family: 'Roboto Condensed', sans-serif; line-height: 1.6; border: 0px; margin: 0px 15px 10px 0px; padding: 0px; background-color: rgb(0, 178, 226); font-size: 30px; font-weight: bold; float: left; display: flex; align-items: center; justify-content: center; width: 60px; height: 60px;">7</div><div class="k8howto__head" style="font-family: 'Roboto Condensed', sans-serif; line-height: 1.6; border: 0px; margin: 0px; padding: 10px; font-size: 20px; font-weight: bold; font-style: italic;">Öffne ein Terminalfenster</div></div><div class="k8howto__txt2" style="font-family: 'Roboto Condensed', sans-serif; line-height: 1.6; border: 0px; margin: 0px; padding: 5px 15px;">  
</div></div></div></div></div></div>Du solltest nun ein Terminalfenster öffnen. In diesem gibst Du ein:

```
ssh root@89.43.107.97
```

Bestätige mit ENTER

Die IP Adresse stammt aus den Serverkonfiguratione die Du bei G-Core im Kundenbereich findest aus dem Schritt 6. Der Benutzername ist immer „root“

<div class="entry-content" id="bkmrk-8-anmeldung-best%C3%A4tig" itemprop="text" style="font-family: 'Roboto Condensed', sans-serif; line-height: 1.6; border: 0px; margin: 2em 0px 0px; padding: 0px; color: rgb(17, 17, 17); font-size: 16px; font-style: normal; font-variant-ligatures: normal; font-variant-caps: normal; font-weight: 400; letter-spacing: normal; orphans: 2; text-align: start; text-indent: 0px; text-transform: none; white-space: normal; widows: 2; word-spacing: 0px; -webkit-text-stroke-width: 0px; background-color: rgb(255, 255, 255); text-decoration-thickness: initial; text-decoration-style: initial; text-decoration-color: initial;"><div class="entry-content" itemprop="text" style="font-family: 'Roboto Condensed', sans-serif; line-height: 1.6; border: 0px; margin: 2em 0px 0px; padding: 0px; color: rgb(17, 17, 17); font-size: 16px; font-style: normal; font-variant-ligatures: normal; font-variant-caps: normal; font-weight: 400; letter-spacing: normal; orphans: 2; text-align: start; text-indent: 0px; text-transform: none; white-space: normal; widows: 2; word-spacing: 0px; -webkit-text-stroke-width: 0px; background-color: rgb(255, 255, 255); text-decoration-thickness: initial; text-decoration-style: initial; text-decoration-color: initial;"><div class="k8howto__wrr clearfix" style="font-family: 'Roboto Condensed', sans-serif; line-height: 1.6; border: 0px; margin: 0px; padding: 30px; background-color: rgb(238, 238, 238); clear: both;"><div class="k8howto__item" id="bkmrk--16" style="font-family: 'Roboto Condensed', sans-serif; line-height: 1.6; border: 0px; margin: 15px 0px 25px; padding: 0px; background: rgb(255, 255, 255);"><div class="k8howto__txt clearfix" style="font-family: 'Roboto Condensed', sans-serif; line-height: 1.6; border: 0px; margin: 0px; padding: 0px; background-color: rgb(51, 204, 153); color: rgb(255, 255, 255);"><div class="k8howto__txt2" style="font-family: 'Roboto Condensed', sans-serif; line-height: 1.6; border: 0px; margin: 0px; padding: 5px 15px;">  
</div></div><div class="k8howto__img k8-lg__wrr" style="font-family: 'Roboto Condensed', sans-serif; line-height: 1.6; border: 0px; margin: 0px; padding: 0px; text-align: center; font-size: 0px;">[![Terminalfenster öffnen](https://vpntester.org/wp-content/uploads/2022/02/wireguard-server-terminal-01-650x415.png "Terminalfenster öffnen")](https://vpntester.org/wp-content/uploads/2022/02/wireguard-server-terminal-01.png)</div></div><div class="k8howto__item" style="font-family: 'Roboto Condensed', sans-serif; line-height: 1.6; border: 0px; margin: 15px 0px 25px; padding: 0px; background: rgb(255, 255, 255);"><div class="k8howto__txt clearfix" style="font-family: 'Roboto Condensed', sans-serif; line-height: 1.6; border: 0px; margin: 0px; padding: 0px; background-color: rgb(51, 204, 153); color: rgb(255, 255, 255);"><div class="clearfix" style="font-family: 'Roboto Condensed', sans-serif; line-height: 1.6; border: 0px; margin: 0px; padding: 0px;"><div class="k8howto__num" style="font-family: 'Roboto Condensed', sans-serif; line-height: 1.6; border: 0px; margin: 0px 15px 10px 0px; padding: 0px; background-color: rgb(0, 178, 226); font-size: 30px; font-weight: bold; float: left; display: flex; align-items: center; justify-content: center; width: 60px; height: 60px;">8</div><div class="k8howto__head" style="font-family: 'Roboto Condensed', sans-serif; line-height: 1.6; border: 0px; margin: 0px; padding: 10px; font-size: 20px; font-weight: bold; font-style: italic;">Anmeldung bestätigen</div></div><div class="k8howto__txt2" style="font-family: 'Roboto Condensed', sans-serif; line-height: 1.6; border: 0px; margin: 0px; padding: 5px 15px;">  
</div></div></div></div></div></div>In diesem Schritt musst Du bestätigen, dass Du die SSH Verbindung aufbauen möchtest. Gib dazu

```
yes
```

ein und bestätige mit ENTER

<div class="entry-content" id="bkmrk-9-passwort-eingeben" itemprop="text" style="font-family: 'Roboto Condensed', sans-serif; line-height: 1.6; border: 0px; margin: 2em 0px 0px; padding: 0px; color: rgb(17, 17, 17); font-size: 16px; font-style: normal; font-variant-ligatures: normal; font-variant-caps: normal; font-weight: 400; letter-spacing: normal; orphans: 2; text-align: start; text-indent: 0px; text-transform: none; white-space: normal; widows: 2; word-spacing: 0px; -webkit-text-stroke-width: 0px; background-color: rgb(255, 255, 255); text-decoration-thickness: initial; text-decoration-style: initial; text-decoration-color: initial;"><div class="entry-content" itemprop="text" style="font-family: 'Roboto Condensed', sans-serif; line-height: 1.6; border: 0px; margin: 2em 0px 0px; padding: 0px; color: rgb(17, 17, 17); font-size: 16px; font-style: normal; font-variant-ligatures: normal; font-variant-caps: normal; font-weight: 400; letter-spacing: normal; orphans: 2; text-align: start; text-indent: 0px; text-transform: none; white-space: normal; widows: 2; word-spacing: 0px; -webkit-text-stroke-width: 0px; background-color: rgb(255, 255, 255); text-decoration-thickness: initial; text-decoration-style: initial; text-decoration-color: initial;"><div class="k8howto__wrr clearfix" style="font-family: 'Roboto Condensed', sans-serif; line-height: 1.6; border: 0px; margin: 0px; padding: 30px; background-color: rgb(238, 238, 238); clear: both;"><div class="k8howto__item" id="bkmrk--17" style="font-family: 'Roboto Condensed', sans-serif; line-height: 1.6; border: 0px; margin: 15px 0px 25px; padding: 0px; background: rgb(255, 255, 255);"><div class="k8howto__txt clearfix" style="font-family: 'Roboto Condensed', sans-serif; line-height: 1.6; border: 0px; margin: 0px; padding: 0px; background-color: rgb(51, 204, 153); color: rgb(255, 255, 255);"><div class="k8howto__txt2" style="font-family: 'Roboto Condensed', sans-serif; line-height: 1.6; border: 0px; margin: 0px; padding: 5px 15px;">  
</div></div><div class="k8howto__img k8-lg__wrr" style="font-family: 'Roboto Condensed', sans-serif; line-height: 1.6; border: 0px; margin: 0px; padding: 0px; text-align: center; font-size: 0px;">[![SSH Verbindung aufbauen](https://vpntester.org/wp-content/uploads/2022/02/wireguard-server-terminal-03-650x414.png "SSH Verbindung aufbauen")](https://vpntester.org/wp-content/uploads/2022/02/wireguard-server-terminal-03.png)</div></div><div class="k8howto__item" style="font-family: 'Roboto Condensed', sans-serif; line-height: 1.6; border: 0px; margin: 15px 0px 25px; padding: 0px; background: rgb(255, 255, 255);"><div class="k8howto__txt clearfix" style="font-family: 'Roboto Condensed', sans-serif; line-height: 1.6; border: 0px; margin: 0px; padding: 0px; background-color: rgb(51, 204, 153); color: rgb(255, 255, 255);"><div class="clearfix" style="font-family: 'Roboto Condensed', sans-serif; line-height: 1.6; border: 0px; margin: 0px; padding: 0px;"><div class="k8howto__num" style="font-family: 'Roboto Condensed', sans-serif; line-height: 1.6; border: 0px; margin: 0px 15px 10px 0px; padding: 0px; background-color: rgb(0, 178, 226); font-size: 30px; font-weight: bold; float: left; display: flex; align-items: center; justify-content: center; width: 60px; height: 60px;">9</div><div class="k8howto__head" style="font-family: 'Roboto Condensed', sans-serif; line-height: 1.6; border: 0px; margin: 0px; padding: 10px; font-size: 20px; font-weight: bold; font-style: italic;">Passwort eingeben</div></div><div class="k8howto__txt2" style="font-family: 'Roboto Condensed', sans-serif; line-height: 1.6; border: 0px; margin: 0px; padding: 5px 15px;">  
</div></div></div></div></div></div>Nun musst Du das Passwort, das Du in der Servervewaltung angezeigt bekommst an dieser Stelle eingeben. Ich empfehle es langsam einzutippen und nicht rein zu kopieren. Danach bestätigst Du mit ENTER

<div class="entry-content" id="bkmrk-10-server-daten-aktu" itemprop="text" style="font-family: 'Roboto Condensed', sans-serif; line-height: 1.6; border: 0px; margin: 2em 0px 0px; padding: 0px; color: rgb(17, 17, 17); font-size: 16px; font-style: normal; font-variant-ligatures: normal; font-variant-caps: normal; font-weight: 400; letter-spacing: normal; orphans: 2; text-align: start; text-indent: 0px; text-transform: none; white-space: normal; widows: 2; word-spacing: 0px; -webkit-text-stroke-width: 0px; background-color: rgb(255, 255, 255); text-decoration-thickness: initial; text-decoration-style: initial; text-decoration-color: initial;"><div class="entry-content" itemprop="text" style="font-family: 'Roboto Condensed', sans-serif; line-height: 1.6; border: 0px; margin: 2em 0px 0px; padding: 0px; color: rgb(17, 17, 17); font-size: 16px; font-style: normal; font-variant-ligatures: normal; font-variant-caps: normal; font-weight: 400; letter-spacing: normal; orphans: 2; text-align: start; text-indent: 0px; text-transform: none; white-space: normal; widows: 2; word-spacing: 0px; -webkit-text-stroke-width: 0px; background-color: rgb(255, 255, 255); text-decoration-thickness: initial; text-decoration-style: initial; text-decoration-color: initial;"><div class="k8howto__wrr clearfix" style="font-family: 'Roboto Condensed', sans-serif; line-height: 1.6; border: 0px; margin: 0px; padding: 30px; background-color: rgb(238, 238, 238); clear: both;"><div class="k8howto__item" id="bkmrk--18" style="font-family: 'Roboto Condensed', sans-serif; line-height: 1.6; border: 0px; margin: 15px 0px 25px; padding: 0px; background: rgb(255, 255, 255);"><div class="k8howto__txt clearfix" style="font-family: 'Roboto Condensed', sans-serif; line-height: 1.6; border: 0px; margin: 0px; padding: 0px; background-color: rgb(51, 204, 153); color: rgb(255, 255, 255);"><div class="k8howto__txt2" style="font-family: 'Roboto Condensed', sans-serif; line-height: 1.6; border: 0px; margin: 0px; padding: 5px 15px;">  
</div></div><div class="k8howto__img k8-lg__wrr" style="font-family: 'Roboto Condensed', sans-serif; line-height: 1.6; border: 0px; margin: 0px; padding: 0px; text-align: center; font-size: 0px;">[![Wireguard Server Installation ganz einfach! 2](https://vpntester.org/wp-content/uploads/2022/02/wireguard-server-terminal-04-650x414.png "wireguard-server-terminal-04")](https://vpntester.org/wp-content/uploads/2022/02/wireguard-server-terminal-04.png)</div></div><div class="k8howto__item" style="font-family: 'Roboto Condensed', sans-serif; line-height: 1.6; border: 0px; margin: 15px 0px 25px; padding: 0px; background: rgb(255, 255, 255);"><div class="k8howto__txt clearfix" style="font-family: 'Roboto Condensed', sans-serif; line-height: 1.6; border: 0px; margin: 0px; padding: 0px; background-color: rgb(51, 204, 153); color: rgb(255, 255, 255);"><div class="clearfix" style="font-family: 'Roboto Condensed', sans-serif; line-height: 1.6; border: 0px; margin: 0px; padding: 0px;"><div class="k8howto__num" style="font-family: 'Roboto Condensed', sans-serif; line-height: 1.6; border: 0px; margin: 0px 15px 10px 0px; padding: 0px; background-color: rgb(0, 178, 226); font-size: 30px; font-weight: bold; float: left; display: flex; align-items: center; justify-content: center; width: 60px; height: 60px;">10</div><div class="k8howto__head" style="font-family: 'Roboto Condensed', sans-serif; line-height: 1.6; border: 0px; margin: 0px; padding: 10px; font-size: 20px; font-weight: bold; font-style: italic;">Server Daten aktualisieren</div></div><div class="k8howto__txt2" style="font-family: 'Roboto Condensed', sans-serif; line-height: 1.6; border: 0px; margin: 0px; padding: 5px 15px;">  
</div></div></div></div></div></div>In diesem Schritt leitest du den Server an, die neuesten Verweise zu aktualisieren. dazu gibst Du

```
apt-get update
```

ein und bestätigst mit ENTER

<div class="entry-content" id="bkmrk-11-server-akualisier" itemprop="text" style="font-family: 'Roboto Condensed', sans-serif; line-height: 1.6; border: 0px; margin: 2em 0px 0px; padding: 0px; color: rgb(17, 17, 17); font-size: 16px; font-style: normal; font-variant-ligatures: normal; font-variant-caps: normal; font-weight: 400; letter-spacing: normal; orphans: 2; text-align: start; text-indent: 0px; text-transform: none; white-space: normal; widows: 2; word-spacing: 0px; -webkit-text-stroke-width: 0px; background-color: rgb(255, 255, 255); text-decoration-thickness: initial; text-decoration-style: initial; text-decoration-color: initial;"><div class="entry-content" itemprop="text" style="font-family: 'Roboto Condensed', sans-serif; line-height: 1.6; border: 0px; margin: 2em 0px 0px; padding: 0px; color: rgb(17, 17, 17); font-size: 16px; font-style: normal; font-variant-ligatures: normal; font-variant-caps: normal; font-weight: 400; letter-spacing: normal; orphans: 2; text-align: start; text-indent: 0px; text-transform: none; white-space: normal; widows: 2; word-spacing: 0px; -webkit-text-stroke-width: 0px; background-color: rgb(255, 255, 255); text-decoration-thickness: initial; text-decoration-style: initial; text-decoration-color: initial;"><div class="k8howto__wrr clearfix" style="font-family: 'Roboto Condensed', sans-serif; line-height: 1.6; border: 0px; margin: 0px; padding: 30px; background-color: rgb(238, 238, 238); clear: both;"><div class="k8howto__item" id="bkmrk--19" style="font-family: 'Roboto Condensed', sans-serif; line-height: 1.6; border: 0px; margin: 15px 0px 25px; padding: 0px; background: rgb(255, 255, 255);"><div class="k8howto__txt clearfix" style="font-family: 'Roboto Condensed', sans-serif; line-height: 1.6; border: 0px; margin: 0px; padding: 0px; background-color: rgb(51, 204, 153); color: rgb(255, 255, 255);"><div class="k8howto__txt2" style="font-family: 'Roboto Condensed', sans-serif; line-height: 1.6; border: 0px; margin: 0px; padding: 5px 15px;">  
</div></div><div class="k8howto__img k8-lg__wrr" style="font-family: 'Roboto Condensed', sans-serif; line-height: 1.6; border: 0px; margin: 0px; padding: 0px; text-align: center; font-size: 0px;">[![Wireguard Server Installation ganz einfach! 3](https://vpntester.org/wp-content/uploads/2022/02/wireguard-server-terminal-06-650x414.png "wireguard-server-terminal-06")](https://vpntester.org/wp-content/uploads/2022/02/wireguard-server-terminal-06.png)</div></div><div class="k8howto__item" style="font-family: 'Roboto Condensed', sans-serif; line-height: 1.6; border: 0px; margin: 15px 0px 25px; padding: 0px; background: rgb(255, 255, 255);"><div class="k8howto__txt clearfix" style="font-family: 'Roboto Condensed', sans-serif; line-height: 1.6; border: 0px; margin: 0px; padding: 0px; background-color: rgb(51, 204, 153); color: rgb(255, 255, 255);"><div class="clearfix" style="font-family: 'Roboto Condensed', sans-serif; line-height: 1.6; border: 0px; margin: 0px; padding: 0px;"><div class="k8howto__num" style="font-family: 'Roboto Condensed', sans-serif; line-height: 1.6; border: 0px; margin: 0px 15px 10px 0px; padding: 0px; background-color: rgb(0, 178, 226); font-size: 30px; font-weight: bold; float: left; display: flex; align-items: center; justify-content: center; width: 60px; height: 60px;">11</div><div class="k8howto__head" style="font-family: 'Roboto Condensed', sans-serif; line-height: 1.6; border: 0px; margin: 0px; padding: 10px; font-size: 20px; font-weight: bold; font-style: italic;">Server akualisieren</div></div><div class="k8howto__txt2" style="font-family: 'Roboto Condensed', sans-serif; line-height: 1.6; border: 0px; margin: 0px; padding: 5px 15px;">  
</div></div></div></div></div></div>In diesem Schritt wirst Du nach Updates für den Server suchen. Gib dazu

```
apt-get upgrade
```

ein und bestätige mit ENTER

<div class="entry-content" id="bkmrk-12-docker-installier" itemprop="text" style="font-family: 'Roboto Condensed', sans-serif; line-height: 1.6; border: 0px; margin: 2em 0px 0px; padding: 0px; color: rgb(17, 17, 17); font-size: 16px; font-style: normal; font-variant-ligatures: normal; font-variant-caps: normal; font-weight: 400; letter-spacing: normal; orphans: 2; text-align: start; text-indent: 0px; text-transform: none; white-space: normal; widows: 2; word-spacing: 0px; -webkit-text-stroke-width: 0px; background-color: rgb(255, 255, 255); text-decoration-thickness: initial; text-decoration-style: initial; text-decoration-color: initial;"><div class="entry-content" itemprop="text" style="font-family: 'Roboto Condensed', sans-serif; line-height: 1.6; border: 0px; margin: 2em 0px 0px; padding: 0px; color: rgb(17, 17, 17); font-size: 16px; font-style: normal; font-variant-ligatures: normal; font-variant-caps: normal; font-weight: 400; letter-spacing: normal; orphans: 2; text-align: start; text-indent: 0px; text-transform: none; white-space: normal; widows: 2; word-spacing: 0px; -webkit-text-stroke-width: 0px; background-color: rgb(255, 255, 255); text-decoration-thickness: initial; text-decoration-style: initial; text-decoration-color: initial;"><div class="k8howto__wrr clearfix" style="font-family: 'Roboto Condensed', sans-serif; line-height: 1.6; border: 0px; margin: 0px; padding: 30px; background-color: rgb(238, 238, 238); clear: both;"><div class="k8howto__item" id="bkmrk--20" style="font-family: 'Roboto Condensed', sans-serif; line-height: 1.6; border: 0px; margin: 15px 0px 25px; padding: 0px; background: rgb(255, 255, 255);"><div class="k8howto__txt clearfix" style="font-family: 'Roboto Condensed', sans-serif; line-height: 1.6; border: 0px; margin: 0px; padding: 0px; background-color: rgb(51, 204, 153); color: rgb(255, 255, 255);"><div class="k8howto__txt2" style="font-family: 'Roboto Condensed', sans-serif; line-height: 1.6; border: 0px; margin: 0px; padding: 5px 15px;">  
</div></div><div class="k8howto__img k8-lg__wrr" style="font-family: 'Roboto Condensed', sans-serif; line-height: 1.6; border: 0px; margin: 0px; padding: 0px; text-align: center; font-size: 0px;">[![Wireguard Server Installation ganz einfach! 4](https://vpntester.org/wp-content/uploads/2022/02/wireguard-server-terminal-07-650x414.png "wireguard-server-terminal-07")](https://vpntester.org/wp-content/uploads/2022/02/wireguard-server-terminal-07.png)</div></div><div class="k8howto__item" style="font-family: 'Roboto Condensed', sans-serif; line-height: 1.6; border: 0px; margin: 15px 0px 25px; padding: 0px; background: rgb(255, 255, 255);"><div class="k8howto__txt clearfix" style="font-family: 'Roboto Condensed', sans-serif; line-height: 1.6; border: 0px; margin: 0px; padding: 0px; background-color: rgb(51, 204, 153); color: rgb(255, 255, 255);"><div class="clearfix" style="font-family: 'Roboto Condensed', sans-serif; line-height: 1.6; border: 0px; margin: 0px; padding: 0px;"><div class="k8howto__num" style="font-family: 'Roboto Condensed', sans-serif; line-height: 1.6; border: 0px; margin: 0px 15px 10px 0px; padding: 0px; background-color: rgb(0, 178, 226); font-size: 30px; font-weight: bold; float: left; display: flex; align-items: center; justify-content: center; width: 60px; height: 60px;">12</div><div class="k8howto__head" style="font-family: 'Roboto Condensed', sans-serif; line-height: 1.6; border: 0px; margin: 0px; padding: 10px; font-size: 20px; font-weight: bold; font-style: italic;">Docker installieren</div></div><div class="k8howto__txt2" style="font-family: 'Roboto Condensed', sans-serif; line-height: 1.6; border: 0px; margin: 0px; padding: 5px 15px;">  
</div></div></div></div></div></div>In diesem schritt wirst Du „Docker“ installieren. Gib dazu

```
sudo apt-get install docker.io
```

ein und bestätige mit ENTER

<div class="entry-content" id="bkmrk-13-gr%C3%B6%C3%9Fe-best%C3%A4tigen" itemprop="text" style="font-family: 'Roboto Condensed', sans-serif; line-height: 1.6; border: 0px; margin: 2em 0px 0px; padding: 0px; color: rgb(17, 17, 17); font-size: 16px; font-style: normal; font-variant-ligatures: normal; font-variant-caps: normal; font-weight: 400; letter-spacing: normal; orphans: 2; text-align: start; text-indent: 0px; text-transform: none; white-space: normal; widows: 2; word-spacing: 0px; -webkit-text-stroke-width: 0px; background-color: rgb(255, 255, 255); text-decoration-thickness: initial; text-decoration-style: initial; text-decoration-color: initial;"><div class="entry-content" itemprop="text" style="font-family: 'Roboto Condensed', sans-serif; line-height: 1.6; border: 0px; margin: 2em 0px 0px; padding: 0px; color: rgb(17, 17, 17); font-size: 16px; font-style: normal; font-variant-ligatures: normal; font-variant-caps: normal; font-weight: 400; letter-spacing: normal; orphans: 2; text-align: start; text-indent: 0px; text-transform: none; white-space: normal; widows: 2; word-spacing: 0px; -webkit-text-stroke-width: 0px; background-color: rgb(255, 255, 255); text-decoration-thickness: initial; text-decoration-style: initial; text-decoration-color: initial;"><div class="k8howto__wrr clearfix" style="font-family: 'Roboto Condensed', sans-serif; line-height: 1.6; border: 0px; margin: 0px; padding: 30px; background-color: rgb(238, 238, 238); clear: both;"><div class="k8howto__item" id="bkmrk--21" style="font-family: 'Roboto Condensed', sans-serif; line-height: 1.6; border: 0px; margin: 15px 0px 25px; padding: 0px; background: rgb(255, 255, 255);"><div class="k8howto__txt clearfix" style="font-family: 'Roboto Condensed', sans-serif; line-height: 1.6; border: 0px; margin: 0px; padding: 0px; background-color: rgb(51, 204, 153); color: rgb(255, 255, 255);"><div class="k8howto__txt2" style="font-family: 'Roboto Condensed', sans-serif; line-height: 1.6; border: 0px; margin: 0px; padding: 5px 15px;">  
</div></div><div class="k8howto__img k8-lg__wrr" style="font-family: 'Roboto Condensed', sans-serif; line-height: 1.6; border: 0px; margin: 0px; padding: 0px; text-align: center; font-size: 0px;">[![Wireguard Server Installation ganz einfach! 5](https://vpntester.org/wp-content/uploads/2022/02/wireguard-server-terminal-09-650x414.png "wireguard-server-terminal-09")](https://vpntester.org/wp-content/uploads/2022/02/wireguard-server-terminal-09.png)</div></div><div class="k8howto__item" style="font-family: 'Roboto Condensed', sans-serif; line-height: 1.6; border: 0px; margin: 15px 0px 25px; padding: 0px; background: rgb(255, 255, 255);"><div class="k8howto__txt clearfix" style="font-family: 'Roboto Condensed', sans-serif; line-height: 1.6; border: 0px; margin: 0px; padding: 0px; background-color: rgb(51, 204, 153); color: rgb(255, 255, 255);"><div class="clearfix" style="font-family: 'Roboto Condensed', sans-serif; line-height: 1.6; border: 0px; margin: 0px; padding: 0px;"><div class="k8howto__num" style="font-family: 'Roboto Condensed', sans-serif; line-height: 1.6; border: 0px; margin: 0px 15px 10px 0px; padding: 0px; background-color: rgb(0, 178, 226); font-size: 30px; font-weight: bold; float: left; display: flex; align-items: center; justify-content: center; width: 60px; height: 60px;">13</div><div class="k8howto__head" style="font-family: 'Roboto Condensed', sans-serif; line-height: 1.6; border: 0px; margin: 0px; padding: 10px; font-size: 20px; font-weight: bold; font-style: italic;">Größe bestätigen</div></div><div class="k8howto__txt2" style="font-family: 'Roboto Condensed', sans-serif; line-height: 1.6; border: 0px; margin: 0px; padding: 5px 15px;">  
</div></div></div></div></div></div>Du musst nun bestätigen, dass Du die Daten von Docker auf Deinen Server laden willst. Gib dazu

```
Y
```

ein und bestätige mit ENTER

<div class="entry-content" id="bkmrk-14-wireguard-server-" itemprop="text" style="font-family: 'Roboto Condensed', sans-serif; line-height: 1.6; border: 0px; margin: 2em 0px 0px; padding: 0px; color: rgb(17, 17, 17); font-size: 16px; font-style: normal; font-variant-ligatures: normal; font-variant-caps: normal; font-weight: 400; letter-spacing: normal; orphans: 2; text-align: start; text-indent: 0px; text-transform: none; white-space: normal; widows: 2; word-spacing: 0px; -webkit-text-stroke-width: 0px; background-color: rgb(255, 255, 255); text-decoration-thickness: initial; text-decoration-style: initial; text-decoration-color: initial;"><div class="entry-content" itemprop="text" style="font-family: 'Roboto Condensed', sans-serif; line-height: 1.6; border: 0px; margin: 2em 0px 0px; padding: 0px; color: rgb(17, 17, 17); font-size: 16px; font-style: normal; font-variant-ligatures: normal; font-variant-caps: normal; font-weight: 400; letter-spacing: normal; orphans: 2; text-align: start; text-indent: 0px; text-transform: none; white-space: normal; widows: 2; word-spacing: 0px; -webkit-text-stroke-width: 0px; background-color: rgb(255, 255, 255); text-decoration-thickness: initial; text-decoration-style: initial; text-decoration-color: initial;"><div class="k8howto__wrr clearfix" style="font-family: 'Roboto Condensed', sans-serif; line-height: 1.6; border: 0px; margin: 0px; padding: 30px; background-color: rgb(238, 238, 238); clear: both;"><div class="k8howto__item" id="bkmrk--22" style="font-family: 'Roboto Condensed', sans-serif; line-height: 1.6; border: 0px; margin: 15px 0px 25px; padding: 0px; background: rgb(255, 255, 255);"><div class="k8howto__txt clearfix" style="font-family: 'Roboto Condensed', sans-serif; line-height: 1.6; border: 0px; margin: 0px; padding: 0px; background-color: rgb(51, 204, 153); color: rgb(255, 255, 255);"><div class="k8howto__txt2" style="font-family: 'Roboto Condensed', sans-serif; line-height: 1.6; border: 0px; margin: 0px; padding: 5px 15px;">  
</div></div><div class="k8howto__img k8-lg__wrr" style="font-family: 'Roboto Condensed', sans-serif; line-height: 1.6; border: 0px; margin: 0px; padding: 0px; text-align: center; font-size: 0px;">[![Wireguard Server Installation ganz einfach! 6](https://vpntester.org/wp-content/uploads/2022/02/wireguard-server-terminal-10-650x414.png "wireguard-server-terminal-10")](https://vpntester.org/wp-content/uploads/2022/02/wireguard-server-terminal-10.png)</div></div><div class="k8howto__item" style="font-family: 'Roboto Condensed', sans-serif; line-height: 1.6; border: 0px; margin: 15px 0px 25px; padding: 0px; background: rgb(255, 255, 255);"><div class="k8howto__txt clearfix" style="font-family: 'Roboto Condensed', sans-serif; line-height: 1.6; border: 0px; margin: 0px; padding: 0px; background-color: rgb(51, 204, 153); color: rgb(255, 255, 255);"><div class="clearfix" style="font-family: 'Roboto Condensed', sans-serif; line-height: 1.6; border: 0px; margin: 0px; padding: 0px;"><div class="k8howto__num" style="font-family: 'Roboto Condensed', sans-serif; line-height: 1.6; border: 0px; margin: 0px 15px 10px 0px; padding: 0px; background-color: rgb(0, 178, 226); font-size: 30px; font-weight: bold; float: left; display: flex; align-items: center; justify-content: center; width: 60px; height: 60px;">14</div><div class="k8howto__head" style="font-family: 'Roboto Condensed', sans-serif; line-height: 1.6; border: 0px; margin: 0px; padding: 10px; font-size: 20px; font-weight: bold; font-style: italic;">Wireguard Server installieren</div></div><div class="k8howto__txt2" style="font-family: 'Roboto Condensed', sans-serif; line-height: 1.6; border: 0px; margin: 0px; padding: 5px 15px;">  
</div></div></div></div></div></div>In diesem Schritt installierst Du den Wireguard Server mit einer grafischen Benutzeroberfläche auf den Server.

Gib dazu die folgenden Befehle ein (als ganzes kopieren und einfügen):

```
docker run -d \
  --name=wg-easy \
  -e WG_HOST=<strong style="font-family: 'Roboto Condensed', sans-serif; line-height: 1.6; font-weight: bold;">89.43.107.97</strong> \
  -e PASSWORD=<strong style="font-family: 'Roboto Condensed', sans-serif; line-height: 1.6; font-weight: bold;">DeinPasswort</strong> \
  -v ~/.wg-easy:/etc/wireguard \
  -p 51820:51820/udp \
  -p 51821:51821/tcp \
  --cap-add=NET_ADMIN \
  --cap-add=SYS_MODULE \
  --sysctl="net.ipv4.conf.all.src_valid_mark=1" \
  --sysctl="net.ipv4.ip_forward=1" \
  --restart unless-stopped \
  weejewel/wg-easy
```

Die IP Adresse (**89.43.107.97**) und das **DenPasswort** sollte passend zu Deinen Daten aus dem Schritt „6“ ausgetauscht werden.

<div class="entry-content" id="bkmrk-15-wireguard-verwalt" itemprop="text" style="font-family: 'Roboto Condensed', sans-serif; line-height: 1.6; border: 0px; margin: 2em 0px 0px; padding: 0px; color: rgb(17, 17, 17); font-size: 16px; font-style: normal; font-variant-ligatures: normal; font-variant-caps: normal; font-weight: 400; letter-spacing: normal; orphans: 2; text-align: start; text-indent: 0px; text-transform: none; white-space: normal; widows: 2; word-spacing: 0px; -webkit-text-stroke-width: 0px; background-color: rgb(255, 255, 255); text-decoration-thickness: initial; text-decoration-style: initial; text-decoration-color: initial;"><div class="entry-content" itemprop="text" style="font-family: 'Roboto Condensed', sans-serif; line-height: 1.6; border: 0px; margin: 2em 0px 0px; padding: 0px; color: rgb(17, 17, 17); font-size: 16px; font-style: normal; font-variant-ligatures: normal; font-variant-caps: normal; font-weight: 400; letter-spacing: normal; orphans: 2; text-align: start; text-indent: 0px; text-transform: none; white-space: normal; widows: 2; word-spacing: 0px; -webkit-text-stroke-width: 0px; background-color: rgb(255, 255, 255); text-decoration-thickness: initial; text-decoration-style: initial; text-decoration-color: initial;"><div class="k8howto__wrr clearfix" style="font-family: 'Roboto Condensed', sans-serif; line-height: 1.6; border: 0px; margin: 0px; padding: 30px; background-color: rgb(238, 238, 238); clear: both;"><div class="k8howto__item" id="bkmrk--23" style="font-family: 'Roboto Condensed', sans-serif; line-height: 1.6; border: 0px; margin: 15px 0px 25px; padding: 0px; background: rgb(255, 255, 255);"><div class="k8howto__txt clearfix" style="font-family: 'Roboto Condensed', sans-serif; line-height: 1.6; border: 0px; margin: 0px; padding: 0px; background-color: rgb(51, 204, 153); color: rgb(255, 255, 255);"><div class="k8howto__txt2" style="font-family: 'Roboto Condensed', sans-serif; line-height: 1.6; border: 0px; margin: 0px; padding: 5px 15px;">  
</div></div><div class="k8howto__img k8-lg__wrr" style="font-family: 'Roboto Condensed', sans-serif; line-height: 1.6; border: 0px; margin: 0px; padding: 0px; text-align: center; font-size: 0px;">[![Wireguard Server Installation ganz einfach! 7](https://vpntester.org/wp-content/uploads/2022/02/wireguard-server-terminal-21-650x414.png "wireguard-server-terminal-21")](https://vpntester.org/wp-content/uploads/2022/02/wireguard-server-terminal-21.png)</div></div><div class="k8howto__item" style="font-family: 'Roboto Condensed', sans-serif; line-height: 1.6; border: 0px; margin: 15px 0px 25px; padding: 0px; background: rgb(255, 255, 255);"><div class="k8howto__txt clearfix" style="font-family: 'Roboto Condensed', sans-serif; line-height: 1.6; border: 0px; margin: 0px; padding: 0px; background-color: rgb(51, 204, 153); color: rgb(255, 255, 255);"><div class="clearfix" style="font-family: 'Roboto Condensed', sans-serif; line-height: 1.6; border: 0px; margin: 0px; padding: 0px;"><div class="k8howto__num" style="font-family: 'Roboto Condensed', sans-serif; line-height: 1.6; border: 0px; margin: 0px 15px 10px 0px; padding: 0px; background-color: rgb(0, 178, 226); font-size: 30px; font-weight: bold; float: left; display: flex; align-items: center; justify-content: center; width: 60px; height: 60px;">15</div><div class="k8howto__head" style="font-family: 'Roboto Condensed', sans-serif; line-height: 1.6; border: 0px; margin: 0px; padding: 10px; font-size: 20px; font-weight: bold; font-style: italic;">Wireguard Verwaltung im Browser</div></div><div class="k8howto__txt2" style="font-family: 'Roboto Condensed', sans-serif; line-height: 1.6; border: 0px; margin: 0px; padding: 5px 15px;">  
</div></div></div></div></div></div>Nun kannst Du in einem Browser die Wireguard Server Verwaltung öffnen. Gib dazu die IP Adresse Deines Server und den Port 51821 getrennt durch ein „:“ Zeichen ein.

Beispiel: „89.43.107.97:51821″  
und bestätige mit ENTER

Die Verwaltung wird angezeigt.  
Du kannst nun Das selbst gewählte Passwort, im Schritt12 ersichtlich“ eingeben und bestätigen.

<div class="entry-content" id="bkmrk-16-client-verwaltung" itemprop="text" style="font-family: 'Roboto Condensed', sans-serif; line-height: 1.6; border: 0px; margin: 2em 0px 0px; padding: 0px; color: rgb(17, 17, 17); font-size: 16px; font-style: normal; font-variant-ligatures: normal; font-variant-caps: normal; font-weight: 400; letter-spacing: normal; orphans: 2; text-align: start; text-indent: 0px; text-transform: none; white-space: normal; widows: 2; word-spacing: 0px; -webkit-text-stroke-width: 0px; background-color: rgb(255, 255, 255); text-decoration-thickness: initial; text-decoration-style: initial; text-decoration-color: initial;"><div class="entry-content" itemprop="text" style="font-family: 'Roboto Condensed', sans-serif; line-height: 1.6; border: 0px; margin: 2em 0px 0px; padding: 0px; color: rgb(17, 17, 17); font-size: 16px; font-style: normal; font-variant-ligatures: normal; font-variant-caps: normal; font-weight: 400; letter-spacing: normal; orphans: 2; text-align: start; text-indent: 0px; text-transform: none; white-space: normal; widows: 2; word-spacing: 0px; -webkit-text-stroke-width: 0px; background-color: rgb(255, 255, 255); text-decoration-thickness: initial; text-decoration-style: initial; text-decoration-color: initial;"><div class="k8howto__wrr clearfix" style="font-family: 'Roboto Condensed', sans-serif; line-height: 1.6; border: 0px; margin: 0px; padding: 30px; background-color: rgb(238, 238, 238); clear: both;"><div class="k8howto__item" id="bkmrk--24" style="font-family: 'Roboto Condensed', sans-serif; line-height: 1.6; border: 0px; margin: 15px 0px 25px; padding: 0px; background: rgb(255, 255, 255);"><div class="k8howto__txt clearfix" style="font-family: 'Roboto Condensed', sans-serif; line-height: 1.6; border: 0px; margin: 0px; padding: 0px; background-color: rgb(51, 204, 153); color: rgb(255, 255, 255);"><div class="k8howto__txt2" style="font-family: 'Roboto Condensed', sans-serif; line-height: 1.6; border: 0px; margin: 0px; padding: 5px 15px;">  
</div></div><div class="k8howto__img k8-lg__wrr" style="font-family: 'Roboto Condensed', sans-serif; line-height: 1.6; border: 0px; margin: 0px; padding: 0px; text-align: center; font-size: 0px;">[![Wireguard Server Installation ganz einfach! 8](https://vpntester.org/wp-content/uploads/2022/02/wireguard-server-browser-01-650x456.png "wireguard-server-browser-01")](https://vpntester.org/wp-content/uploads/2022/02/wireguard-server-browser-01.png)</div></div><div class="k8howto__item" style="font-family: 'Roboto Condensed', sans-serif; line-height: 1.6; border: 0px; margin: 15px 0px 25px; padding: 0px; background: rgb(255, 255, 255);"><div class="k8howto__txt clearfix" style="font-family: 'Roboto Condensed', sans-serif; line-height: 1.6; border: 0px; margin: 0px; padding: 0px; background-color: rgb(51, 204, 153); color: rgb(255, 255, 255);"><div class="clearfix" style="font-family: 'Roboto Condensed', sans-serif; line-height: 1.6; border: 0px; margin: 0px; padding: 0px;"><div class="k8howto__num" style="font-family: 'Roboto Condensed', sans-serif; line-height: 1.6; border: 0px; margin: 0px 15px 10px 0px; padding: 0px; background-color: rgb(0, 178, 226); font-size: 30px; font-weight: bold; float: left; display: flex; align-items: center; justify-content: center; width: 60px; height: 60px;">16</div><div class="k8howto__head" style="font-family: 'Roboto Condensed', sans-serif; line-height: 1.6; border: 0px; margin: 0px; padding: 10px; font-size: 20px; font-weight: bold; font-style: italic;">Client Verwaltung</div></div><div class="k8howto__txt2" style="font-family: 'Roboto Condensed', sans-serif; line-height: 1.6; border: 0px; margin: 0px; padding: 5px 15px;">  
</div></div></div></div></div></div>Du kannst nun neue Client Zugangsdaten erstellen für Deinen Wireguard Server

<div class="entry-content" id="bkmrk-17-namen-des-client-" itemprop="text" style="font-family: 'Roboto Condensed', sans-serif; line-height: 1.6; border: 0px; margin: 2em 0px 0px; padding: 0px; color: rgb(17, 17, 17); font-size: 16px; font-style: normal; font-variant-ligatures: normal; font-variant-caps: normal; font-weight: 400; letter-spacing: normal; orphans: 2; text-align: start; text-indent: 0px; text-transform: none; white-space: normal; widows: 2; word-spacing: 0px; -webkit-text-stroke-width: 0px; background-color: rgb(255, 255, 255); text-decoration-thickness: initial; text-decoration-style: initial; text-decoration-color: initial;"><div class="entry-content" itemprop="text" style="font-family: 'Roboto Condensed', sans-serif; line-height: 1.6; border: 0px; margin: 2em 0px 0px; padding: 0px; color: rgb(17, 17, 17); font-size: 16px; font-style: normal; font-variant-ligatures: normal; font-variant-caps: normal; font-weight: 400; letter-spacing: normal; orphans: 2; text-align: start; text-indent: 0px; text-transform: none; white-space: normal; widows: 2; word-spacing: 0px; -webkit-text-stroke-width: 0px; background-color: rgb(255, 255, 255); text-decoration-thickness: initial; text-decoration-style: initial; text-decoration-color: initial;"><div class="k8howto__wrr clearfix" style="font-family: 'Roboto Condensed', sans-serif; line-height: 1.6; border: 0px; margin: 0px; padding: 30px; background-color: rgb(238, 238, 238); clear: both;"><div class="k8howto__item" id="bkmrk--25" style="font-family: 'Roboto Condensed', sans-serif; line-height: 1.6; border: 0px; margin: 15px 0px 25px; padding: 0px; background: rgb(255, 255, 255);"><div class="k8howto__txt clearfix" style="font-family: 'Roboto Condensed', sans-serif; line-height: 1.6; border: 0px; margin: 0px; padding: 0px; background-color: rgb(51, 204, 153); color: rgb(255, 255, 255);"><div class="k8howto__txt2" style="font-family: 'Roboto Condensed', sans-serif; line-height: 1.6; border: 0px; margin: 0px; padding: 5px 15px;">  
</div></div><div class="k8howto__img k8-lg__wrr" style="font-family: 'Roboto Condensed', sans-serif; line-height: 1.6; border: 0px; margin: 0px; padding: 0px; text-align: center; font-size: 0px;">[![Wireguard Server Installation ganz einfach! 9](https://vpntester.org/wp-content/uploads/2022/02/wireguard-server-browser-02-650x412.png "wireguard-server-browser-02")](https://vpntester.org/wp-content/uploads/2022/02/wireguard-server-browser-02.png)</div></div><div class="k8howto__item" style="font-family: 'Roboto Condensed', sans-serif; line-height: 1.6; border: 0px; margin: 15px 0px 25px; padding: 0px; background: rgb(255, 255, 255);"><div class="k8howto__txt clearfix" style="font-family: 'Roboto Condensed', sans-serif; line-height: 1.6; border: 0px; margin: 0px; padding: 0px; background-color: rgb(51, 204, 153); color: rgb(255, 255, 255);"><div class="clearfix" style="font-family: 'Roboto Condensed', sans-serif; line-height: 1.6; border: 0px; margin: 0px; padding: 0px;"><div class="k8howto__num" style="font-family: 'Roboto Condensed', sans-serif; line-height: 1.6; border: 0px; margin: 0px 15px 10px 0px; padding: 0px; background-color: rgb(0, 178, 226); font-size: 30px; font-weight: bold; float: left; display: flex; align-items: center; justify-content: center; width: 60px; height: 60px;">17</div><div class="k8howto__head" style="font-family: 'Roboto Condensed', sans-serif; line-height: 1.6; border: 0px; margin: 0px; padding: 10px; font-size: 20px; font-weight: bold; font-style: italic;">Namen des Client angeben</div></div><div class="k8howto__txt2" style="font-family: 'Roboto Condensed', sans-serif; line-height: 1.6; border: 0px; margin: 0px; padding: 5px 15px;">  
</div></div></div></div></div></div>Du solltest einen eindeutigen und selbstgewählten Namen für die einzelnen Clients die. Du mit dem Wireguard Server verwenen möchtest angeben,

<div class="entry-content" id="bkmrk-18-verwaltung-der-cl" itemprop="text" style="font-family: 'Roboto Condensed', sans-serif; line-height: 1.6; border: 0px; margin: 2em 0px 0px; padding: 0px; color: rgb(17, 17, 17); font-size: 16px; font-style: normal; font-variant-ligatures: normal; font-variant-caps: normal; font-weight: 400; letter-spacing: normal; orphans: 2; text-align: start; text-indent: 0px; text-transform: none; white-space: normal; widows: 2; word-spacing: 0px; -webkit-text-stroke-width: 0px; background-color: rgb(255, 255, 255); text-decoration-thickness: initial; text-decoration-style: initial; text-decoration-color: initial;"><div class="entry-content" itemprop="text" style="font-family: 'Roboto Condensed', sans-serif; line-height: 1.6; border: 0px; margin: 2em 0px 0px; padding: 0px; color: rgb(17, 17, 17); font-size: 16px; font-style: normal; font-variant-ligatures: normal; font-variant-caps: normal; font-weight: 400; letter-spacing: normal; orphans: 2; text-align: start; text-indent: 0px; text-transform: none; white-space: normal; widows: 2; word-spacing: 0px; -webkit-text-stroke-width: 0px; background-color: rgb(255, 255, 255); text-decoration-thickness: initial; text-decoration-style: initial; text-decoration-color: initial;"><div class="k8howto__wrr clearfix" style="font-family: 'Roboto Condensed', sans-serif; line-height: 1.6; border: 0px; margin: 0px; padding: 30px; background-color: rgb(238, 238, 238); clear: both;"><div class="k8howto__item" id="bkmrk--26" style="font-family: 'Roboto Condensed', sans-serif; line-height: 1.6; border: 0px; margin: 15px 0px 25px; padding: 0px; background: rgb(255, 255, 255);"><div class="k8howto__txt clearfix" style="font-family: 'Roboto Condensed', sans-serif; line-height: 1.6; border: 0px; margin: 0px; padding: 0px; background-color: rgb(51, 204, 153); color: rgb(255, 255, 255);"><div class="k8howto__txt2" style="font-family: 'Roboto Condensed', sans-serif; line-height: 1.6; border: 0px; margin: 0px; padding: 5px 15px;">  
</div></div><div class="k8howto__img k8-lg__wrr" style="font-family: 'Roboto Condensed', sans-serif; line-height: 1.6; border: 0px; margin: 0px; padding: 0px; text-align: center; font-size: 0px;">[![Wireguard Server Installation ganz einfach! 10](https://vpntester.org/wp-content/uploads/2022/02/wireguard-server-browser-03-650x412.png "wireguard-server-browser-03")](https://vpntester.org/wp-content/uploads/2022/02/wireguard-server-browser-03.png)</div></div><div class="k8howto__item" style="font-family: 'Roboto Condensed', sans-serif; line-height: 1.6; border: 0px; margin: 15px 0px 0px; padding: 0px; background: rgb(255, 255, 255);"><div class="k8howto__txt clearfix" style="font-family: 'Roboto Condensed', sans-serif; line-height: 1.6; border: 0px; margin: 0px; padding: 0px; background-color: rgb(51, 204, 153); color: rgb(255, 255, 255);"><div class="clearfix" style="font-family: 'Roboto Condensed', sans-serif; line-height: 1.6; border: 0px; margin: 0px; padding: 0px;"><div class="k8howto__num" style="font-family: 'Roboto Condensed', sans-serif; line-height: 1.6; border: 0px; margin: 0px 15px 10px 0px; padding: 0px; background-color: rgb(0, 178, 226); font-size: 30px; font-weight: bold; float: left; display: flex; align-items: center; justify-content: center; width: 60px; height: 60px;">18</div><div class="k8howto__head" style="font-family: 'Roboto Condensed', sans-serif; line-height: 1.6; border: 0px; margin: 0px; padding: 10px; font-size: 20px; font-weight: bold; font-style: italic;">Verwaltung der Clients</div></div><div class="k8howto__txt2" style="font-family: 'Roboto Condensed', sans-serif; line-height: 1.6; border: 0px; margin: 0px; padding: 5px 15px;">  
</div></div></div></div></div></div>Di kannst die Konfigurationen für die einzelnen Clients als QR Code anzeigen lassen oder auf Dein Gerät laden. Ebenso kannst Du den Client Sperren oder erneut löschen.

<div class="entry-content" id="bkmrk--1" itemprop="text" style="font-family: 'Roboto Condensed', sans-serif; line-height: 1.6; border: 0px; margin: 2em 0px 0px; padding: 0px; color: rgb(17, 17, 17); font-size: 16px; font-style: normal; font-variant-ligatures: normal; font-variant-caps: normal; font-weight: 400; letter-spacing: normal; orphans: 2; text-align: start; text-indent: 0px; text-transform: none; white-space: normal; widows: 2; word-spacing: 0px; -webkit-text-stroke-width: 0px; background-color: rgb(255, 255, 255); text-decoration-thickness: initial; text-decoration-style: initial; text-decoration-color: initial;"><div class="entry-content" itemprop="text" style="font-family: 'Roboto Condensed', sans-serif; line-height: 1.6; border: 0px; margin: 2em 0px 0px; padding: 0px; color: rgb(17, 17, 17); font-size: 16px; font-style: normal; font-variant-ligatures: normal; font-variant-caps: normal; font-weight: 400; letter-spacing: normal; orphans: 2; text-align: start; text-indent: 0px; text-transform: none; white-space: normal; widows: 2; word-spacing: 0px; -webkit-text-stroke-width: 0px; background-color: rgb(255, 255, 255); text-decoration-thickness: initial; text-decoration-style: initial; text-decoration-color: initial;"><div class="k8howto__wrr clearfix" style="font-family: 'Roboto Condensed', sans-serif; line-height: 1.6; border: 0px; margin: 0px; padding: 30px; background-color: rgb(238, 238, 238); clear: both;"><div class="k8howto__item" id="bkmrk--27" style="font-family: 'Roboto Condensed', sans-serif; line-height: 1.6; border: 0px; margin: 15px 0px 0px; padding: 0px; background: rgb(255, 255, 255);"><div class="k8howto__txt clearfix" style="font-family: 'Roboto Condensed', sans-serif; line-height: 1.6; border: 0px; margin: 0px; padding: 0px; background-color: rgb(51, 204, 153); color: rgb(255, 255, 255);"><div class="k8howto__txt2" style="font-family: 'Roboto Condensed', sans-serif; line-height: 1.6; border: 0px; margin: 0px; padding: 5px 15px;">  
</div></div><div class="k8howto__img k8-lg__wrr" style="font-family: 'Roboto Condensed', sans-serif; line-height: 1.6; border: 0px; margin: 0px; padding: 0px; text-align: center; font-size: 0px;">[![Wireguard Server Installation ganz einfach! 11](https://vpntester.org/wp-content/uploads/2022/02/wireguard-server-browser-04-650x412.png "wireguard-server-browser-04")](https://vpntester.org/wp-content/uploads/2022/02/wireguard-server-browser-04.png)</div></div></div>---

</div></div>## <span class="ez-toc-section" id="bkmrk--28" style="font-family: 'Roboto Condensed', sans-serif; line-height: 1.6; border: 0px; margin: 0px; padding: 0px;"></span>Anpassungen für erfahrene Nutzer

**Erfahrene Nutzer können auch weitere Einstellungen am VPN Server vornehmen.** Wir setzen hier Ubuntu ein, es kann auch zu notwendigen Anpassungen bei anderen Betriebssystemen wie Debian usw kommen. Diese Installation mit Docker lässt sich auch auf raspberry Pi mit ausreichender Leistung verwenden, wir haben dies allerdings nicht getestet.

### Konfigurationen anpassen

Die Konfigurationsdaten des Server werden unter „~/.wg-easy“ gespeichert. (config.js ) Dort können diese auch später jederzeit angepasst werden.

### Optionen bei der Installation

Diese Optionen können durch Setzen von Umgebungsvariablen mit -e KEY=“VALUE“ im Befehl docker run konfiguriert werden.

<div class="entry-content" id="bkmrk-env-standard-beispie" itemprop="text" style="font-family: 'Roboto Condensed', sans-serif; line-height: 1.6; border: 0px; margin: 2em 0px 0px; padding: 0px; color: rgb(17, 17, 17); font-size: 16px; font-style: normal; font-variant-ligatures: normal; font-variant-caps: normal; font-weight: 400; letter-spacing: normal; orphans: 2; text-align: start; text-indent: 0px; text-transform: none; white-space: normal; widows: 2; word-spacing: 0px; -webkit-text-stroke-width: 0px; background-color: rgb(255, 255, 255); text-decoration-thickness: initial; text-decoration-style: initial; text-decoration-color: initial;"><div class="entry-content" itemprop="text" style="font-family: 'Roboto Condensed', sans-serif; line-height: 1.6; border: 0px; margin: 2em 0px 0px; padding: 0px; color: rgb(17, 17, 17); font-size: 16px; font-style: normal; font-variant-ligatures: normal; font-variant-caps: normal; font-weight: 400; letter-spacing: normal; orphans: 2; text-align: start; text-indent: 0px; text-transform: none; white-space: normal; widows: 2; word-spacing: 0px; -webkit-text-stroke-width: 0px; background-color: rgb(255, 255, 255); text-decoration-thickness: initial; text-decoration-style: initial; text-decoration-color: initial;"><table style="font-family: 'Roboto Condensed', sans-serif; line-height: 1.6; border-width: 1px 0px 0px 1px; border-style: solid; border-color: rgba(0, 0, 0, 0.1); border-image: initial; margin: 0px 0px 1.5em; padding: 0px; border-collapse: separate; border-spacing: 0px; width: 922.5px;"><tbody style="font-family: 'Roboto Condensed', sans-serif; line-height: 1.6; border: 0px; margin: 0px; padding: 0px;"><tr style="font-family: 'Roboto Condensed', sans-serif; line-height: 1.6; border: 0px; margin: 0px; padding: 0px;"><td style="font-family: 'Roboto Condensed', sans-serif; line-height: 1.6; border-width: 0px 1px 1px 0px; border-style: solid; border-color: rgba(0, 0, 0, 0.1); border-image: initial; margin: 0px; padding: 8px; font-weight: 400; text-align: left;">**Env**</td><td style="font-family: 'Roboto Condensed', sans-serif; line-height: 1.6; border-width: 0px 1px 1px 0px; border-style: solid; border-color: rgba(0, 0, 0, 0.1); border-image: initial; margin: 0px; padding: 8px; font-weight: 400; text-align: left;">**Standard**</td><td style="font-family: 'Roboto Condensed', sans-serif; line-height: 1.6; border-width: 0px 1px 1px 0px; border-style: solid; border-color: rgba(0, 0, 0, 0.1); border-image: initial; margin: 0px; padding: 8px; font-weight: 400; text-align: left;">**Beispiel**</td><td style="font-family: 'Roboto Condensed', sans-serif; line-height: 1.6; border-width: 0px 1px 1px 0px; border-style: solid; border-color: rgba(0, 0, 0, 0.1); border-image: initial; margin: 0px; padding: 8px; font-weight: 400; text-align: left;">**Beschreibung**</td></tr><tr style="font-family: 'Roboto Condensed', sans-serif; line-height: 1.6; border: 0px; margin: 0px; padding: 0px;"><td style="font-family: 'Roboto Condensed', sans-serif; line-height: 1.6; border-width: 0px 1px 1px 0px; border-style: solid; border-color: rgba(0, 0, 0, 0.1); border-image: initial; margin: 0px; padding: 8px; font-weight: 400; text-align: left;">PASSWORD</td><td style="font-family: 'Roboto Condensed', sans-serif; line-height: 1.6; border-width: 0px 1px 1px 0px; border-style: solid; border-color: rgba(0, 0, 0, 0.1); border-image: initial; margin: 0px; padding: 8px; font-weight: 400; text-align: left;">–</td><td style="font-family: 'Roboto Condensed', sans-serif; line-height: 1.6; border-width: 0px 1px 1px 0px; border-style: solid; border-color: rgba(0, 0, 0, 0.1); border-image: initial; margin: 0px; padding: 8px; font-weight: 400; text-align: left;">DeinPasswort</td><td style="font-family: 'Roboto Condensed', sans-serif; line-height: 1.6; border-width: 0px 1px 1px 0px; border-style: solid; border-color: rgba(0, 0, 0, 0.1); border-image: initial; margin: 0px; padding: 8px; font-weight: 400; text-align: left;">Wenn diese Option aktiviert ist, ist bei der Anmeldung bei der Web-Benutzeroberfläche ein Passwort erforderlich.</td></tr><tr style="font-family: 'Roboto Condensed', sans-serif; line-height: 1.6; border: 0px; margin: 0px; padding: 0px;"><td style="font-family: 'Roboto Condensed', sans-serif; line-height: 1.6; border-width: 0px 1px 1px 0px; border-style: solid; border-color: rgba(0, 0, 0, 0.1); border-image: initial; margin: 0px; padding: 8px; font-weight: 400; text-align: left;">WG\_HOST</td><td style="font-family: 'Roboto Condensed', sans-serif; line-height: 1.6; border-width: 0px 1px 1px 0px; border-style: solid; border-color: rgba(0, 0, 0, 0.1); border-image: initial; margin: 0px; padding: 8px; font-weight: 400; text-align: left;">–</td><td style="font-family: 'Roboto Condensed', sans-serif; line-height: 1.6; border-width: 0px 1px 1px 0px; border-style: solid; border-color: rgba(0, 0, 0, 0.1); border-image: initial; margin: 0px; padding: 8px; font-weight: 400; text-align: left;">vpn.myserver.com</td><td style="font-family: 'Roboto Condensed', sans-serif; line-height: 1.6; border-width: 0px 1px 1px 0px; border-style: solid; border-color: rgba(0, 0, 0, 0.1); border-image: initial; margin: 0px; padding: 8px; font-weight: 400; text-align: left;">Der öffentliche Hostname Ihres VPN-Servers.</td></tr><tr style="font-family: 'Roboto Condensed', sans-serif; line-height: 1.6; border: 0px; margin: 0px; padding: 0px;"><td style="font-family: 'Roboto Condensed', sans-serif; line-height: 1.6; border-width: 0px 1px 1px 0px; border-style: solid; border-color: rgba(0, 0, 0, 0.1); border-image: initial; margin: 0px; padding: 8px; font-weight: 400; text-align: left;">WG\_PORT</td><td style="font-family: 'Roboto Condensed', sans-serif; line-height: 1.6; border-width: 0px 1px 1px 0px; border-style: solid; border-color: rgba(0, 0, 0, 0.1); border-image: initial; margin: 0px; padding: 8px; font-weight: 400; text-align: left;">51820</td><td style="font-family: 'Roboto Condensed', sans-serif; line-height: 1.6; border-width: 0px 1px 1px 0px; border-style: solid; border-color: rgba(0, 0, 0, 0.1); border-image: initial; margin: 0px; padding: 8px; font-weight: 400; text-align: left;">1234</td><td style="font-family: 'Roboto Condensed', sans-serif; line-height: 1.6; border-width: 0px 1px 1px 0px; border-style: solid; border-color: rgba(0, 0, 0, 0.1); border-image: initial; margin: 0px; padding: 8px; font-weight: 400; text-align: left;">Der öffentliche UDP-Port Ihres VPN-Servers. WireGuard wird innerhalb des Docker-Containers immer auf 51820 lauschen.</td></tr><tr style="font-family: 'Roboto Condensed', sans-serif; line-height: 1.6; border: 0px; margin: 0px; padding: 0px;"><td style="font-family: 'Roboto Condensed', sans-serif; line-height: 1.6; border-width: 0px 1px 1px 0px; border-style: solid; border-color: rgba(0, 0, 0, 0.1); border-image: initial; margin: 0px; padding: 8px; font-weight: 400; text-align: left;">WG\_MTU</td><td style="font-family: 'Roboto Condensed', sans-serif; line-height: 1.6; border-width: 0px 1px 1px 0px; border-style: solid; border-color: rgba(0, 0, 0, 0.1); border-image: initial; margin: 0px; padding: 8px; font-weight: 400; text-align: left;">null</td><td style="font-family: 'Roboto Condensed', sans-serif; line-height: 1.6; border-width: 0px 1px 1px 0px; border-style: solid; border-color: rgba(0, 0, 0, 0.1); border-image: initial; margin: 0px; padding: 8px; font-weight: 400; text-align: left;">1420</td><td style="font-family: 'Roboto Condensed', sans-serif; line-height: 1.6; border-width: 0px 1px 1px 0px; border-style: solid; border-color: rgba(0, 0, 0, 0.1); border-image: initial; margin: 0px; padding: 8px; font-weight: 400; text-align: left;">Die MTU, die die Clients verwenden werden. Der Server verwendet die Standard-WG-MTU.</td></tr><tr style="font-family: 'Roboto Condensed', sans-serif; line-height: 1.6; border: 0px; margin: 0px; padding: 0px;"><td style="font-family: 'Roboto Condensed', sans-serif; line-height: 1.6; border-width: 0px 1px 1px 0px; border-style: solid; border-color: rgba(0, 0, 0, 0.1); border-image: initial; margin: 0px; padding: 8px; font-weight: 400; text-align: left;">WG\_PERSISTENT\_KEEPALIVE</td><td style="font-family: 'Roboto Condensed', sans-serif; line-height: 1.6; border-width: 0px 1px 1px 0px; border-style: solid; border-color: rgba(0, 0, 0, 0.1); border-image: initial; margin: 0px; padding: 8px; font-weight: 400; text-align: left;">0</td><td style="font-family: 'Roboto Condensed', sans-serif; line-height: 1.6; border-width: 0px 1px 1px 0px; border-style: solid; border-color: rgba(0, 0, 0, 0.1); border-image: initial; margin: 0px; padding: 8px; font-weight: 400; text-align: left;">25</td><td style="font-family: 'Roboto Condensed', sans-serif; line-height: 1.6; border-width: 0px 1px 1px 0px; border-style: solid; border-color: rgba(0, 0, 0, 0.1); border-image: initial; margin: 0px; padding: 8px; font-weight: 400; text-align: left;">Wert in Sekunden, um die „Verbindung“ offen zu halten.</td></tr><tr style="font-family: 'Roboto Condensed', sans-serif; line-height: 1.6; border: 0px; margin: 0px; padding: 0px;"><td style="font-family: 'Roboto Condensed', sans-serif; line-height: 1.6; border-width: 0px 1px 1px 0px; border-style: solid; border-color: rgba(0, 0, 0, 0.1); border-image: initial; margin: 0px; padding: 8px; font-weight: 400; text-align: left;">WG\_DEFAULT\_ADDRESS</td><td style="font-family: 'Roboto Condensed', sans-serif; line-height: 1.6; border-width: 0px 1px 1px 0px; border-style: solid; border-color: rgba(0, 0, 0, 0.1); border-image: initial; margin: 0px; padding: 8px; font-weight: 400; text-align: left;">10.8.0.x</td><td style="font-family: 'Roboto Condensed', sans-serif; line-height: 1.6; border-width: 0px 1px 1px 0px; border-style: solid; border-color: rgba(0, 0, 0, 0.1); border-image: initial; margin: 0px; padding: 8px; font-weight: 400; text-align: left;">10.6.0.x</td><td style="font-family: 'Roboto Condensed', sans-serif; line-height: 1.6; border-width: 0px 1px 1px 0px; border-style: solid; border-color: rgba(0, 0, 0, 0.1); border-image: initial; margin: 0px; padding: 8px; font-weight: 400; text-align: left;">IP-Adressbereich des Clients.</td></tr><tr style="font-family: 'Roboto Condensed', sans-serif; line-height: 1.6; border: 0px; margin: 0px; padding: 0px;"><td style="font-family: 'Roboto Condensed', sans-serif; line-height: 1.6; border-width: 0px 1px 1px 0px; border-style: solid; border-color: rgba(0, 0, 0, 0.1); border-image: initial; margin: 0px; padding: 8px; font-weight: 400; text-align: left;">WG\_DEFAULT\_DNS</td><td style="font-family: 'Roboto Condensed', sans-serif; line-height: 1.6; border-width: 0px 1px 1px 0px; border-style: solid; border-color: rgba(0, 0, 0, 0.1); border-image: initial; margin: 0px; padding: 8px; font-weight: 400; text-align: left;">1.1.1.1</td><td style="font-family: 'Roboto Condensed', sans-serif; line-height: 1.6; border-width: 0px 1px 1px 0px; border-style: solid; border-color: rgba(0, 0, 0, 0.1); border-image: initial; margin: 0px; padding: 8px; font-weight: 400; text-align: left;">8.8.8.8</td><td style="font-family: 'Roboto Condensed', sans-serif; line-height: 1.6; border-width: 0px 1px 1px 0px; border-style: solid; border-color: rgba(0, 0, 0, 0.1); border-image: initial; margin: 0px; padding: 8px; font-weight: 400; text-align: left;">DNS-Server, den die Clients verwenden.</td></tr><tr style="font-family: 'Roboto Condensed', sans-serif; line-height: 1.6; border: 0px; margin: 0px; padding: 0px;"><td style="font-family: 'Roboto Condensed', sans-serif; line-height: 1.6; border-width: 0px 1px 1px 0px; border-style: solid; border-color: rgba(0, 0, 0, 0.1); border-image: initial; margin: 0px; padding: 8px; font-weight: 400; text-align: left;">WG\_ALLOWED\_IPS</td><td style="font-family: 'Roboto Condensed', sans-serif; line-height: 1.6; border-width: 0px 1px 1px 0px; border-style: solid; border-color: rgba(0, 0, 0, 0.1); border-image: initial; margin: 0px; padding: 8px; font-weight: 400; text-align: left;">0.0.0.0/0,  
::/0</td><td style="font-family: 'Roboto Condensed', sans-serif; line-height: 1.6; border-width: 0px 1px 1px 0px; border-style: solid; border-color: rgba(0, 0, 0, 0.1); border-image: initial; margin: 0px; padding: 8px; font-weight: 400; text-align: left;">192.168.15.0/24,  
10.0.1.0/24</td><td style="font-family: 'Roboto Condensed', sans-serif; line-height: 1.6; border-width: 0px 1px 1px 0px; border-style: solid; border-color: rgba(0, 0, 0, 0.1); border-image: initial; margin: 0px; padding: 8px; font-weight: 400; text-align: left;">Erlaubte IPs, die die Clients verwenden.</td></tr><tr style="font-family: 'Roboto Condensed', sans-serif; line-height: 1.6; border: 0px; margin: 0px; padding: 0px;"><td style="font-family: 'Roboto Condensed', sans-serif; line-height: 1.6; border-width: 0px 1px 1px 0px; border-style: solid; border-color: rgba(0, 0, 0, 0.1); border-image: initial; margin: 0px; padding: 8px; font-weight: 400; text-align: left;">WG\_POST\_UP</td><td style="font-family: 'Roboto Condensed', sans-serif; line-height: 1.6; border-width: 0px 1px 1px 0px; border-style: solid; border-color: rgba(0, 0, 0, 0.1); border-image: initial; margin: 0px; padding: 8px; font-weight: 400; text-align: left;">…</td><td style="font-family: 'Roboto Condensed', sans-serif; line-height: 1.6; border-width: 0px 1px 1px 0px; border-style: solid; border-color: rgba(0, 0, 0, 0.1); border-image: initial; margin: 0px; padding: 8px; font-weight: 400; text-align: left;">iptables …</td><td style="font-family: 'Roboto Condensed', sans-serif; line-height: 1.6; border-width: 0px 1px 1px 0px; border-style: solid; border-color: rgba(0, 0, 0, 0.1); border-image: initial; margin: 0px; padding: 8px; font-weight: 400; text-align: left;">siehe config.js für den Standardwert.</td></tr><tr style="font-family: 'Roboto Condensed', sans-serif; line-height: 1.6; border: 0px; margin: 0px; padding: 0px;"><td style="font-family: 'Roboto Condensed', sans-serif; line-height: 1.6; border-width: 0px 1px 1px 0px; border-style: solid; border-color: rgba(0, 0, 0, 0.1); border-image: initial; margin: 0px; padding: 8px; font-weight: 400; text-align: left;">WG\_POST\_DOWN</td><td style="font-family: 'Roboto Condensed', sans-serif; line-height: 1.6; border-width: 0px 1px 1px 0px; border-style: solid; border-color: rgba(0, 0, 0, 0.1); border-image: initial; margin: 0px; padding: 8px; font-weight: 400; text-align: left;">…</td><td style="font-family: 'Roboto Condensed', sans-serif; line-height: 1.6; border-width: 0px 1px 1px 0px; border-style: solid; border-color: rgba(0, 0, 0, 0.1); border-image: initial; margin: 0px; padding: 8px; font-weight: 400; text-align: left;">iptables …</td><td style="font-family: 'Roboto Condensed', sans-serif; line-height: 1.6; border-width: 0px 1px 1px 0px; border-style: solid; border-color: rgba(0, 0, 0, 0.1); border-image: initial; margin: 0px; padding: 8px; font-weight: 400; text-align: left;">siehe config.js für den Standardwert.</td></tr></tbody></table>

</div></div>### Updating

Um auf die neueste Version zu aktualisieren, führen Sie einfach aus:

<div class="entry-content" id="bkmrk-docker-stop-wg-easy-" itemprop="text" style="font-family: 'Roboto Condensed', sans-serif; line-height: 1.6; border: 0px; margin: 2em 0px 0px; padding: 0px; color: rgb(17, 17, 17); font-size: 16px; font-style: normal; font-variant-ligatures: normal; font-variant-caps: normal; font-weight: 400; letter-spacing: normal; orphans: 2; text-align: start; text-indent: 0px; text-transform: none; white-space: normal; widows: 2; word-spacing: 0px; -webkit-text-stroke-width: 0px; background-color: rgb(255, 255, 255); text-decoration-thickness: initial; text-decoration-style: initial; text-decoration-color: initial;"><div class="entry-content" itemprop="text" style="font-family: 'Roboto Condensed', sans-serif; line-height: 1.6; border: 0px; margin: 2em 0px 0px; padding: 0px; color: rgb(17, 17, 17); font-size: 16px; font-style: normal; font-variant-ligatures: normal; font-variant-caps: normal; font-weight: 400; letter-spacing: normal; orphans: 2; text-align: start; text-indent: 0px; text-transform: none; white-space: normal; widows: 2; word-spacing: 0px; -webkit-text-stroke-width: 0px; background-color: rgb(255, 255, 255); text-decoration-thickness: initial; text-decoration-style: initial; text-decoration-color: initial;">- docker stop wg-easy
- docker rm wg-easy
- docker pull weejewel/wg-easy

</div></div>Und führen Sie dann den obigen Befehl „docker run -d \\ …“ erneut aus.

Links:

[https://www.edvpfau.de/wireguard-netzwerk-mit-routing-einrichten/](https://www.edvpfau.de/wireguard-netzwerk-mit-routing-einrichten/)

[https://unix.stackexchange.com/questions/689975/mount-smb-share-after-wireguard-with-fstab-or-systemd](https://unix.stackexchange.com/questions/689975/mount-smb-share-after-wireguard-with-fstab-or-systemd)

[https://www.wireguard.com/quickstart/](https://www.wireguard.com/quickstart/)

# DS-Lite IPv6 Tunnel – Port Forwarding – NAT – WireGuard VPN

#   


[![image.png](https://bst.wkmimnl.de/uploads/images/gallery/2024-11/scaled-1680-/deNimage.png)](https://bst.wkmimnl.de/uploads/images/gallery/2024-11/deNimage.png)

NAT IPv6 Port Forward Cloud Server

Viele Internetnutzer haben eine **Dual Stack** Internetverbindung mit einer nicht eigenen **IPv4 und/oder IPv6** Adresse. Dabei hat man schnell das Problem wenn man auf seine eigenen Dienst zugreifen möchte, keine Verbindung zu Stande kommt. Die IPv4 und die IPv6 Verbindung wechselt eventuell oder die IPv4 ist eine NAT Adresse usw. Es gibt also viele Hürden wieso man nicht an seine Dienst immer dran kommt.

Im besten Fall sucht man sich also einen Punkt im Internet der gut erreichbar ist und der die Anfragen an deine Dienste weiterleitet. Hier in diesem Beispiel mieten wir uns einen Cloud Server mit einer eigenen IPv4 &amp; IPv6 Adresse. Somit sind die Dienste immer über beide Internet Protokolle erreichbar.

<div class="post-content" id="bkmrk--3" style="box-sizing: border-box; padding: 36px; color: rgb(68, 68, 68); font-family: Roboto, sans-serif; font-size: 18px; font-style: normal; font-variant-ligatures: normal; font-variant-caps: normal; font-weight: 400; letter-spacing: normal; orphans: 2; text-align: start; text-indent: 0px; text-transform: none; widows: 2; word-spacing: 0px; -webkit-text-stroke-width: 0px; white-space: normal; text-decoration-thickness: initial; text-decoration-style: initial; text-decoration-color: initial;"><figure class="wp-block-gallery has-nested-images columns-default wp-block-gallery-1 is-layout-flex wp-block-gallery-is-layout-flex" style="margin: 0px; gap: var( --wp--style--gallery-gap-default, var( --gallery-block--gutter-size, var( --wp--style--block-gap, 0.5em ) ) ); box-sizing: border-box; flex-wrap: wrap; align-items: normal; display: flex; --wp--style--unstable-gallery-gap: var( --wp--style--gallery-gap-default, var( --gallery-block--gutter-size, var( --wp--style--block-gap, 0.5em ) ) );">[![image.png](https://bst.wkmimnl.de/uploads/images/gallery/2024-11/scaled-1680-/HSyimage.png)](https://bst.wkmimnl.de/uploads/images/gallery/2024-11/HSyimage.png)


</figure></div>## Lösungsbeschreibung

Du brauchst folgendes

<div class="post-content" id="bkmrk-cloud-server%C2%A0-%3E-z.b." style="box-sizing: border-box; padding: 36px; color: rgb(68, 68, 68); font-family: Roboto, sans-serif; font-size: 18px; font-style: normal; font-variant-ligatures: normal; font-variant-caps: normal; font-weight: 400; letter-spacing: normal; orphans: 2; text-align: start; text-indent: 0px; text-transform: none; widows: 2; word-spacing: 0px; -webkit-text-stroke-width: 0px; white-space: normal; text-decoration-thickness: initial; text-decoration-style: initial; text-decoration-color: initial;">- **Cloud Server** -&gt; z.B. Hetzner Cloud (kleinster Server) [HIER 20€ STARTGUTHABEN](https://hetzner.cloud/?ref=B7SA7EkDfqfL)
- **VPN Gateway** -&gt; z.B. pfSense // [Hardware Appliance](https://amzn.to/3nFKVbK)

</div>Es wird zwischen dem Cloud Server und deinem VPN Gateway ein Wireguard VPN Tunnel aufgebaut. Diese Verbindung kann über IPv4 oder IPv6 aufgebaut werden. Da diese Verbindung sowieso durch deine pfSense initiiert wird, ist es egal ob v4 oder v6.

Auf dem Cloud Server wird die unten stehen WireGuard Konfiguration genommen und somit auch die 4 Wunderregeln für das DNAT (Destination NAT).

```
[Interface]
Address = 10.0.0.2/24
ListenPort = 51820
PrivateKey = <YOUR-PRIVATE-KEY>
PostUp = iptables -A FORWARD -i eth0 -o wg0 -j ACCEPT
PostUp = iptables -A FORWARD -i wg0 -o eth0 -j ACCEPT
PostUp = iptables -t nat -A PREROUTING -i eth0 -p tcp -m multiport --dport 3000 -j DNAT --to 192.168.77.1
PostUp = iptables -t nat -A POSTROUTING -o wg0 -j MASQUERADE

PostDown = iptables -D FORWARD -i eth0 -o wg0 -j ACCEPT
PostDown = iptables -D FORWARD -i wg0 -o eth0 -j ACCEPT
PostDown = iptables -t nat -D PREROUTING -i eth0 -p tcp -m multiport --dport 3000 -j DNAT --to 192.168.77.1
PostDown = iptables -t nat -D POSTROUTING -o wg0 -j MASQUERADE

[Peer]
PublicKey = <YOUR-PUBLIC-KEY>
AllowedIPs = 192.168.77.0/24, 10.0.0.0/24
```

Mit dieser Konfiguration wird der Port 3000 eingehend auf dem Server mittels DNAT auf die Zieladresse 192.168.77.1 weitergeleitet. (**PREROUTING**)  
Mit dem **PORTROUTING** wird dem Daten-Paket die IP-Adresse des Wireguard Tunnel aufgezwungen.  
Die beiden **FORWARD** Regeln geben dem System die Freigabe Pakete zwischen beiden Interfaces zu verschieben.

Natürlich kann die besonders wichtige Regel „PREROUTING“ so angepasst werden das diese für euch passt. Man kann auch UDP Freigaben oder mehrere Ports gleichzeitig freigeben.

#  

# mit 

```
iptables -I DOCKER-USER -i eth0 ! -s 127.0.0.1 -p tcp --dport 81 -j DROP
```

Wird die Managementseite des Proxys von außen gesperrt.

Alle weitere Informationen natürlich wie immer im Video.

<div class="post-content" id="bkmrk-video-%C2%A0ansichten%3A%C2%A013" style="box-sizing: border-box; padding: 36px; color: rgb(68, 68, 68); font-family: Roboto, sans-serif; font-size: 18px; font-style: normal; font-variant-ligatures: normal; font-variant-caps: normal; font-weight: 400; letter-spacing: normal; orphans: 2; text-align: start; text-indent: 0px; text-transform: none; widows: 2; word-spacing: 0px; -webkit-text-stroke-width: 0px; white-space: normal; text-decoration-thickness: initial; text-decoration-style: initial; text-decoration-color: initial;"><figure class="wp-block-embed is-type-video is-provider-youtube wp-block-embed-youtube wp-embed-aspect-16-9 wp-has-aspect-ratio" style="margin: 0px; box-sizing: border-box; overflow-wrap: break-word;"><div class="wp-block-embed__wrapper" style="box-sizing: border-box; position: relative; margin-bottom: 0px;">[Video](https://youtu.be/7QBh1YVoaj8 "Erläuterungsvideo")</div></figure><div class="post-views content-post post-3596 entry-meta load-static" style="box-sizing: border-box;"> <span class="post-views-label" style="box-sizing: border-box; margin-right: 0px !important; line-height: 1;">Ansichten: </span><span class="post-views-count" style="box-sizing: border-box; margin-bottom: 0px; margin-right: 0px !important; line-height: 1;">13.909</span></div></div>

# IPTABLES

**1. Overview**

When working on a Linux-based server or firewall, understanding how to manage and filter network traffic is crucial. One of the most powerful tools available for this purpose is iptables. It allows us to define rules that control the flow of traffic through network ports, ensuring that only legitimate and authorized traffic can reach our system.

In this article, we’ll go through how to use iptables to manage multiple ports efficiently. We’ll begin by covering the theoretical aspects of iptables and then demonstrate practical code examples to illustrate how we can manipulate port-based traffic filtering.

**2. Understanding iptables Basics**

Before diving into managing multiple ports, it’s important to understand the fundamentals of how iptables works. At its core, iptables operates by organizing traffic filtering into tables, chains, and rules:

 tables: these define the context in which traffic rules are applied, such as filter (for general traffic filtering), nat (for network address translation), and mangle (for packet modification)  
 chains: each table has several chains, such as INPUT, OUTPUT, and FORWARD, in which these chains define the direction of traffic (incoming, outgoing, or forwarded)  
 rules: these are the individual conditions that define how traffic should be handled, where each rule specifies criteria like the protocol, source, destination, and port

In the context of managing network ports, we’re primarily concerned with the INPUT chain, as this controls the traffic coming into our system.

Let’s start by adding a rule to allow incoming traffic on a single port, such as port 80 to allow HTTP requests:

<span style="color: rgb(35, 111, 161);">$ sudo iptables -A INPUT -p tcp --dport 80 -j ACCEPT</span>

Next, let’s analyze the command above:

 -A INPUT: appends the rule to the INPUT chain  
 -p tcp: specifies the protocol, which is TCP in this case  
 –dport 80: targets traffic destined for port 80  
 -j ACCEPT: accepts the matching traffic, allowing it through the firewall

If we run this command and inspect the rules with iptables -L, we’ll see the new rule added:

<span style="color: rgb(35, 111, 161);">$ iptables -L</span>  
target prot opt source destination  
ACCEPT tcp -- anywhere anywhere tcp dpt:http

This allows incoming HTTP traffic. In the upcoming sections, we’ll explore how to manage multiple ports.

**3. Managing Multiple Ports in iptables**

Handling a few ports individually is manageable, but what if we need to manage several ports, such as HTTP, HTTPS, and SSH? Instead of creating separate rules for each port, we can use the multiport module to group them into a single rule.

The multiport module in iptables enables us to specify multiple ports in one rule, simplifying configuration and improving readability. For example, let’s look at an example where we allow traffic on ports 80 (HTTP), 443 (HTTPS), and 22 (SSH):

<span style="color: rgb(35, 111, 161);">$ sudo iptables -A INPUT -p tcp -m multiport --dports 80,443,22 -j ACCEPT</span>  
Chain INPUT (policy DROP)  
target prot opt source destination   
ACCEPT tcp -- anywhere anywhere multiport dports http,https,ssh

In the above snippet, we’ve used the -m multiport option, which in turn loads the multiport module that consequently enables us to specify multiple ports during our configuration. In addition, –dports 80,443,22 specifies the list of destination ports (80, 443, and 22).

On the other hand, one may not want to specify specific ports for known protocols. In this particular situation, we can use –dport 1000:2000 to open up inbound traffic to TCP ports numbered from 1000 to 2000 inclusive.

Now, we have a single rule that allows traffic on all three critical ports. Essentially, using multiport saves time and reduces clutter in our firewall rules.

**4. Combining Ports and Protocols**

There are situations where we may need to handle both TCP and UDP protocols for different services. For example, DNS commonly uses both UDP and TCP. In essence, DNS uses UDP for quick lookups and TCP for larger queries. In addition, we can add rules to manage these protocols separately, even for the same ports:

<span style="color: rgb(35, 111, 161);">$ sudo iptables -A INPUT -p tcp -m multiport --dports 80,443 -j ACCEPT</span>  
<span style="color: rgb(35, 111, 161);">$ sudo iptables -A INPUT -p udp -m multiport --dports 53 -j ACCEPT</span>  
Chain INPUT (policy DROP)  
target prot opt source destination   
ACCEPT tcp -- anywhere anywhere multiport dports http,https  
ACCEPT udp -- anywhere anywhere udp dpt:domain

Here, we can see that the first rule allows HTTP and HTTPS traffic over TCP. However, the second rule allows DNS queries over UDP specifically on port 53. Finally, we can easily see how both protocols are managed with separate rules. This level of control is critical for handling services that operate across different transport layers.

**5. Exploring Security Best Practices**

In this section, we’ll get to understand some of the security best practices to be able to manage your configurations effectively using multiports.

*5.1. Restricting Access to Specific IPs on Multiple Ports*

In some use cases, we may need to allow traffic on multiple ports but only from specific IP addresses. For instance, we might want to limit access to SSH and web services to a trusted internal network.

To do this, we can combine the multiport module with IP-based filtering. Let’s say we only want to allow traffic from 192.168.1.100 to ports 22 (SSH), 80 (HTTP), and 443 (HTTPS).

Let’s check out an example illustrating how to meet our inquiry:

<span style="color: rgb(35, 111, 161);">$ sudo iptables -A INPUT -p tcp -m multiport --dports 22,80,443 -s 192.168.1.100 -j ACCEPT</span>

Chain INPUT (policy DROP)  
target prot opt source destination   
ACCEPT tcp -- 192.168.1.100 anywhere multiport dports ssh,http,https

From the output, we can see that the source column is now populated with the IP address value of 192.168.1.100. In this matter, we specify our source and leave the destination without any constraints, as it still shows anywhere. In particular, this restricts traffic on the specified ports to a single trusted IP. Notably, this is a highly effective way to secure sensitive services like SSH or any other protocol.

*5.2. Blocking Multiple Ports*

Blocking traffic on certain ports is just as important as allowing it. For example, we may want to block access to unused or vulnerable ports like 8080 (alternative HTTP), 8443 (alternative HTTPS), or 3306 (MySQL).

Let’s understand how to utilize the iptables options to meet our goal:

<span style="color: rgb(35, 111, 161);">$ sudo iptables -A INPUT -p tcp -m multiport --dports 8080,8443,3306 -j DROP</span>

Chain INPUT (policy DROP)  
target prot opt source destination   
DROP tcp -- anywhere anywhere multiport dports 8080,8443,mysql

Here, we’re able to utilize the -j DROP option, which is very useful as it silently drops the traffic without sending a response. Wrapping up, the DROP action is useful for completely ignoring traffic on these ports, improving the system’s security.

*5.3. Saving and Persisting iptables Rules*

By default, iptables rules do not persist across reboots. To ensure that our rules are saved and restored on boot, we need to save them manually. On most systems, we can save the rules using iptables-save:

$ <span style="color: rgb(35, 111, 161);">sudo iptables-save &gt; /etc/iptables/rules.v4</span>

\# Generated by iptables-save  
\*filter  
:INPUT ACCEPT \[0:0\]  
:FORWARD ACCEPT \[0:0\]  
:OUTPUT ACCEPT \[0:0\]  
-A INPUT -p tcp -m multiport --dports 80,443,22 -j ACCEPT  
COMMIT

This command writes the current rule set to a file (/etc/iptables/rules.v4) that will be loaded when the system boots. By saving our rules, we ensure that our configuration persists even after the server restarts.

**6. Troubleshooting Common Issues**

Even though iptables is powerful, it’s easy to make mistakes that can disrupt traffic or leave systems vulnerable. Regularly, common issues include:

 incorrect rule ordering  
 missing the multiport module  
 unintentionally dropping legitimate traffic

To tackle the issues above, we can use the following command to debug and review our rules in detail:

$ <span style="color: rgb(35, 111, 161);">sudo iptables -L -v -n</span>  
Chain INPUT (policy DROP 0 packets, 0 bytes)  
 pkts bytes target prot opt in out source destination   
 100 6000 ACCEPT tcp -- \* \* anywhere anywhere multiport dports http,https,ssh

In the example above, we utilized three important options that come with the iptables command:

 -L: this is essential for verifying the current firewall configuration and ensuring that the desired rules are in place  
 -v: this option provides valuable information about the effectiveness of the firewall rules, such as the number of packets being blocked or allowed, which can help us identify potential security issues or optimize the rules for performance  
 -n: this option is often preferred for troubleshooting and debugging firewall issues, as it provides a more precise and easier-to-read representation of the rules, which can help us identify specific IP addresses or port numbers that are being blocked or allowed

This output provides a detailed view of the traffic counters, protocols, and IP addresses involved. We can use it to verify that our rules are working as expected.

**7. Conclusion**

In this article, we explored how to use iptables to manage multiple ports efficiently. Furthermore, we covered everything from basic rules to handling multiple ports with the multiport module, combining protocols, restricting access by IP, and persisting our configurations.

By mastering these techniques, we can fine-tune network traffic and enhance the security and performance of Linux systems. Whether managing a single server or an entire network, iptables remains an indispensable tool for systems administrators.