Windows
- Installer-Krams
- Microsoft Standard Installer Command-Line Optionen
- Debuggen von Systemfehlercodes
- Setup.exe and Update.exe Command-Line Parameters
- Backup and Restore Office 2016 / 2019 Activation
- Drucker-Krams
- Beep Code des BIOS
- Windows 10 Benutzerprofile sauber löschen
- Dies und das
- Windows 11 ohne Microsoft-Konto
- Schortcuts
- Bios F-Tasten
- Win3.11
- Proxy setzen
- Windows 11-Installationsmedium mit Tiny11 abspecken
- Certutil
Installer-Krams
Microsoft Standard Installer Command-Line Optionen
Hier sind standardmäßige Befehlszeilenoptionen für das Microsoft Standard Installer (Msiexec.exe), die ausführbare Datei, die verwendet wird, um Pakete zu interpretieren und Produkte zu installieren.
Befehlszeilenoptionen sind groß- und kleinschreibungsfähig.
Msiexec legt eine Fehlerstufe für die Rückgabe fest, die Den Systemfehlercodes entspricht.
Hinweis
Die Befehlszeilenoptionen, die in diesem Thema identifiziert werden, sind ab Windows Installer 3.0 verfügbar. Die Windows Befehlszeilenoptionen sind mit Windows Installer 3.0 und früheren Versionen verfügbar.
/help
Hilfe- und Schnellverweisoption. Zeigt die richtige Verwendung des Setupbefehls an, einschließlich einer Liste aller Schalter und des Verhaltens. Die Beschreibung der Verwendung kann in der Benutzeroberfläche angezeigt werden. Die falsche Verwendung einer beliebigen Option ruft diese Hilfeoption auf.
Das entsprechende Windows Installer Command-Line Option lautet: /?.
Beispiele
Msiexec /help.
/quiet
Option für die ruhige Anzeige. Das Installationsprogramm führt eine Installation aus, ohne eine Benutzeroberfläche anzuzeigen. Es werden keine Eingabeaufforderungen, Nachrichten oder Dialogfelder für den Benutzer angezeigt. Der Benutzer kann die Installation nicht abbrechen.
Verwenden Sie die /norestart Befehlszeilenoptionen, /forcerestart um Neustarts zu steuern. Wenn keine Neustartoptionen angegeben werden, startet das Installationsprogramm den Computer bei Bedarf neu, ohne dass ein Benutzer aufgefordert oder warnungen angezeigt wird.
Das entsprechende Windows Installer Command-Line Option lautet: /qn.
Beispiele
Msiexec /package Application.msi /quiet
Msiexec /uninstall Application.msi /quiet
Msiexec /update msipatch.msp /quiet
Msiexec /uninstall msipatch.msp /package Application.msi / quiet
/passive
Passive Anzeigeoption. Das Installationsprogramm zeigt dem Benutzer eine Statusleiste an, die angibt, dass eine Installation ausgeführt wird, aber keine Aufforderungen oder Fehlermeldungen für den Benutzer angezeigt werden. Der Benutzer kann die Installation nicht abbrechen.
Verwenden Sie die /norestart Befehlszeilenoptionen, /forcerestart um Neustarts zu steuern. Wenn keine Neustartoption angegeben wird, startet das Installationsprogramm den Computer immer neu, ohne dass der Benutzer aufgefordert oder gewarnt wird.
Das entsprechende Windows Installer Command-Line Option lautet: /qb!- mit REBOOTPROMPT=S Festgelegt auf der Befehlszeile.
Beispiele
msiexec /package Application.msi /passive
/norestart
Option nie neu starten. Das Installationsprogramm startet den Computer nach der Installation nie neu.
Die entsprechende Windows Installer-Befehlszeile hat REBOOT=ReallySuppress sich auf der Befehlszeile festgelegt.
Beispiele
msiexec /package Application.msi /norestart.
/forcerestart
Option "Immer neu starten". Das Installationsprogramm startet immer nach jeder Installation den Computer neu.
Die entsprechende Windows Installer-Befehlszeile hat REBOOT=Force sich auf der Befehlszeile festgelegt.
Beispiele
msiexec /package Application.msi /forcerestart
/promptrestart
Eingabeaufforderung vor dem Neustart der Option. Zeigt eine Meldung an, dass ein Neustart erforderlich ist, um die Installation abzuschließen, und fragt den Benutzer, ob das System jetzt neu gestartet werden soll. Diese Option kann nicht zusammen mit der /quiet-Option verwendet werden.
Die entsprechende Windows Installer-Befehlszeile hat REBOOTPROMPT = "" sich auf der Befehlszeile festgelegt.
/deinstallieren (Produkt)
Produktoption deinstallieren. Deinstalliert ein Produkt.
Das entsprechende Windows Installer Command-Line Option ist/x.
Parameter
<Package.msi| Productcode>
/uninstall (Patch)
Deinstallationsoption. Deinstalliert einen Update-Patch.
Das entsprechende Windows Installer Command-Line Option lautet: /I mit MSIPATCHREMOVE=Update1.msp | PatchGUID1[;Update2.msp | PatchGUID2] festgelegter Befehlszeile.
Parameter
/package <Package.msi | ProductCode> /deinstallieren [; Update2.msp | PatchGUID2]
/log
Protokolloption. Schreibt Protokollierungsinformationen in eine Protokolldatei im angegebenen vorhandenen Pfad. Der Pfad zum Speicherort der Protokolldatei muss bereits vorhanden sein. Das Installationsprogramm erstellt die Verzeichnisstruktur für die Protokolldatei nicht.
Weitere Informationen zu allen Methoden, die zum Festlegen des Protokollierungsmodus verfügbar sind, finden Sie unter "Normal Logging Windows Installer".
Das entsprechende Windows Installer Command-Line Option lautet: /L*.
Die folgenden Informationen werden in das Protokoll eingegeben:
- Statusmeldungen
- Nichtfatale Warnungen
- Alle Fehlermeldungen
- Starten von Aktionen
- Aktionsspezifische Datensätze
- Benutzeranforderungen
- Anfängliche UI-Parameter
- Veraltete Speicher- oder tödliche Exitinformationen
- Out-of-Disk-Space-Nachrichten
- Terminaleigenschaften
/package
Installieren Sie die Produktoption. Installiert oder konfiguriert ein Produkt.
Das entsprechende Windows Installer Command-Line Option lautet: /I.
Parameter
<Package.msi| Productcode>
/update
Installieren Sie die Option "Patches". Installiert eine oder mehrere Patches.
Die entsprechende Windows Installer-Befehlszeile hat PATCH = [msipatch.msp]<; PatchGuid2> auf der Befehlszeile festgelegt.
Parameter
[; Update2.msp]
Empfohlener Inhalt
-
Befehlszeilenoptionen - Win32 apps
Befehlszeilenoptionen für msiexec.exe für Windows Installer 3.0 und früher. Stellt eine Tabelle mit Optionen, Parametern und Beschreibungen bereit. Beispiele zum Installieren von Produkten und anderen Aufgaben.
-
Befehlszeilenoptionen, die von Self-Extractor-Paketen unterstützt werden - Windows Client
Beschreibt die Befehlszeilenoptionen, die von einem Softwareinstallationspaket, einem Updatepaket oder einem Hotfixpaket unterstützt werden, das mithilfe von Microsoft Self-Extractor erstellt wurde.
-
ALLUSERS-Eigenschaft - Win32 apps
Die ALLUSERS-Eigenschaft konfiguriert den Installationskontext des Pakets.
-
Debuggen von Systemfehlercodes
Dieser Abschnitt ist für Entwickler vorgesehen, die Systemfehler debuggen. Wenn Sie diese Seite erreicht haben, während Sie nach anderen Fehlern suchen, sind einige Links aufgeführt, die möglicherweise helfen:
- Windows Update Fehler – Hilfe beim Beheben von Problemen mit Windows Update.
- Windows Aktivierungsfehler – Hilfe beim Überprüfen Ihrer Kopie von Windows.
- Problembehandlung bei Blauen Bildschirmfehlern – Hilfe beim Ermitteln, was zu einem Stoppfehler führte.
- Microsoft-Support – Unterstützung für ein Microsoft-Produkt.
Weitere Möglichkeiten zum Suchen eines Fehlercodes
Wir haben die Systemfehlercodes in diesem Abschnitt aufgelistet, organisiert nach Zahl. Wenn Sie weitere Hilfe beim Nachverfolgen eines bestimmten Fehlers benötigen, finden Sie weitere Empfehlungen:
- Verwenden Sie das Microsoft Error Lookup Tool.
- Installieren Sie die Debugtools für Windows, laden Sie eine Speicherabbilddatei, und führen Sie dann den Codebefehl> !err < aus.
- Suchen Sie die Microsoft Protocol-Website nach dem rohen Text oder Fehlercode. Weitere Informationen finden Sie unter [MS-ERREF]: Windows Fehlercodes.
Fehlercodes von Drittanbietern
Andere Fehlercodes können von Drittanbieterdiensten oder Apps generiert werden (z. B. Fehlercode: -118 kann vom Steam-Spieldienst angezeigt werden), und in diesen Situationen würden Sie sich an die Supportzeile des Drittanbieters wenden.
Systemfehlercodes
Systemfehlercodes sind sehr breit: Jeder kann in einem von vielen hundert Standorten im System auftreten. Folglich können die Beschreibungen dieser Codes nicht sehr speziell sein. Die Verwendung dieser Codes erfordert einige Untersuchungen und Analysen. Sie müssen sowohl den programmgesteuerten als auch den Laufzeitkontext beachten, in dem diese Fehler auftreten.
Da diese Codes in WinError.h definiert sind, werden manchmal die Codes von nicht Systemsoftware zurückgegeben. Und manchmal wird der Code von einer Funktion tief im Stapel zurückgegeben und entfernt von Code, der den Fehler behandelt.
In den folgenden Themen werden Listen von Systemfehlercodes bereitgestellt. Diese Werte werden in der WinError.h-Headerdatei definiert.
- Systemfehlercodes (0-499) (0x0-0x1f3)
- Systemfehlercodes (500-999) (0x1f4-0x3e7)
- Systemfehlercodes (1000-1299) (0x3e8-0x513)
- Systemfehlercodes (1300-1699) (0x514-0x6a3)
- Systemfehlercodes (1700-3999) (0x6a4-0xf9f)
- Systemfehlercodes (4000-5999) (0xfa0-0x176f)
- Systemfehlercodes (6000-8199) (0x1770-0x2007)
- Systemfehlercodes (8200-8999) (0x2008-0x2327)
- Systemfehlercodes (9000-11999) (0x2328-0x2edf)
- Systemfehlercodes (12000-15999) (0x2ee0-0x3e7f)
Setup.exe and Update.exe Command-Line Parameters
InstallShield 2018
Setup.exe can accept a number of command-line parameters. Update.exe (available only for Basic MSI and InstallScript MSI projects) accepts nearly all of the same command-line parameters. Using these parameters, end users can specify such data as the language that the installation should run in and whether to launch Setup.exe silently. For Basic MSI and InstallScript MSI, end users can also pass parameters through Setup.exe to the included .msi file.
Note • Command-line options that require a parameter must be specified with no space between the option and its parameter. For example, Setup.exe /v"ALLUSERS=2" is valid, while Setup.exe /v "ALLUSERS=2" is not. Quotation marks around an option’s parameter are required only if the parameter contains spaces. If a path within a parameter contains spaces, you may need to use quotation marks within quotation marks, as in the following example:
Setup.exe /v"INSTALLDIR=\"c:\My Files\""
Project • Some of the command-line options apply to only certain project types. Project-specific information is listed for each option.
Built-In Command-Line Parameters
This section describes valid command-line parameters for Setup.exe. The parameters are organized into the following categories:
|
Parameter |
Project Type |
Description |
|
Basic MSI, InstallScript MSI |
If you configured the password-related settings for your release on the Setup.exe tab in the Releases view, the end user must specify the password with the /p option when running the installation silently. A typical command is as follows: Setup.exe /s /p"password" |
|
|
InstallScript, InstallScript MSI |
Use this command line to run the installation in record mode. In order to run an InstallScript MSI or InstallScript installation in silent mode, you must first run Setup.exe with the /r option to generate a response file, which stores information about the data entered and options selected by the user at run time. Launching an InstallScript MSI or InstallScript installation with the /r parameter displays all the run-time dialogs and stores the data in a file called Setup.iss, created inside the system’s Windows folder. To specify an alternative response file name and location, use the /f1 option, described below. Basic MSI projects do not create or use a response file for silent installations. |
|
|
Basic MSI, InstallScript, InstallScript MSI |
For an InstallScript MSI or InstallScript project, the command Setup.exe /s runs the installation in silent mode, by default based on the responses contained in a response file called Setup.iss in the same directory. (Response files are created by running Setup.exe with the /r option.) To specify an alternative file name or location of the response file, use the /f1 option. The command Setup.exe /s also suppresses the Setup.exe initialization dialog for a Basic MSI installation, but it does not read a response file. To run a Basic MSI installation silently, use the following command line: Setup.exe /s /v/qn To specify the values of public properties for a silent Basic MSI installation, you can use a command such as the following one: Setup.exe /s /v"/qn INSTALLDIR=D:\Destination" Note • Using this command-line parameter to launch an installation that includes an InstallShield prerequisite does not automatically run the prerequisite installation silently. You may also need to specify a valid silent command-line parameter for the InstallShield prerequisite in the Specify the command line for the application when the setup is running in silent mode setting on the Application to Run tab in the InstallShield Prerequisite Editor. For more information, see Specifying Command-Line Parameters for an InstallShield Prerequisite. |
|
|
InstallScript, InstallScript MSI |
Using the /f1 option enables you to specify where the response file is (or where it should be created) and what its name is, as in the following example: Setup.exe /s /f1"C:\Temp\Setup.iss" Specify an absolute path; using a relative path gives unpredictable results. The /f1 option is available both when creating a response file (with the /r option) and when using a response file (with the /s option). |
|
|
InstallScript, InstallScript MSI |
When running an InstallScript MSI or InstallScript installation in silent mode (using the /s option), the log file Setup.log is by default created in the same directory and with the same name (except for the extension) as the response file. The /f2 option enables you to specify an alternative log file location and file name, as in the following example: Setup.exe /s /f2"C:\Setup.log" Specify an absolute path; using a relative path gives unpredictable results. |
|
Parameter |
Project Type |
Description |
|
Basic MSI, InstallScript MSI |
Note • The /a parameter does not work with Update.exe. Update.exe launches a patch that accesses and modifies an existing cached .msi file on the system, and an administrative installation does not cache the .msi file. The /a option causes Setup.exe to perform an administrative installation. An administrative installation copies (and uncompresses) your data files to a directory that is specified by the user, but it does not create shortcuts, register COM servers, or create an uninstallation log. Tip • If an installation contains InstallShield prerequisites and you want to extract them from Setup.exe, add a path after the /a parameter to extract the prerequisites to that location. A sample command is Setup.exe /a"C:\temp". |
|
|
Basic MSI, InstallScript MSI |
The /j option causes Setup.exe to perform an advertised installation. An advertised installation creates shortcuts, registers COM servers, and registers file types, but does not install your product’s files until the user invokes one of these “entry points.” |
|
|
Basic MSI, InstallScript MSI |
The /x option causes Setup.exe to uninstall a previously installed product. |
|
|
InstallScript, InstallScript MSI (if the InstallScript user interface (UI) style is the traditional style, which uses the InstallScript engine as an external UI handler) |
Important • This parameter does not apply to InstallScript MSI projects in which the InstallScript UI style is the new style (which uses the InstallScript engine as an embedded UI handler). To learn more, see Using the InstallScript Engine as an External vs. Embedded UI Handler for InstallScript MSI Installations. The /uninst option is provided for compatibility with earlier versions of InstallShield. This option causes the InstallScript engine to execute the event handler function OnUninstall, whose default code uninstalls the previously installed product. Project • Note that in InstallScript MSI installations, the /uninst parameter does not invoke the InstallScript engine uninstall behavior that processes install log and removes any resources that were created and logged through script. However, the /removeonly option does invoke this behavior. |
|
|
InstallScript, InstallScript MSI |
The /removeonly option sets the REMOVEONLY system variable equal to a non-zero value. The default code for the OnMaintUIBefore event handler function conditionally displays the SdWelcomeMaint dialog, depending on the value of REMOVEONLY. |
|
|
Basic MSI |
The /instance=<InstanceId> option—which is available for Basic MSI projects that support the installation of multiple instances of a product—lets you specify which instance you want to install, update, or uninstall. <InstanceId> represents the value of the InstanceId property that identifies the instance. Whenever you use this option and include a valid InstanceId value, the installation suppresses the instance selection dialog. For example, the following sample command line installs the instance that has 2 as the value of the InstanceId property: Setup.exe /instance=2 Use default to identify the instance that is installed by the base installation package, as in the following example: Setup.exe /instance=default To specify the instance that you want to uninstall, include the /x option with the /instance=<InstanceId> option. For more information, see Naming an Instance and Run-Time Behavior for Installing Multiple Instances of a Product. |
Passing Data to the Installation
|
Parameter |
Project Type |
Description |
|
Basic MSI, InstallScript MSI |
Use the /v option to pass command-line options and values of public properties through to Msiexec.exe. If you want to pass more than one argument to Msiexec.exe, you can use the /v option multiple times at the command line, once for each argument. For example: Setup.exe /v"/l*v c:\test.log" /v"MYPROPERTY1=value1" /v"/qb" As an alternative, you can pass multiple arguments through the /v option as in the following example: Setup.exe /v"/l*v c:\test.log MYPROPERTY1=value1 /qb" Note • If you pass the /v parameter at the command prompt when launching Setup.exe, any parameters that are specified for the CmdLine keyname in Setup.ini are ignored. To learn more, see Setup.ini. |
|
|
Basic MSI projects that have InstallScript custom actions |
This option specifies command-line parameters to be passed to the script. Any property supported by InstallScript MSI (where appropriate) can be specified. (The most common ones are /d and /z.) For example, the following indicates that you want to debug the script, and that the CMDLINE variable should contain TEST. Setup.exe /v"ISSCRIPTCMDLINE=\"-d -zTEST\"" Note that as shown above, when you want to specify that a double quote character is not a delimiter for the command line but a delimiter for the property, use \". Note also that as with any public Windows Installer property, this property should be specified with all uppercase letters. |
|
|
InstallScript MSI |
The /z option is used to pass data to the InstallScript system variable CMDLINE, as in the following example: Setup.exe /z"My Custom Data" When this command line is used, the variable CMDLINE contains the string My Custom Data. |
Download and Cache Locations (Basic MSI and InstallScript MSI Projects)
|
Parameter |
Project Type |
Description |
|
Basic MSI, InstallScript MSI |
In the Release Wizard, you can specify download locations for the Windows Installer installers InstMsiA.exe and InstMsiW.exe. A user can specify an alternative URL at run time using the /ua option (for the InstMsiA.exe location) and /uw option (for the InstMsiW.exe location), as in the following example: Setup.exe /uw"http://www.otherlocation.com/engines" The file name is not necessary. Note • You must specify the full URL with the parameters. |
|
|
Basic MSI, InstallScript MSI |
In the Release Wizard, for a Web Downloader build, you can specify a download location for your .msi database. A user can specify an alternative URL using the /um option, as in the following example: Setup.exe /um"http://www.otherlocation.com/packages/product.msi" Note • You must specify the full URL with the parameter. |
|
|
Basic MSI, InstallScript MSI |
In the Release Wizard, for a Downloader build, you can specify whether to cache the contents of a compressed package on the local system. With the /b option, the user can specify the directory in which to cache the installation files, as in the following example: Setup.exe /b"C:\CacheDirectory" Note • You must specify the full URL with the parameter. |
|
Parameter |
Project Type |
Description |
|
Basic MSI projects with InstallScript custom actions, |
For an InstallScript project, running the command Setup.exe /d runs the installation program with the InstallScript Debugger. Note • Debugging InstallScript code requires the debug-information file Setup.dbg to be available. In addition, in order to debug an installation on a system other than your development machine, you need to copy certain files from your development machine to the debugging machine. To learn more, see Debugging an Installation on Any Computer. For a Basic MSI project, the following command runs your InstallScript custom actions in the InstallScript Debugger: Setup.exe /v"ISSCRIPTDEBUG=1 ISSCRIPTDEBUGPATH=\"path-to-Setup.dbg\"" |
|
|
Basic MSI, InstallScript MSI |
The /debuglog parameter lets you generate a log file for Setup.exe. To generate a log named InstallShield.log in the same directory as the Setup.exe file, pass just the command-line parameter. Note that this does not work if the Setup.exe file is in a read-only location. For example: setup.exe /debuglog To specify the name and location of the log file, pass the path and name, as in the following example: Setup.exe /debuglog"C:\PathToLog\setupexe.log" To generate a log file for the feature prerequisites in the installation, use the /v parameter to set the ISDEBUGLOG property to the full path and file name for the log file, as follows: Setup.exe /debuglog"C:\PathToSetupLogFile\setup.log" /v"ISDEBUGLOG=prereq.log" You can use directory properties and environment variables in the path for the feature prerequisite log file. |
|
Parameter |
Project Type |
Description |
|
InstallScript, InstallScript MSI |
The /m option causes Setup.exe to generate an SMS Management Information Format (.mif) file. Following is a typical command: Setup.exe /m"SampleApp" Including the “.mif” file extension is not necessary. |
|
|
InstallScript, InstallScript MSI |
Using the /m1 parameter (along with /m) enables you to specify a serial number to be written to the .mif file. A typical command is as follows: Setup.exe /m"SampleApp" /m1"1234-5678" |
|
|
InstallScript, InstallScript MSI |
Using the /m2 parameter (along with /m) enables you to specify a locale string to be written to the .mif file. A typical command is as follows: Setup.exe /m"SampleApp" /m2"ENU" |
|
Parameter |
Project Type |
Description |
|
/passive |
Advanced UI, Suite/Advanced UI |
Use the /passive parameter to runs a suite installer setup in a minimum UI mode (just displaying a progress panel): Setup.exe /passive To uninstall using a minimum UI mode, use the following command: Setup.exe /passive /remove |
|
Parameter |
Project Type |
Description |
||||||
|
InstallScript |
Specifies the amount of time (in seconds) by which initialization of the installation is delayed after Setup.exe is launched. Note • Using the -delayedstart option is recommended when manually launching an additional installation after reboot (for example, by using the RunOnce key). The delay allows the operation system to initialize completely; this prevents the problems—such as Remote Procedure Call (RPC) errors—that can occur if an installation initializes before the operating system has initialized completely. The recommended delay length is 30 seconds. Note that this option is not needed when the installation starts automatically after reboot (for example, due to a call to SdFinishReboot before reboot). |
|||||||
|
Basic MSI, InstallScript, InstallScript MSI |
This parameter allows the setup author to always clone the setup and run it from the temporary directory, even if the setup does not meet the conditions for running from the temporary directory. This parameter is ignored if the setup is a self-extracting executable file (.exe). |
|||||||
|
InstallScript, Basic MSI, InstallScript MSI, Suite/Advanced UI |
This parameter indicates that the original setup should wait for the cloned setup process to complete before exiting. By default, the original setup is enabled to wait for the completion of the installation process. For more information on Clone_wait, see Changing the Default Clone_wait Parameter for the Setup. |
|||||||
|
InstallScript |
Specifies that a self-extracting package’s files should not be run but simply extracted to the location that is specified by <path>. |
|||||||
|
Basic MSI, InstallScript MSI |
The build engine automatically creates an installation that supports Setup.exe cloning in cases where cloning is required (for example, multi-disk installations). If you need to do this manually, pass /h to Setup.exe and it will clone itself to a temporary location and run from that location. |
|||||||
|
Basic MSI, InstallScript, InstallScript MSI |
Suppresses the display of any small and standard progress dialogs that might be shown during initialization. The small progress dialog is usually used for installations that display a splash screen during initialization, since a standard-size progress dialog does not leave any space for the splash screen. Specifying the /hide_progress option hides the small progress dialog for those installations, so end users would see just the splash screen without any progress indication. Note • For InstallScript installations: If you specify /hide_progress and include a splash screen in your InstallScript installation, the length of time that the splash screen is displayed depends on whether SmallProgress=Y or SmallProgress=N is specified in Setup.ini.
For InstallScript MSI installations: If you include a splash screen, the installation automatically switches to the small progress dialog, and the splash screen is shown only during the time that the progress dialog is displayed. Note that this is true even if /hide_progress is specified. Therefore, it is recommended that you avoid using /hide_progress with a splash screen in InstallScript MSI installations. |
|||||||
|
InstallScript, InstallScript MSI |
Suppresses the display of the splash screen if one is included. |
|||||||
|
InstallScript |
Suppresses display of the dialog that is displayed by an update-enabled installation to let the end user select which instance of your product will be updated. This dialog is displayed by default when an update-enabled installation detects multiple previous instances. When this command-line option is used and an update-enabled installation detects multiple previous instances, the installation creates a new instance. |
|||||||
|
InstallScript |
Specifies the value of the system variable INSTANCE_GUID; for example, -ig{722C7440-B317-4B3B-AECA-0199EA4E7CDB}. If this option is not used, the installation automatically assigns a value to INSTANCE_GUID (for multi-instance installations, this value is a newly generated GUID; for standard installations, this value is the same as the value of PRODUCT_GUID). This option is useful if you have created an installation launcher—that is, a custom application that runs before your installation does to perform pre-setup tasks, such as determining the instance GUID that you want to use for the installation. Do not specify anything other than a valid GUID with this option. |
|||||||
|
InstallScript |
This option is similar to the media_path option except that this option forces the installation to behave like a launched One-Click Install installation, even if the path to the media files is not a URL. Use this option if you are launching the installation from a Web page manually. In addition, this option is added automatically if the built-in Setup.ocx file is used to launch the installation. |
|||||||
|
InstallScript |
This option indicates that the installation should look for the Disk1 files in the location that is specified. Note that only the Setup.exe file needs to be in the original launch location; the installation obtains all other required files from the specified location (including Setup.exe, which must be present in the media location). You can specify a URL as the path to the media files; in this case, the installation behaves like a launched One-Click Install installation, which always shows the security dialog. To learn more about the behavior of One-Click Install installations, see One-Click Install Installations in InstallScript Projects. |
|||||||
|
Basic MSI, InstallScript, InstallScript MSI |
This option indicates that the installation should run in the specified language as specified. You can specify the language ID as either a hexadecimal or decimal number. If you specify the hexadecimal number, be sure to proceed the value with 0x. For example, the following commands indicate that the installation should be run in German: Setup.exe -L0x0407 Setup.exe -L1031 Note that if you specify a language ID that is not supported by the installation or you specify an invalid language ID, the parameter is ignored. Also note that if this parameter is specified and it is valid, the language dialog (if enabled) is automatically suppressed. |
|||||||
|
Basic MSI, InstallScript MSI |
For a Basic MSI project, the /w option forces Setup.exe to wait until the installation is complete before exiting. Note • If you are using the /w option in a batch file, you may want to precede the entire Setup.exe command-line option with start /WAIT. A properly formatted example of this usage is as follows: start /WAIT setup.exe /w |
|||||||
|
InstallScript MSI |
For an InstallScript MSI project, Setup.exe automatically waits for the installation to finish before exiting, so this option (used by earlier versions of InstallShield Professional) is no longer necessary. |
Backup and Restore Office 2016 / 2019 Activation
If you still couldn’t recover your Office product key, the last resort is to backup Office activation before reinstalling Windows or Office, so you can reactivate it later.
To do this, open File Explorer and browse to the location: C:\Windows\System32\spp. Make a backup copy of all its folders/files and save them to an external USB drive for safekeeping.
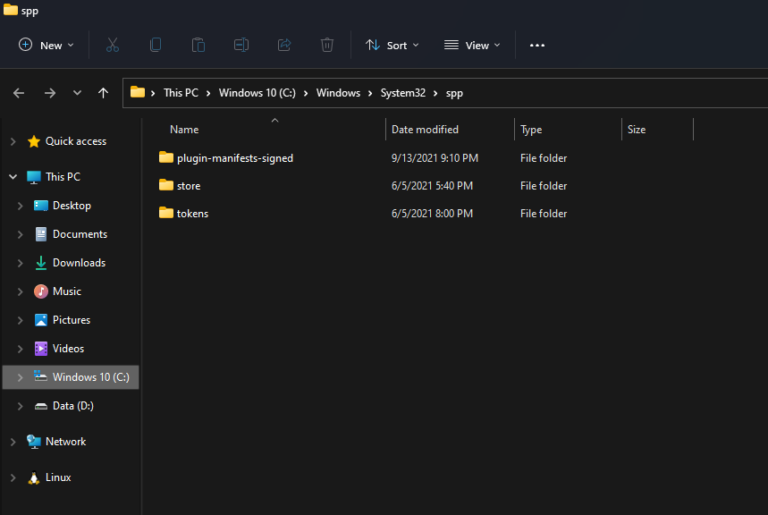
After installing a fresh copy of the same edition of Office, you can activate it by restoring the backup files to its original location: C:\Windows\System32\spp.
When pasting the files, you may get an error message informing me that “The action can’t be completed because the folder or a file in it is open in another program“.
To get around this problem, just close the Office application and run the following command to stop the sppsvc service: net stop sppsvc
When the files are restored, re-launch your Office application and you’ll find the product is already activated. You can also use this method to transfer Office activation over to another computer. But remember to deactivate Office on your old PC before restoring the activation to your new PC.
Drucker-Krams
Drucker vollständig entfernen
#->Powershell ->User: Printqueue anpassen!
Get-WmiObject -Class Win32_Printer | where{$_.Network -eq ‘true‘ -and $_.Name -like "\\ws068\g3716*" -and $_.DriverName -eq "Canon Generic Plus PCL6"}| foreach{$_.delete()}
#->Powershell ->Administrator:
Stop-Service -Name Spooler -Force
Start-Sleep -s 10
Rename-Item -Path "HKLM:\SYSTEM\CurrentControlSet\Control\Print\Environments\Windows x64\Print Processors\CnXP0PP" -NewName CnXP0PP.old
Rename-Item -Path "HKLM:\SYSTEM\CurrentControlSet\Control\Print\Environments\Windows x64\Print Processors\winprint" -NewName winprint.old
Start-Service -Name Spooler
Start-Sleep -s 10
Remove-PrinterDriver –Name "Canon Generic Plus PCL6"
Rename-Item -Path "HKLM:\SYSTEM\CurrentControlSet\Control\Print\Environments\Windows x64\Print Processors\CnXP0PP.old" -NewName CnXP0PP
Rename-Item -Path "HKLM:\SYSTEM\CurrentControlSet\Control\Print\Environments\Windows x64\Print Processors\winprint.old" -NewName winprint
Stop-Service -Name Spooler -Force
Start-Sleep -s 10
Start-Service -Name Spooler
Epson Workforce:
Drucker über die Registry entfernen
Generell sollten Sie an der Registry von Windows nicht viel herumspielen. Kommt es jedoch, wie in diesem Fall zu Problemen, ist eine Lösung des Problems über einen Registry-Eintrag sehr einfach und auch von Laien problemlos durchführbar.
Gehen Sie zu "Start" > " Ausführen" und geben Sie "regedit" ein.
Rufen Sie das Programm anschließend auf.
Gehen Sie nun zu " HKEY_LOCAL_MACHINE > SOFTWARE > Microsoft > Windows NT > CurrentVersion > Print > Printers."
Hier sind alle Ihre installierten Drucker zu finden.
Klicken Sie nun mit der rechten Maustaste auf das Gerät, welches sich nicht entfernen lässt.
Wählen Sie "Löschen" aus, um den Drucker aus Ihrem System zu entfernen.
Führen Sie anschließend einen Neustart durch.
Treiber entfernen:
Lösung:
So bereiten Sie das Entfernen von Druckertreiberdateien vor:
Starten Sie Programme und Funktionen in der Systemsteuerung und deinstallieren Sie jedes Programm, das mit dem Druckertreiber zusammenhängt, den Sie entfernen möchten.
Öffnen Sie anschließend Geräte und Drucker. Sollte der Druckertreiber immer noch vorhanden sein, entfernen Sie ihn, indem Sie mit der rechten Maustaste darauf klicken und „Gerät entfernen“ auswählen.
Wenn Sie diesen Vorgang nicht ausführen, bevor Sie versuchen, die Treiberdateien zu entfernen, wird möglicherweise der Fehler „Zugriff verweigert“ oder „Drucker wird verwendet“ ausgegeben.
So entfernen Sie Druckertreiberdateien vollständig aus dem System:
Führen Sie einen der folgenden Schritte aus, um das Dialogfeld Druckservereigenschaften zu öffnen:
Klicken Sie auf das Startmenü und geben Sie im Suchfeld printui /s /t2 ein. Drücken Sie anschließend die Eingabetaste oder klicken Sie in der Suchliste auf den entsprechenden Eintrag.
Drücken Sie die Tastenkombination Windows+R, um das Fenster Ausführen zu öffnen. Geben Sie printui /s /t2 ein und drücken Sie anschließend die Eingabetaste oder klicken Sie auf OK.
Drücken Sie die Windows-Taste, um den Startbildschirm anzuzeigen. Geben Sie printui /s /t2 ein und klicken Sie anschließend in der Suchliste auf den entsprechenden Eintrag.
Über das Startmenü oder den Startbildschirm:
Öffnen Sie Geräte und Drucker.
Wählen Sie einen Drucker aus, und klicken Sie dann am oberen Rand des Fensters auf „Druckservereigenschaften“.
Klicken Sie auf die Registerkarte Treiber.
Wählen Sie den Druckertreiber aus, der deinstalliert werden soll.
Klicken Sie auf die Schaltfläche Entfernen.
Wählen Sie „Treiber und Treiberpaket entfernen“ aus, und klicken Sie auf „OK“.
Drucker installieren inklusive Treiber mit PowerShell
Mit PowerShell lassen sich einige Prozesse automatisieren, unter anderem auch das Drucker installieren. Aber hierzu gehören natürlich auch das Installieren von Treibern und das Anlegen des Drucker Ports. Wie das mit PowerShell mit Hilfe eines Printserver erledigt werden kann, zeigen wir in diesem Beitrag.
Freigegebenen Drucker eines Printservers installieren
Ist im Netzwerk ein Druckerserver im Einsatz, so ist das Installieren eines Druckers auf dem Windows Client ein Kinderspiel. Unter PowerShell gibt es das Cmdlet Add-Printer welchem der Parameter -ConnectionName übergeben werden kann. Somit weiß PowerShell, dass es sich um einen Netzwerkdrucker handelt.
Add-Printer -ConnectionName \\printserver\druckername
Das Bereitstellen der Treiber und der Port-Konfigurationen übernimmt in diesem Fall der Printserver. Das ist somit die einfachste Methode unter Windows einen Drucker installieren zu lassen.
Lokalen Drucker installieren mit PowerShell
Man hat allerdings nicht immer das Glück einen Printserver zur Verfügung zu haben. Der häufigste Fall ist wohl das Installieren eines lokalen Druckers auf einem Windows Betriebssystem. Auch hier kann PowerShell alle notwendigen Schritte erledigen. Die einzelnen Schritte sind hier zusammengefasst:
- Treiber zu Windows Treiber-Store hinzufügen
- Drucker-Treiber installieren
- Drucker-Port erstellen
- Drucker installieren
Treiber zu Store hinzufügen
Windows besitzt unter folgendem Pfad den so genannten Treiber-Store. Dieser Treiber Store besitzt schon viele Treiber, aber nicht alle, denn es gibt weltweit einfach zu viele verschiedene Geräte.
C:\Windows\System32\DriverStore\FileRepository
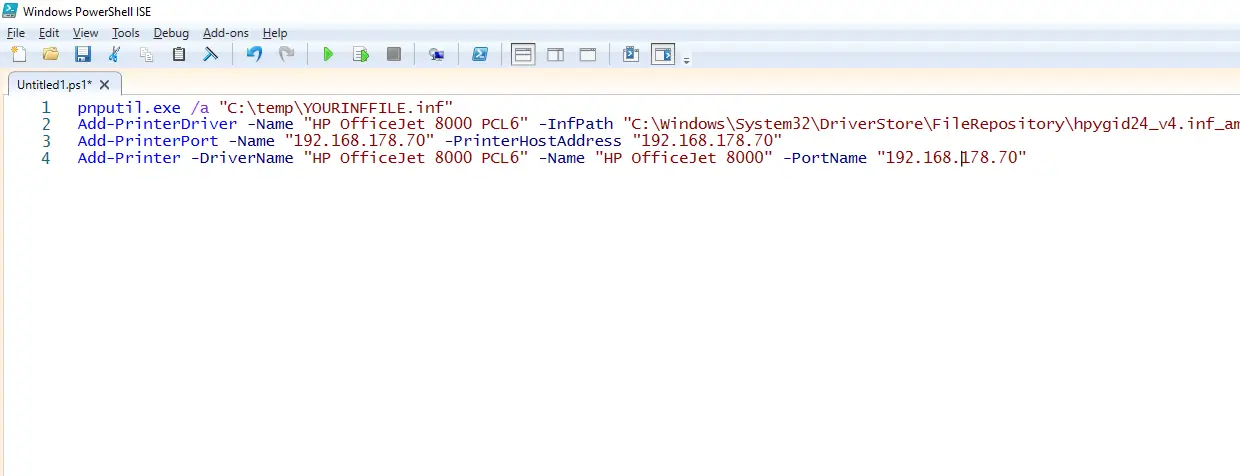
Das Windows interne Tool pnputil fügt den Druckertreiber zum Windows Treiber Store hinzu, sodass wir diesen in den nachfolgenden Schritten installieren können. Achtung: pnputil installiert nicht den Treiber, sondern fügt diesen lediglich zum Store hinzu. Hierzu nutzt man folgenden Befehl, welcher unter CMD und PowerShell funktioniert:
pnputil.exe /a "\\yourshare\HPPrinter\*.inf"
Wurde dieser Befehl ausgeführt, steht dem Installieren des Drucker-Treibers mit PowerShell nichts mehr im Weg.
Drucker-Treiber installieren
Mit pnputil wurde der Treiber eben in den Store importiert. Nun ist es mit PowerShell möglich den Druckertreiber installieren zu lassen. Hierzu wird das Cmdlet Add-PrinterDriver verwendet, mit der Angabe des Namens für den Treiber und die zu verwendende INF-Datei.
Add-PrinterDriver -Name "HP OfficeJet 8000 series PCL6" -InfPath "C:\Windows\System32\DriverStore\FileRepository\YOURDRIVERPATH\YOURINF.inf"
Es ist durchaus nicht einfach die INF-Datei auf Anhieb zu finden, beziehungsweise zu ermitteln, da Treiber-Dateien oft einen “wirren” Namen haben.
Drucker-Port erstellen
Um einen Drucker installieren zu können, benötigt man neben dem Treiber auch einen Port, über den der Drucker kommunizieren kann. In der Regel wird hier die IP-Adresse des Druckers verwendet, wenn es sich um einen Netzwerkdrucker handelt. Unter PowerShell gibt es auch für den Port ein extra Cmdlet Namens Add-PrinterPort. Hier muss der Port-Name und die IP-Adresse angegeben werden um den Port installieren zu können.
Add-PrinterPort -Name "PORT-NAME" -PrinterHostAddress "192.168.178.80"
Natürlich kann der Name frei gewählt werden und die IP-Adresse muss mit der IP des Drucker übereinstimmen. Ist dieser PowerShell Befehl abgesetzt, so wurde der Drucker Port installiert, beziehungsweise angelegt.
Drucker installieren
Nachdem wir den Treiber installiert haben und der Drucker Port angelegt wurde, kann nun der Drucker installiert werden. Auch hier verwendet man das PowerShell Commandlet Add-Printer. Hier müssen allerdings weitere Parameter angegeben werden:
- -DriverName (Name des Treibers)
- -Name (Name des Druckers)
- -PortName (Name des Ports)
Add-Printer -DriverName "HP OfficeJet 8000 series PCL6" -Name "HP OfficeJet 8000" -PortName "PORT-NAME"
Wurden mit PowerShell alle Schritte durchgeführt, so wurde der Drucker inklusive Treiber und Port auf dem Windows Betriebssystem installiert.
Natürlich können alle Befehle kombiniert werden, damit man so wenig wie möglich Tippen muss. 🙂
Beep Code des BIOS
Beep Code des BIOS
Beep Code des BIOS – dies bedeutet das Tonsignal
Hier eine Zuordnung der Beep-Codes zu den entsprechenden Fehlerquellen!
Fangen wir bei einem der BIOS an, das sehr oft zum Einsatz kommt!
Phoenix BIOS Beep Codes
Das Phoenix BIOS kann sehr viele Fehler im Detail signalisieren. Dafür verwendet es eine Abfolge aus kurzen und langen Signalen. Um Euch den Beep-Code etwas zu verdeutlichen, hier ein kleines Beispiel zur Deutung.
Beispiel: 2-2-1 –> zwei kurze Pieptöne – Pause – zwei kurze Pieptöne – Pause – ein langer Piepton
Die Zahl „1“ bedeutet immer einen längeren Beep-Ton. Eine größere Zahl, eine Abfolge von kurzen Beep-Tönen.
1 – 1 – 2 CPU / motherboard failure Bad CPU / motherboard
1 – 1 – 3 CMOS read/write failure Bad motherboard
1 – 1 – 4 BIOS ROM failure Bad BIOS chip
1 – 2 – 1 Timer failure Bad motherboard
1 – 2 – 2 DMA failure Bad motherboard
1 – 2 – 3 DMA failure Bad motherboard
1 – 3 – 1 Memory refresh failure Bad memory
1 – 3 – 2 64K memory failure Bad memory
1 – 3 – 3 64K memory failure Bad memory
1 – 3 – 4 64K memory failure Bad memory
1 – 4 – 1 Address line failure Bad memory
1 – 4 – 2 Parity error Bad memory
1 – 4 – 3 Timer failure Bad motherboard
1 – 4 – 4 NMI port failure Bad motherboard
2 – 1 – 1 64K memory failure Bad memory
2 – 1 – 2 64K memory failure Bad memory
2 – 1 – 3 64K memory failure Bad memory
2 – 1 – 4 64K memory failure Bad memory
2 – 2 – 1 64K memory failure Bad memory
2 – 2 – 2 64K memory failure Bad memory
2 – 2 – 3 64K memory failure Bad memory
2 – 2 – 4 64K memory failure Bad memory
2 – 3 – 1 64K memory failure Bad memory
2 – 3 – 2 64K memory failure Bad memory
2 – 3 – 3 64K memory failure Bad memory
2 – 3 – 4 64K memory failure Bad memory
2 – 4 – 1 64K memory failure Bad memory
2 – 4 – 2 64K memory failure Bad memory
2 – 4 – 4 64K memory failure Bad memory
2 – 4 – 4 64K memory failure Bad memory
3 – 1 – 1 Slave DMA failure Bad motherboard
3 – 1 – 2 Master DMA failure Bad motherboar
3 – 1 – 3 Interrupt controller failure Bad motherboard
3 – 1 -4 Slave IC failure Bad motherboard
3 – 2 -2 Interrupt Controller failure Bad motherboard
3 – 2 – 3 <RESERVED>
3 – 2 – 4 Keyboard control failure Bad motherboard
3 – 3 – 1 CMOS batter failure Bad CMOS battery
3 – 3 – 2 CMOS configuration error Incorrect setting
3 – 3 – 3 <RESERVED>
3 – 3 – 4 Video memory failure Bad video card or memory
3 – 4 – 1 Video init failure Bad video card or memory
4 – 2 – 1 Timer failure Bad motherboard
4 – 2 – 2 CMOS shutdown failure Bad motherboard
4 – 2 – 3 Gate A20 failure Bad motherboard
4 – 2 – 4 Unexpected interrupt Bad processor
4 – 3 – 1 RAM test failure Bad memory
4 – 3 – 3 Timer failure Bad motherboard
4 – 3 – 4 RTC failure Bad motherboard
4 – 4 – 1 Serial port failure Bad motherboard
4 – 4 – 2 Parallel port failure Bad motherboard
4 – 4 – 3 Coprocessor failure Bad motherboard or CPU.
9 – 2 – 1 Video adapter incompatibility Use a different brand of video card
AMI BIOS Beep Codes
Ähnlich funktioniert die Erkennung des Fehlers beim AMI BIOS.
1 lang Power on Self Test erfolgreich
1 kurz DRAM refresh Fehler
2 kurz Parity Fehler
3 kurz Base 64K RAM Fehler
4 kurz System timer Fehler Batterie leer oder Mainboard defekt
5 kurz Prozessor (CPU) Fehler
6 kurz Tastaturkontrollerfehler
7 kurz Virtual mode exception Fehler
8 kurz Grafikkarten Speicher Fehler
9 kurz ROM BIOS checksum Fehler
10 kurz Systemboard Fehler
11 kurz Cache Speicher Fehler
1 lang, 1 kurz Systemboard fehler
1 lang, 2 kurz Grafkkartenfehler
1 lang, 3 kurz Conventional/Extended memory failure
1 lang, 4 kurz Timer defekt
1 lang, 5 kurz Prozessor (CPU) Fehler
1 lang, 6 kurz Tastaturkontroller defekt
1 lang, 7 kurz Virtual Mode Problem
1 lang, 8 kurz Grafik Speicher Fehler
1 lang, 9 kurz Checksum Fehler
2 kurz, einmal lang Grafikkarten Kontaktfehler
2 lang, 2 kurz Videofehler
3 kurz, 3 lang, 3 kurz RAM defekt
Dauerton Netzteil defekt
Award BIOS Beep Codes
Hier läuft die Erkennung des Fehlers wieder über unterschiedliche längen der Signalisierung ab. Zusätzlich kommen beim Award BIOS auch noch unterschiedliche Tonhöhen zum Einsatz.
1 lang, 2 kurz Grafik-Problem (das System kann keine zusätzlichen Infos anzeigen)
1 lang, 3 kurz keine Grafikkarte oder defekter Grafikspeicher
hoch frequente beeps während Betreib CPU zu heiß
wiederholt hoch tief Prozessor (CPU)
wiederholt (endlos) Speicherfehler
alle anderen beep(s) Speicher
IBM BIOS Beep Codes
Auch hier kommt eine Kombination aus kurzen und langen Beeps zum Einsatz.
1 kurz Beep normaler start, computer ist ok.
2 kurz Beep POST error, zusätzlicher Fehlercode wird am Bildschirm angezeigt
kein Beep Netzteil, systemboard, prozessor fehler
dauer Beep Netzteil, Systemboard, Tastatur Problem
wiederholt kurzer Beep Netzteil oder Systemboard problem
1 lang, 1 kurzer Beep Systemboard Problem
1 lang, 2 kurze Beeps Grafikkarten Problem
1 lang. 3 kurze Beeps Grafikkarten Problem
3 lange Beeps Tastaturproblem
TIPP: Wenn sich das BIOS mit Fehler-Code meldet und der Rechner nicht mehr starten möchte, liegt es zu über 90 Prozent am Arbeitsspeicher oder an der Grafikkarte! Dies ist zumindest meine persönliche Erfahrung. Checkt dann, ob alle Speicher-Riegel und Karten richtig gesteckt sind. Hin und wieder hilft es auch die Speicher auf andere Bänke zu stecken oder temporär einen anderen Speicher zu verwenden. Oft funktioniert danach auch wieder der Original-Speicher! Fragt mich bitte nicht woran dies liegt – es ist halt so! Bei Problemen mit der Grafikkarte reicht es auch hin und wieder aus, diese zu entfernen und wieder in das System einzusetzen. Dies führt jedoch nicht so oft zum Erfolgt wie der „Trick“ mit den Speicherriegeln! ;)
Version #1
Erstellt: 10 February 2023 12:02:10 von willi
Zuletzt aktualisiert: 10 February 2023 12:05:32 von willi
Windows 10 Benutzerprofile sauber löschen
Ein Windows 10 Benutzerprofil kann man über die „Erweiterten Systemeinstellungen“ sauber löschen.
Die Schnellversion (Admin Eingabeaufforderung, cmd STRG+SHIFT+ENTER)
rundll32.exe sysdm.cpl,EditUserProfiles
Ein anderer Weg: In der Windows Suche, oder im Ausführen Dialog (Windows-Taste + R) gibt man ein:
sysdm.cpl
Klassisch kann man auch wie folgt aufrufen:
Systemsteuerung > System & Sicherheit > System > Erweiterte Systemeinstellungen (im linken Menü)
Nun begibt man sich dort auf die Registerkarte Erweitert. Mittig findet man die Benutzerprofile, dort klickt man den Button Einstellungen.
Im folgenden Fenster kann man das gewünschte Benutzerprofil auswählen und über den Button Löschen mit Windows Bordmitteln sauber entfernen.
Man sollte bei weiteren Problemen auch den jeweiligen Registry Schlüssel löschen.
Die Registry öffnet man mit regedit über die Windows Suche.
Diesen findet man unter:
HKEY_LOCAL_MACHINE\SOFTWARE\Microsoft\Windows NT\CurrentVersion\ProfileList
Dies und das
For ZCM prior to 11.2.3a: If the data in sectors 6-63 is not required, then to clear the space (after taking a backup, see Additional Information section below), at the bash prompt issue the following command:
dd if=/dev/zero of=/dev/hda bs=512 seek=5 count=58
N.B. for SCSI or SATA, use:
dd if=/dev/zero of=/dev/sda bs=512 seek=5 count=58
Be very careful to get the syntax correct when issuing "dd" commands on disks that contain data, as using the wrong parameter may erase all of the data on the disk.
Blur-Effekt beim Anmeldebilschirm auscchalten:
Den "blurrigen" Acryl Effekt kann man natürlich auch in den Gruppenrichtlinien deaktivieren oder aktivieren.
- Windows-Taste + R gpedit.msc eingeben und starten
- Computerkonfiguration -> Administrative Vorlagen -> System -> Anmelden
- Im rechten Fensterteil nun Durchsichtigen Anmeldehintergrund anzeigen doppelt anklicken
- Aktiviert: Der Anmeldebildschirm wird wieder wie gewohnt angezeigt
- Nicht konfiguriert oder Deaktiviert: Das Hintergrundbild bei der Anmeldung ist verschwommen
IFalls ihr bei der Installation eines Lenovos aktuell Probleme habt, dass der Power Management Driver nicht installiert wird (bzw. die Kiste dabei hängt),
C:\Windows\System32\taskkill /IM n3xku04w.exe /F
C:\Windows\System32\taskkill /IM n3xku04w.tmp /F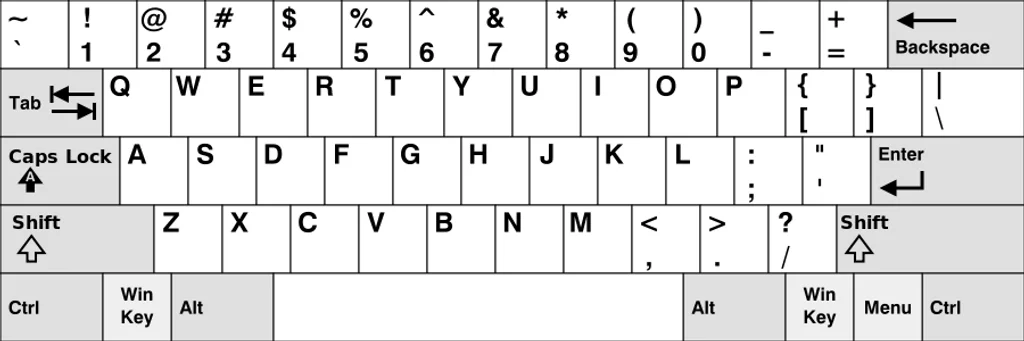
Zenworks
zac reg -g https://zenworks.stadt.muenster.de:444 -u a_benutzername
Windows 11 ohne Microsoft-Konto
Wenn das Internet deaktiviert ist, startet man die Neuinstallation von Windows 11. Man kommt bis zum Fenster: "Leider haben Sie die Internetverbindung verloren". Ab hier geht es dann los:
- Umschalt + F10 drücken. Die Eingabeaufforderung öffnet sich
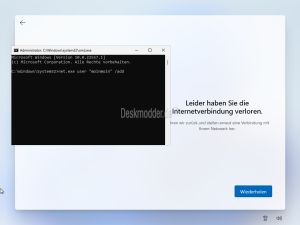
- Hier nun net.exe user "moinmoin" /add eintragen (Anstatt moinmoin natürlich euren Namen)
- Danach net.exe localgroup "Administratoren" "moinmoin" /add

- Jetzt: cd OOBE
- Danach dann msoobe.exe && shutdown.exe -r
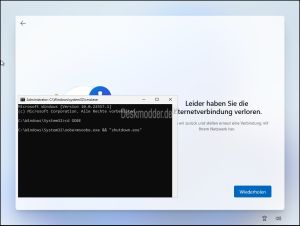
- Windows startet jetzt neu und beginnt mit den weiteren Einstellungen bis Windows 11 dann korrekt mit einem lokalen Konto installiert ist.

Bei der Anmeldung erscheint jetzt "Der Benutzername oder das Kennwort ist falsch".
Hier einfach auf OK drücken und links unten das richtige Konto auswählen.
Danach kann man die Internetverbindung wieder aktivieren und dem Konto auch ein Passwort hinzufügen, sowie alle weiteren Einstellungen vornehmen.
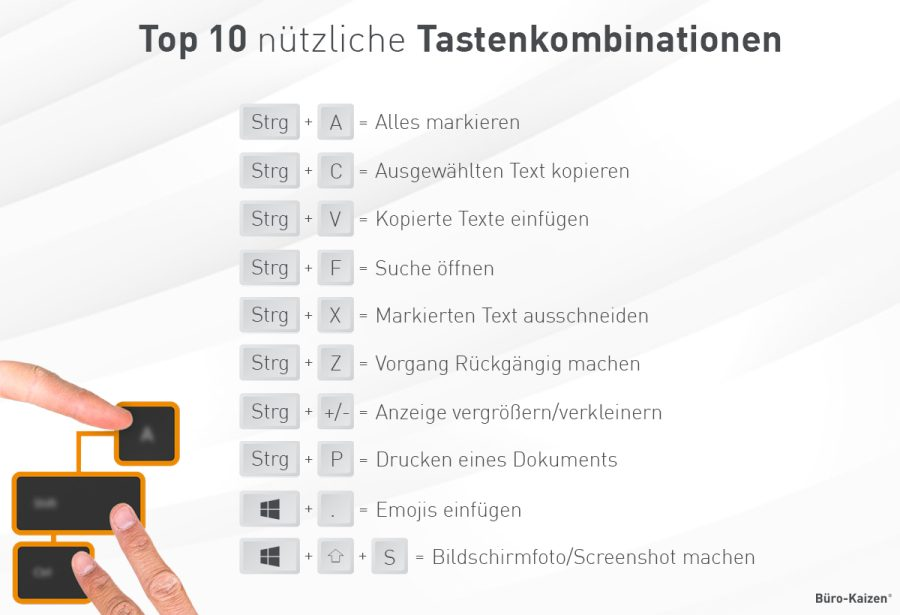
Schortcuts
Mit diesen 70 Shortcuts (Tastenkombinationen) für Windows sparen Sie jeden Tag wertvolle Zeit und noch wertvollere Nerven! Ich musste heute Morgen eine große Anzahl an Dokumenten speichern und das an verschiedenen, ganz speziellen Orten. Früher hätte ich das alles mit der Maus erledigt. Wenn ich jetzt daran denke, wieviel Nerven, Zeit und letztendlich Geld mich das gekostet hat, kann ich nur den Kopf schütteln.
Inhaltsverzeichnis
1. Unbekannte Shortcuts/Tastenkombinationen
Eigentlich sollte es in jedermanns Interesse liegen den eigenen Computer und seine wunderbaren Funktionen in- und auswendig zu kennen. In der Praxis sehe ich jedoch: Das ist meist nicht so.
Gibt es Dinge, die Ihnen am Computer vielleicht umständlich vorkommen? Dann gibt es mit einer relativ hohen Wahrscheinlichkeit ein viel praktischeres Tastaturkürzel dafür. Ein Tastaturkürzel vereinfacht in fast allen Fällen die Zusammenarbeit zwischen Mensch und Maschine.
Mit Shortcuts sparen Sie eine Menge Zeit. Dadurch verdienen Sie am Ende Geld und sparen Nerven! Genau aus diesem Grund kennen auch Sie einige Tastaturkürzel die Ihren Alltag bereits spürbar erleichtern. Doch nutzen wir alle tendenziell nicht genug Kombinationen. Mit ein wenig Wissen um die zahlreichen zur Verfügung stehenden Helfer werden Sie Ihre Effizienz um ein Vielfaches steigern. Allerdings funktionieren die Tastenkombinationen nicht auf jedem Gerät gleich. Die Shortcuts auf dem Mac funktionieren nicht automatisch auch bei Windows-Geräten. Deshalb wollen wir Ihnen nun einen Einblick in die Welt der Windows-Kurzbefehle geben.
2. Die wichtigsten Shortcuts für effiziente Büroarbeit
Die folgenden Funktionen können Sie überall anwenden, wenn Sie mit einem Windows PC arbeiten. Egal ob Sie E-Mails beantworten, an einer Word- oder PowerPoint-Datei arbeiten…
| Befehl | Tastenkombination |
|
Ausgewählten Inhalt kopieren |
STRG + C |
|
Ausgewählten Inhalt einfügen |
STRG + V |
|
Mehrfachauswahl |
STRG + Maus |
|
Alles markieren |
STRG + A |
|
Ausgewählten Inhalt ausschneiden |
STRG + X |
|
Rückgängig |
STRG + Z |
|
Wiederherstellen |
STRG + Y |
|
Neues Dokument/Fenster erstellen |
STRG + N |
|
Neuen Ordner erstellen |
STRG + Shift + N |
|
Vorhandene Datei öffnen |
STRG + O |
|
Zum Anfang des Dokuments wechseln |
STRG + POS1 |
|
Zum Ende des Dokuments wechseln |
STRG + ENDE |
|
Suche im Dokument |
STRG + F |
|
Größe der Seite ändern (auszoomen/einzoomen) |
STRG + Maus-Scrollrad |
|
Cursor an den Anfang des vorherigen Wortes |
STRG + ⇐ |
|
Cursor an den Anfang des nächsten Wortes |
STRG + ⇒ |
3. Tastaturkürzel für Windows-Nutzer
Manche Shortcuts stehen nur für Windows-Nutzer zur Verfügung, da sie in der Regel in Kombination mit der Windows-Taste ausgeführt werden:
| Befehl | Tastenkombination |
|
Taskmanager/Anmeldebildschirm aufrufen |
STRG + ALT + ENTF |
|
Geöffnete Windows-Anwendung wechseln |
ALT + TAB |
|
Windows-Anwendung wechseln (Rückwärts) |
ALT + Shift + TAB |
|
Geöffnetes Fenster minimieren |
Windows + ⇓ |
|
Verkleinertes Fenster vergrößern |
Windows + ⇑ |
|
Geöffnetes Fenster links anordnen |
Windows + ⇐ |
|
Geöffnetes Fenster rechts anordnen |
Windows + ⇒ |
|
Windows-Anwendungen wechseln mit 3D-Effekt |
Windows + TAB |
|
Alle auf der Taskleiste vorhandenen Fenster minimieren |
Windows + M |
|
Alle Fenster auf der Taskleiste minimieren bzw. |
Windows + D |
|
Durch die Programme der Taskleiste navigieren |
Windows + T |
|
Rückwärts durch die Programme der Taskleiste |
Windows + Shift + T |
|
Fenster innerhalb der Anwendung wechseln |
STRG + TAB |
|
Fenster innerhalb der Anwendung wechseln |
STRG + ⇑ + TAB |
|
Fenster innerhalb der Anwendung schließen |
STRG + F4 |
|
Fenster schließen |
ALT + F4 |
|
Startmenü aufrufen |
STRG + ESC |
|
Taskmanager aufrufen |
STRG + Shift + ESC |
|
Ausführen |
Windows + R |
|
Computer sperren |
Windows + L |
|
Windows-Explorer öffnen |
Windows + E |
|
Windows-Suche öffnen |
Windows + F |
|
Präsentationsmodus |
Windows + P |
|
Systemeigenschaften öffnen |
Windows + Pause |
|
Kopiert Bildschirmfotos in die Zwischenablage |
Windows + Druck |
|
Kopiert Bildschirmfotos des aktiven Fensters in |
Windows + ALT + Druck |
|
Screenshot/Bildschirmaufnahme |
Windows + Shift + S |
|
Zwischenablage abrufen |
Windows + V |
4. Shortcuts für den Browser
Die folgenden Shortcuts können Sie bei Ihrer täglichen Nutzung des Browsers anwenden. Es ist egal, welchen Browser Sie dafür verwenden (Google Chrom, Microsoft Edge oder Mozilla Firefox).
| Befehl | Tastenkombination |
|
Neuen Tab öffnen |
STRG + T |
|
Aktuelle Seite als Lesezeichen speichern |
STRG + D |
|
Den geöffneten Tab schließen |
STRG + W |
|
Seite neu laden |
STRG + R = F5 |
|
Mit dem Cursor in die Adresszeile gelangen |
STRG + L |
|
Ansicht vergrößern |
STRG + + |
|
Ansicht verkleinern |
STRG + – |
5. Tastenkombinationen zur Dokumentbearbeitung
Man denkst es kaum, doch selbst beim Schreiben von Texten können Sie sich mit ein paar kleinen Funktionen den Arbeitsalltag enorm erleichtern.
| Befehl | Tastenkombination |
|
Schriftgröße um einen Punkt verringern |
STRG + 8 |
|
Schriftgröße um einen Punkt vergrößern |
STRG + 9 |
|
Fett |
STRG + Shift + F |
|
Unterstreichen |
STRG + Shift + U |
|
Kursiv |
STRG + Shift + K |
|
Hochgestellt |
STRG + + |
|
Tiefgestellt |
STRG + # |
|
Geschütztes Leerzeichen |
ALT + 0160 |
|
Gedankenstrich |
ALT + 0150 |
|
Speichern |
STRG + S |
|
Speichern unter |
STRG + ⇑ + S = F12 |
|
|
STRG + P |
6. Shortcuts für (Sonder)-Zeichen
Mit der Alt-Taste an Windows-PCs können Sie viele Sonderzeichen innerhalb von Sekunden verwenden:
| Zeichen | Befehl | Tastenkombination |
| „ |
Anführungszeichen unten (öffnend) |
Alt + 0132 |
| “ |
Anführungszeichen oben (schließend) |
Alt + 0147 |
| ‚ |
Anführungszeichen unten (einfach öffnend) |
Alt + 0130 |
| ‘ |
Anführungszeichen oben (einfach schließend) |
Alt + 0145 |
| – |
Gedankenstrich |
Alt + 0150 |
| ’ |
Apostroph |
Alt + 0146 |
| [ |
Öffnende eckige Klammer |
Alt Gr + 8 |
| ] |
Schließende eckige Klammer |
Alt Gr + 9 |
| { |
Öffnende geschweifte Klammer |
Alt Gr + 7 |
| } |
Schließende geschweifte Klammer |
Alt Gr + 0 |
| | |
Senkrechter Strich |
Alt Gr + < |
| \ |
Umgekehrter Schrägstrich (Backslash) |
Alt Gr + ß |
| ® |
Registered Trademark |
Alt + 0174 |
| © |
Copyright |
Alt + 0169 |
| ™ |
Trademark |
Alt + 0153 |
| ∗ |
Sternchen (Asterisk) |
Shift + + |
| ° |
Gradzeichen |
Shift + ^ |
| ∼ |
Tilde (mathematisch) |
Alt Gr + + |
| π |
Pi |
Alt + 0227 |
7. Die F-Tastenkombinationen
Die Funktionstasten(F-Tasten) im oberen Bereich der Tastatur gehen häufig unter, doch Sie bieten eine schnelle Hilfe bei der Ausführung von Befehlen. Oft können sie auch in Kombination mit anderen Tasten weitere Befehle ausüben.
| Befehl | Tastenkombination |
|
Schnellaufruf von Hilfestellungen |
F1 |
|
Dateien umbenennen |
F2 |
|
Suchfeld |
F3 |
|
Aufrufen der Adresszeile im Internet-Explorer |
F4 |
|
Aktualisiert die geöffnete Webseite im Browser |
F5 |
|
URL in der Adresszeile markieren |
F6 |
|
Funktioniert nur in Kombination mit anderen Tasten |
F7 |
|
Abgesicherter Modus |
F8 |
|
Funktioniert nur in Kombination mit anderen Tasten |
F9 |
|
Menüleiste im Browser auswählen |
F10 |
|
Vollbildmodus aktivieren |
F11 |
|
Funktioniert nur in Office-Programmen |
F12 |
8. Mit einem Shortcut überall Emojis einfügen können
Eine Tastenkombination, die bisher noch nicht aufgeführt wurde, ist das Erstellen von einer Vielzahl an Emojis in Outlook und co. Die meisten wissen zwar, dass man mit einem Doppelpunkt und einer schließenden Klammer :) auch einen Smiley erstellen kann. Doch mit dem Shortcut Windows + Punkt können Sie mehr als 200 Smileys verwenden.
9. Anwendung von Shortcuts im Alltag
Natürlich ist es nicht Ihre Aufgabe all diese Tastaturkürzel auswendig zu lernen. Suchen Sie sich 1 bis 2 Kürzel heraus, von denen Sie wissen, dass Sie in Ihren Alltag passen. Arbeiten Sie mit diesen für zwei Wochen. Dann können Sie die nächsten auswählen. Sie werden merken: Je mehr Sie sie benutzen, umso leichter gehen Ihnen die Aktionen von der Hand. Nach etwas Eingewöhnungszeit kann ich Ihnen versprechen: Sie arbeiten unkomplizierter, schneller und vor allem: Komfortabler!
Video-Anleitung zu den 7 erstaunlichsten Tastenkombinationen
Die 7 besten Tastenkombinationen für Windows, die du kennen musst!
(Dauer: 06:46 Minuten)
Inhalt dieses Video-Tutorials:
- Einleitung 00:00
- Geteilter Bildschirm zwischen zwei Apps 00:16
- Virtuellen Desktop erstellen & verwenden 00:51
- Zwischenablageverlauf öffnen 01:30
- Desktop anzeigen & alle Apps minimieren 02:43
- Screenshots erstellen 03:17
- Emojis & GIFs einblenden 04:29
- Bildschirmvideos aufnehmen (Xbox Game Bar) 05:06
10. Der Unterschied zwischen CTRL- und der STRG-Taste
Die Abkürzung CTRL steht für das englische Wort „control“. Im deutschen entspricht diese Taste der STRG-Taste (das steht für Steuerung). Diese Taste wird nur in Kombination mit anderen Tasten verwendet um Funktionen auszuführen.
Bios F-Tasten
Häufige Tastenkombinationen für BIOS und Boot-Menü (BIOS Keys)
| Hersteller | Aufruf BIOS-Menü | Aufruf Boot-Menü |
| Acer | F2 oder ENTF | F12 |
| ASRock | F2 oder ENTF | F11 |
| ASUS | F2 oder F10 | ESC |
| Dell | F2 | F12 |
| Fujitsu | F2 | F12 |
| Gigabyte | ENTF | - |
| HP | F2 oder F10 | F9 oder ESC |
| Intel | F2 | F12 |
| Lenovo | F1 | F12 |
| Medion | F2 | F10 |
| Microsoft | Lauter und Power | |
| MSI | ENTF | F11 |
| Samsung | F2 | ESC |
| Sony | F2 | F11 |
| Terra | F2 | F7 |
| Toshiba | Starten mit ESC gedrückt, dann F1 | F12 |
| Zotac | ENTF | F12 |
Win3.11
Inatallationsanleitung für DOS-Box
DosBox, Windows 3.11 & Games
Mitunter soll ältere Software nochmal zum Laufen gebracht werden. Gründe gibt es mindestens zwei: man will ältere Dokumente lesen und benötigt den entsprechenden Reader oder … „Just4Fun“ …man will nochmal ein altes Spiel von früher Spielen. Ich habe letzteres mit „Mamba“ probiert.
Benötigt wurde dafür Windows 3.11 und ich hatte ein Ubuntu 18.04.
Die Schritte in der Übersicht:
- DosBox installieren
- Laufwerk anlegen und einbinden
- Windows 3.11 installieren
- Mamba auf das Laufwerk auf und starten
…und nun die Details…
DosBox installieren
Unter Ubuntu reicht hier ein apt-get install dosbox. Danach muss ein Ordner für evtl. Konfigurationen und das Laufwerk angelegt werden: mkdir ~/.dosbox.
Laufwerk anlegen und einbinden
Für das Laufwerk (c:) muss ein Unterverzeichnis in ~/.dosbox und ein Konfiguration (~/.dosbox/dosbox.conf bzw. ~/.dosbox/dosbox-VERSION.conf) angelegt werden:
mkdir ~/.dosbox/drive_c
Die Datei ~/.dosbox/dosbox.conf muss folgenden Inhalt haben:
[autoexec]
mount c ~/.dosbox/drive_cWindows 3.11 installieren
Zunächst muss man sich die Windows 3.11-Disketten besorgen. Ich hatte 8 Disketten-Images. Diese habe ich einzeln gemounten und in einen Installationsordner kopiert:
mkdir ~/.dosbox/drive_c/install
for i in `seq 1 8`; do
sudo mount -o loop Disk0$i.img /mnt
cp /mnt/* ~/.dosbox/drive_c/install
sudo umount /mnt
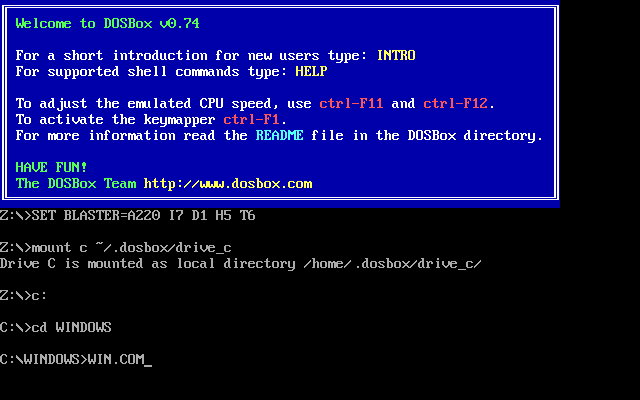
doneNun „dosbox“ starten und dort ins Laufwerk „c:“ und in den Ordner „c:/install“ wechseln. Jetzt kann mit „setup.exe“ die Win3.11-Installation beginnen.
Mamba auf das Laufwerk auf und starten
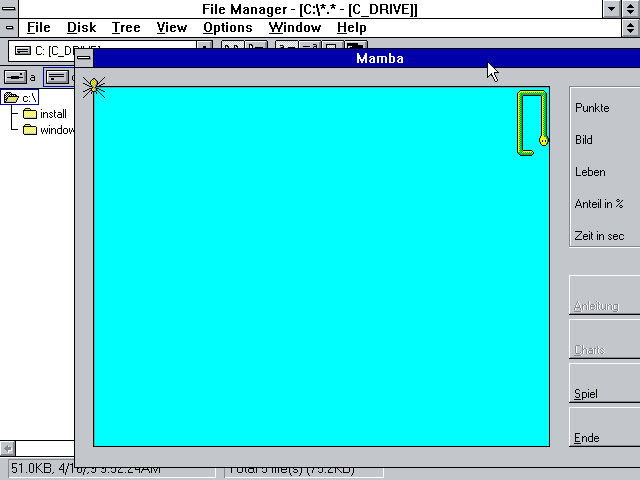
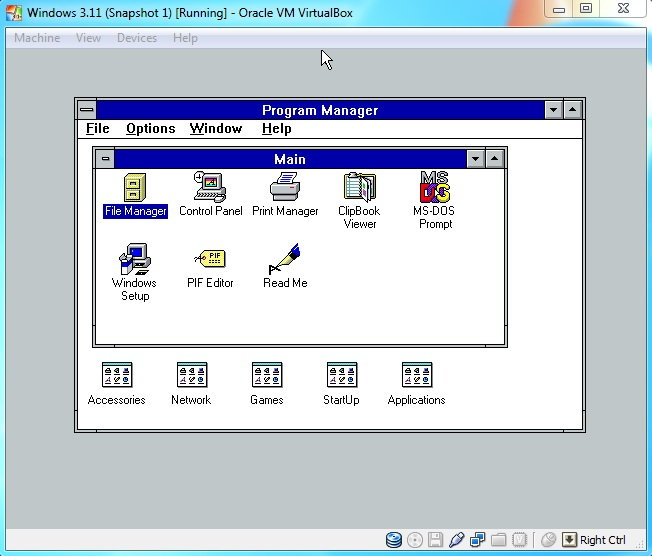
Zum Schluss wird Mamba in das Verzeichnis ~/.dosbox/drive_c kopiert. Nun Windows hochfahren, den File Manager öffnen und Mamba starten.
-

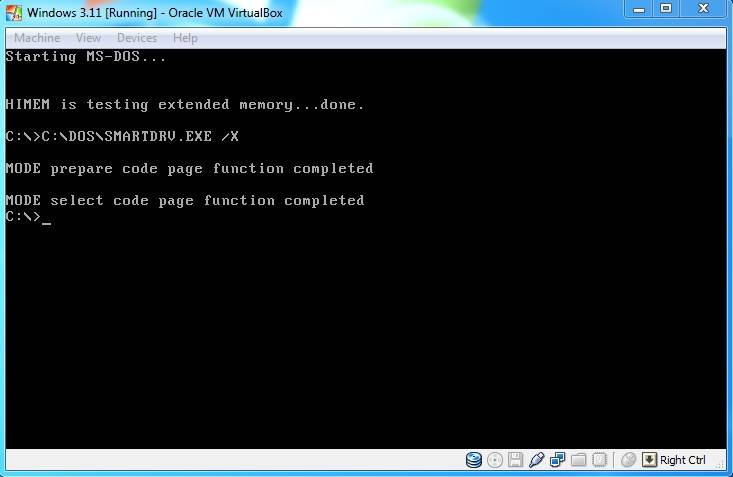
Windows aus DOS heraus starten. -

File Manager öffnen -

Mamba spielen

Linkliste
- https://www.dosbox.com/
- DosBox unter Ubuntu: https://wiki.ubuntuusers.de/DOSBox/
- Mounten via Loop Device: https://de.wikipedia.org/wiki/Loop_device
- Windows 3.11 im Internet suchen
- Mamba
Tutorial: Installing Windows 3.11 with (working) drivers! [Updated]
---------------------------------------------------------------------------------------------------------------------------------------------------------------------------------------
Tutorial: Installing Windows For Workgroups 3.11 (Windows 3.11) on VirtualBox with full driver support.
Introduction
For this Tutorial VirtualBox has to be installed (correctly) on your computer.
This tutorial was tested on the hosts Windows 7 SP1 and Linux (Ubuntu 11.04). But should probably work on other hosts as well.
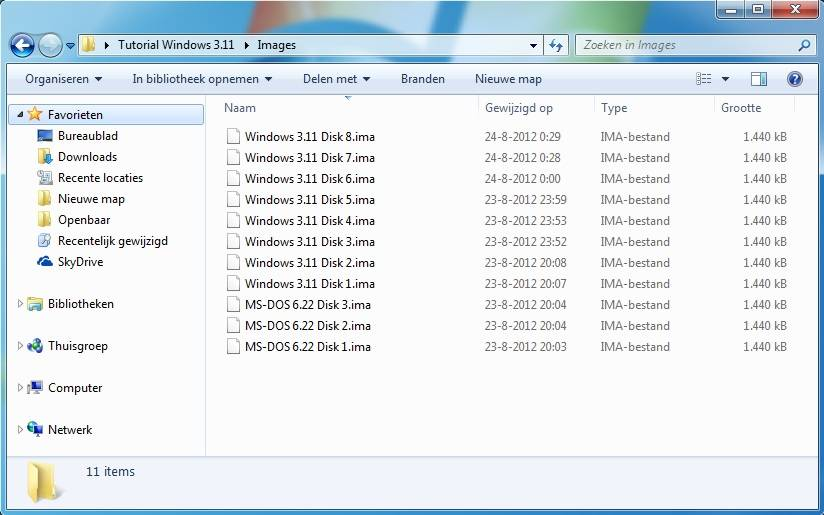
For this tutorial I used my 3.5-inch floppy disks of MS-DOS 6.22 and Windows 3.11. My present pc no longer has a floppy disk drive, so I used an old pc to create floppy images (.IMA) from my old floppy's.
-

- floppyimages.jpg (55.78 KiB) Viewed 90277 times
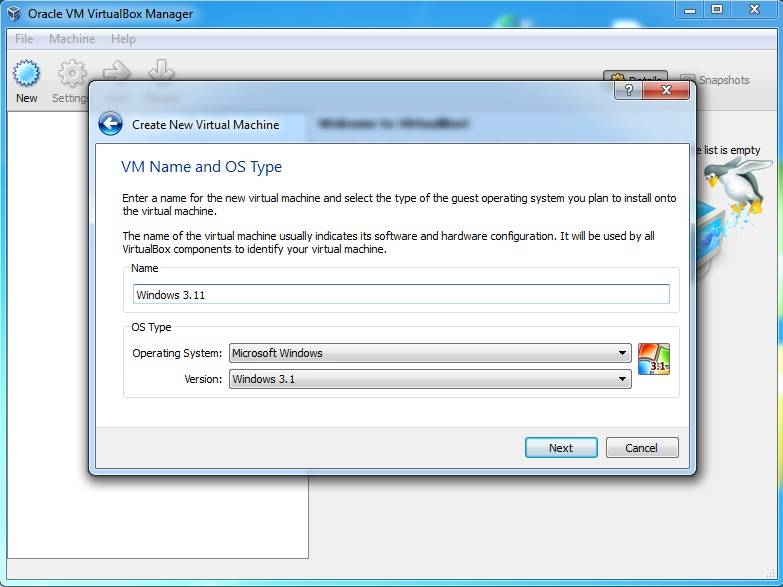
Create a virtual machine
Create in VirtualBox a new virtual machine with the name Windows 3.11 or any name you like. By OS Type select the Operating System: Microsoft Window. Under version select: Windows 3.1.
-

- vitualboxnewvm.jpg (50.34 KiB) Viewed 90277 times
By memory use the default Base memory size of 32 megabyte.
Hit Next.
Create a new hard disk.
Hit Next.
Use the default file type: VDI (Others may also work).
Hit Next.
By storage details use the option you like (I used Dynamically allocated)
Hit Next.
If you like, you can give the virtual disk another name or location.
Use the default disk size of 1,00 Gigabyte (MS-DOS 6.22 can only recognise hard disks up to 2.1 GB)
Hit Next, then two times Create to create the virtual machine.
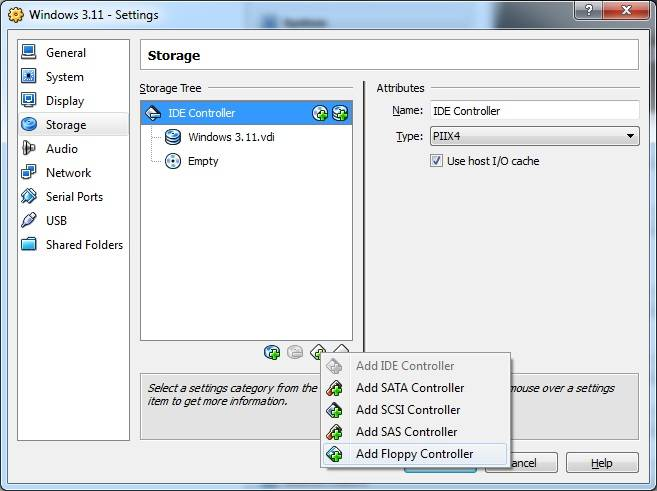
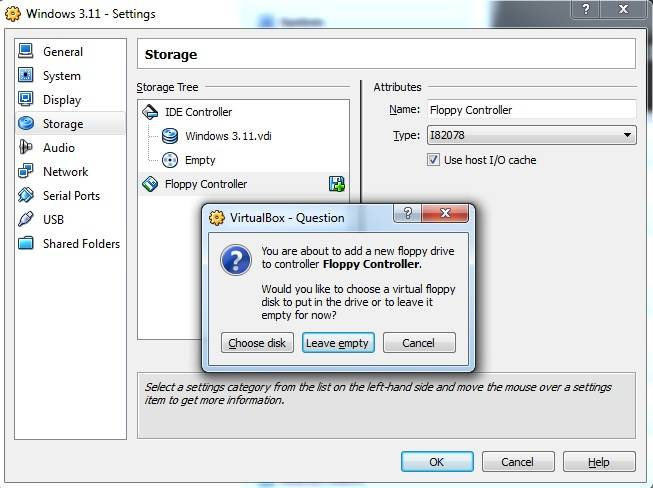
Adding a Floppy Controller
Right click on the new virtual machine, then Settings, under Storage click: Add floppy controller.
-

- newvmcreatedfloppy.jpg (38.54 KiB) Viewed 90193 times
-

- floppyleaveempty.jpg (44.12 KiB) Viewed 90193 times
Selecting the MS-DOS Boot floppy
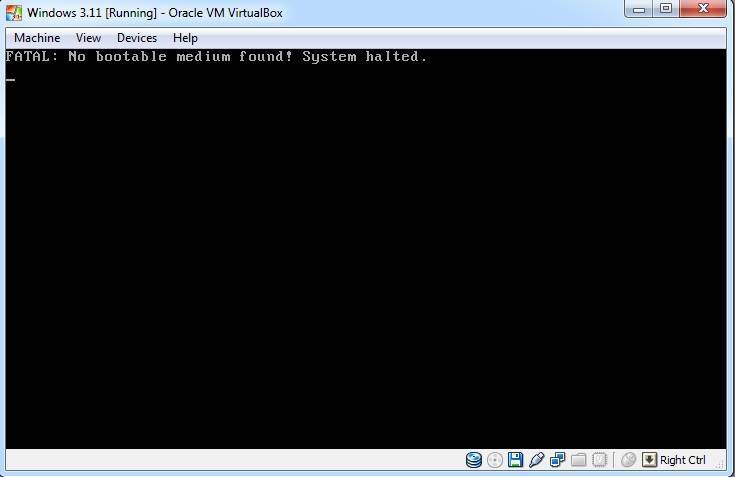
Now that your virtual machine is running you will get the following message:
-

- vmrunninghalted.jpg (18.19 KiB) Viewed 90084 times
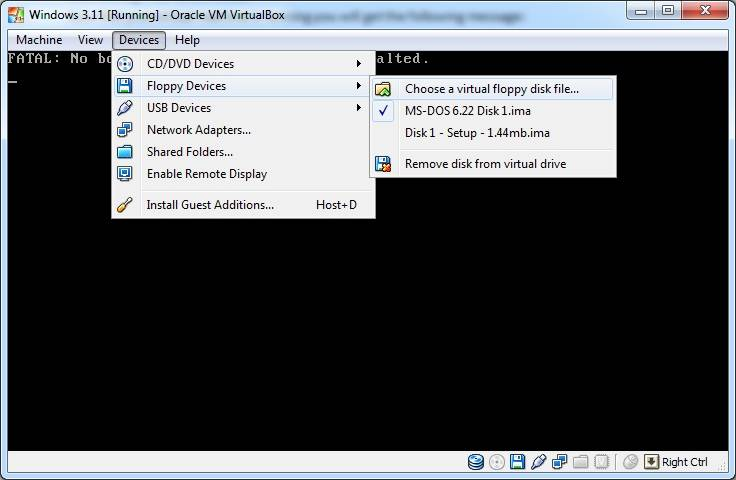
-

- vmrunningselectmsdosflo.jpg (32.7 KiB) Viewed 90084 times
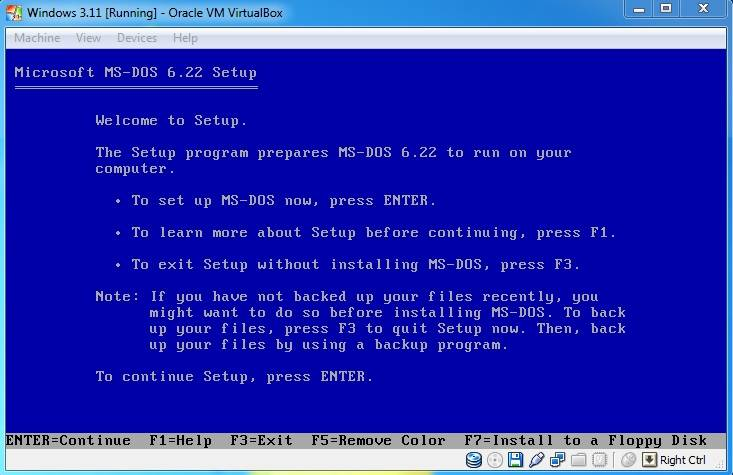
After the reboot VirtualBox loads the floppy Image and it will show the MS-DOS setup screen.
-

- msdossetup.jpg (49.46 KiB) Viewed 90084 times

Installing MS-DOS 6.22 (Format virtual hard disk)
Next Choose: Configure Unallocated disk space.
Next, hit Enter to reboot your virtual machine.
After the reboot MS-DOS will format the virtual hard disk.
-
- msdosformat.jpg (31.13 KiB) Viewed 90132 times
-

- msdossetuphitf8screen.jpg (26.61 KiB) Viewed 90132 times
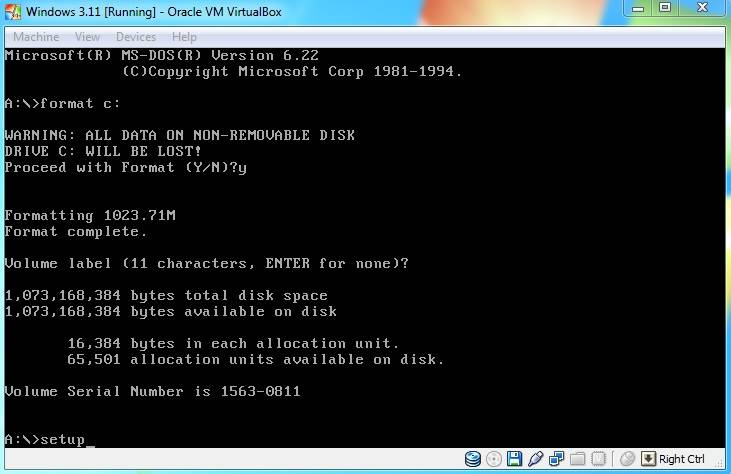
When the A:\> prompt will appears, give the command "format c:" and enter the command "setup" once formatting is done.
-

- msdossetuphitf8screenfo.jpg (41.05 KiB) Viewed 90132 times
Installing MS-DOS 6.22 (Continued)
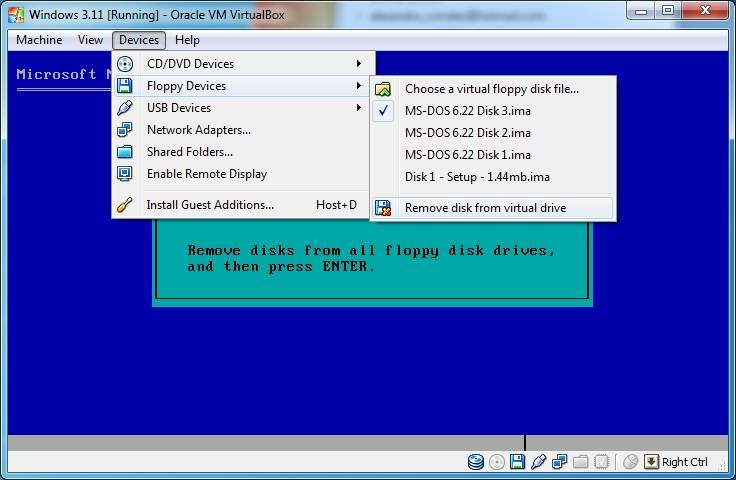
Click on devices in the menu bar again, then --> Floppy Devices --> Choose a virtual floppy disk file... then select your next MS-DOS 6.22 floppy image file.
Use the same method for disk #3.
-

- msdossetupnewdisk.jpg (43.79 KiB) Viewed 90132 times
-

- msdossetupfinishremoved.jpg (41.01 KiB) Viewed 90132 times
-

- msdossetupfinishfinal.jpg (33.21 KiB) Viewed 90132 times
Installing MS-DOS 6.22 (Continued)
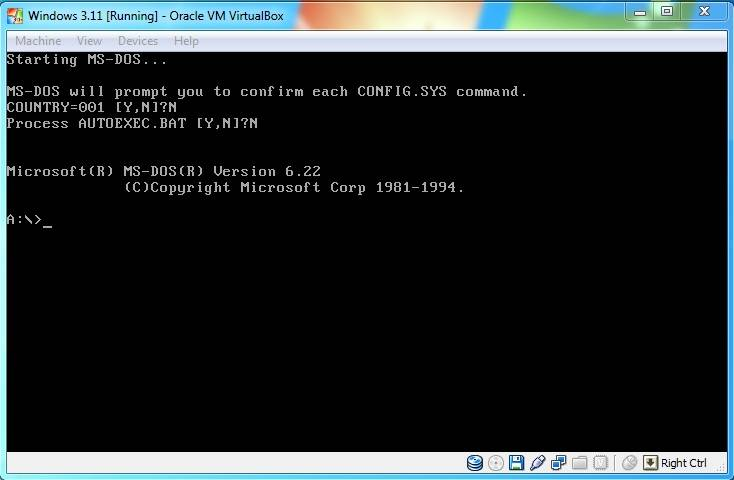
- Attachments
-
-

- dospromt.jpg (26.34 KiB) Viewed 90133 times
-
Installing Windows 3.11
Click on devices in the menu bar again then --> Floppy Devices --> Choose a virtual floppy disk file... then select your first Windows 3.11 floppy image file.
At the C:\> prompt, give the command "A:\" and enter the command 'setup' once the prompt A:\> will appear and hit enter.
The Windows for Workgroups 3.11 setup screen will appear.
-

- 311setupscreen.jpg (36.69 KiB) Viewed 90133 times
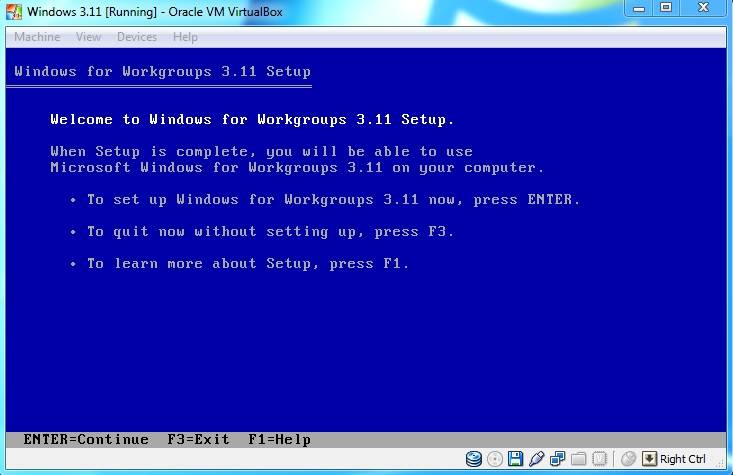
Hit enter to setup Windows for Workgroups 3.11.
On the next screen choose the Express Setup with the enter key (the express setup is usually fine).
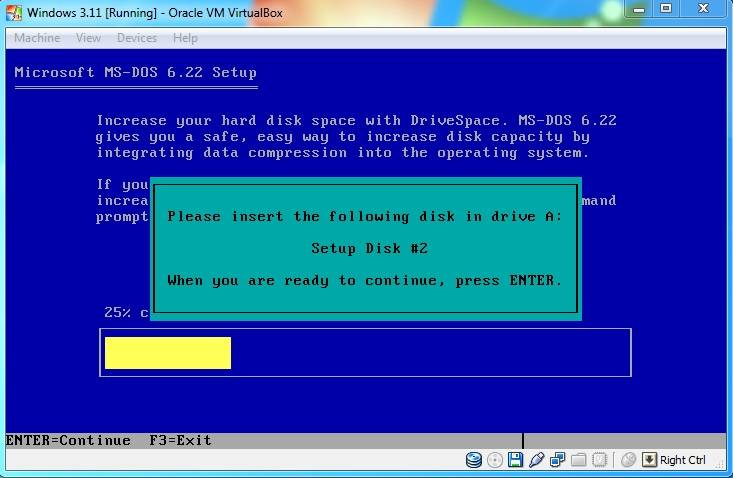
Windows will now be installed. When the setup asks for disk 2, click on devices in the menu bar again then --> Floppy Devices --> Choose a virtual floppy disk file... then select your next Windows 3.11 floppy image file.
After that the setup will reboot to a more graphical style and ask for your name, company and product number (use your windows 3.11 product number )
-

- 311setupproductnumber.jpg (60.39 KiB) Viewed 90133 times
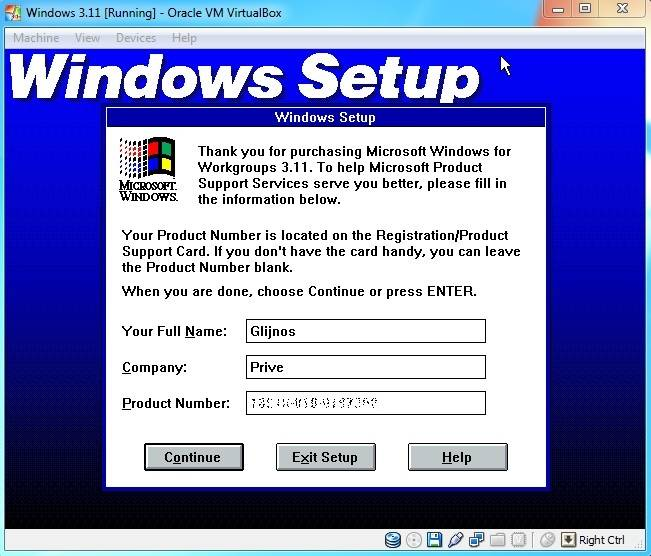
Verify your information and Click Continue.
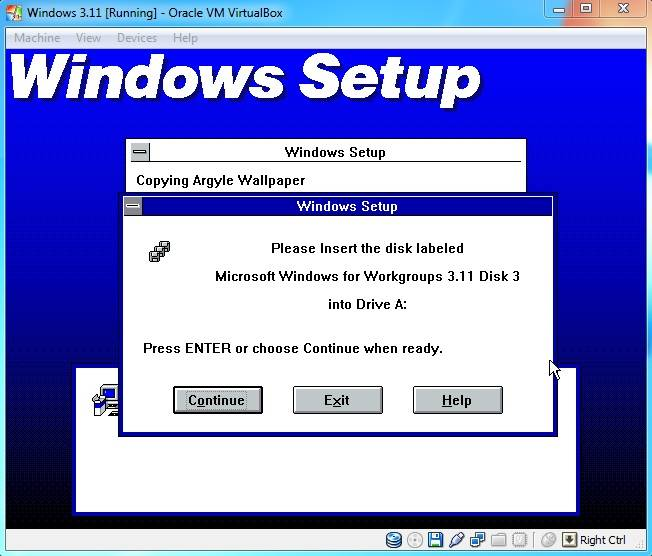
The setup will now continue. When it ask for the next disk, select your next Windows 3.11 floppy image and hit Enter.
-

- 311setupfloppydisk3.jpg (47.49 KiB) Viewed 90133 times
Installing Windows 3.11 (Continued)
When it asks for Network Setup, just press continue (You have to configure this later).
When it asks for the application name for C:\DOS\EDIT.COM, leave the default "MS-DOS Editor" option enabled and press OK.
You can choose to either Run Tutorial or Skip Tutorial.
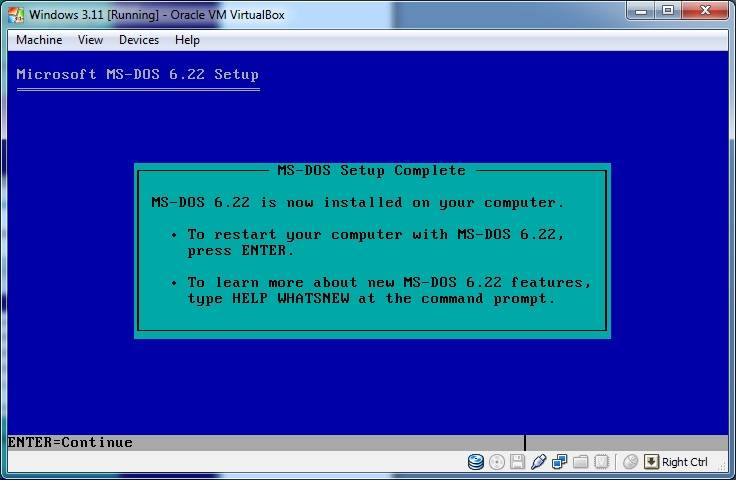
Setup complete!
Remove your last floppy Image and press Restart Computer.
-

- 311setupcomplete.jpg (49.87 KiB) Viewed 90133 times

-

- 311windows.jpg (76.71 KiB) Viewed 90132 times
Adding CD-ROM Support
Search the web for the file AOATAPI.SYS and Copy the AOATAPI.SYS file to a floppy disk image, or use the CD-ROM driver floppy Image that I already made for you.
Start your virtual machine. Load the floppy Image, and then type COPY A:\AOATAPI.SYS C: at the command prompt to copy the AOATAPI.SYS file to your C: drive.
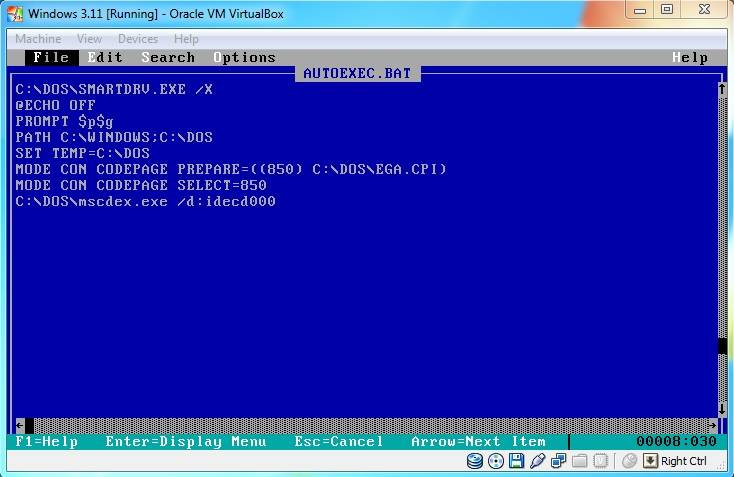
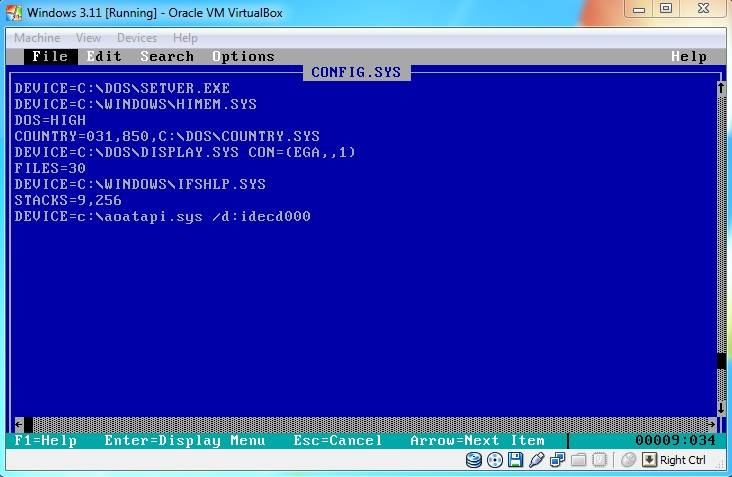
After that you must edit your AUTOEXEC.BAT and CONFIG.SYS files.
At the C:\ command prompt type EDIT AUTOEXEC.BAT. Place the line: c:\dos\mscdex.exe /d:idecd000 in the autoexec.bat and save, then exit (use the Alt key to activate the menu).
-

- cdromeditautoexec.jpg (45.24 KiB) Viewed 90131 times
-

- cdromeditconfig.jpg (45.65 KiB) Viewed 90131 times
I loaded the VirtualBox Guest additions for testing.
-

- cdromloaded.jpg (45.47 KiB) Viewed 90131 times
Sound Card Installation
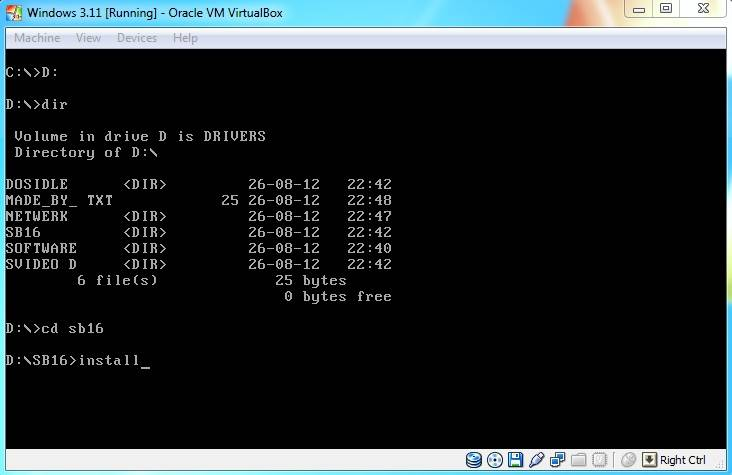
Start-up MS-DOS to a C:\ prompt. Load the floppy or CD image, access the SoundBlaster 16 drivers on the A: or D: drive, then type install.
Note: On my driver CDROM type CD sb16 at the command prompt and then install.
-

- soundinstallcmd.jpg (32.32 KiB) Viewed 90243 times
-

- soundinstallsettings.jpg (45.51 KiB) Viewed 90243 times

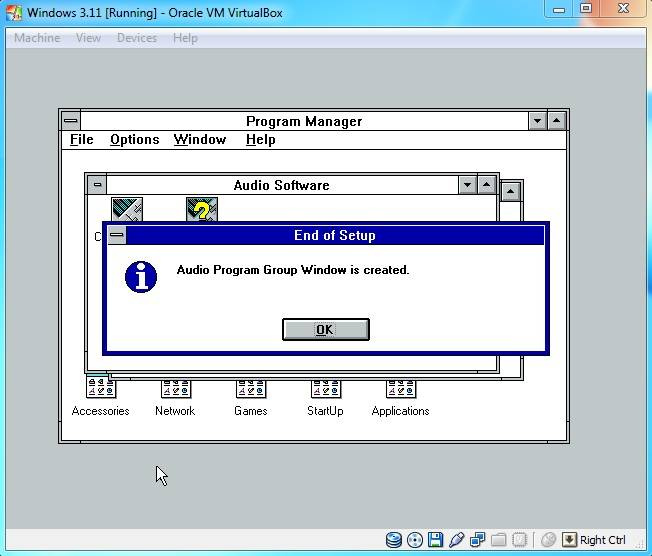
When you run windows it will create a Audio Program Group automatically.
-

- soundwindows311.jpg (38.2 KiB) Viewed 90243 times
Network Installation
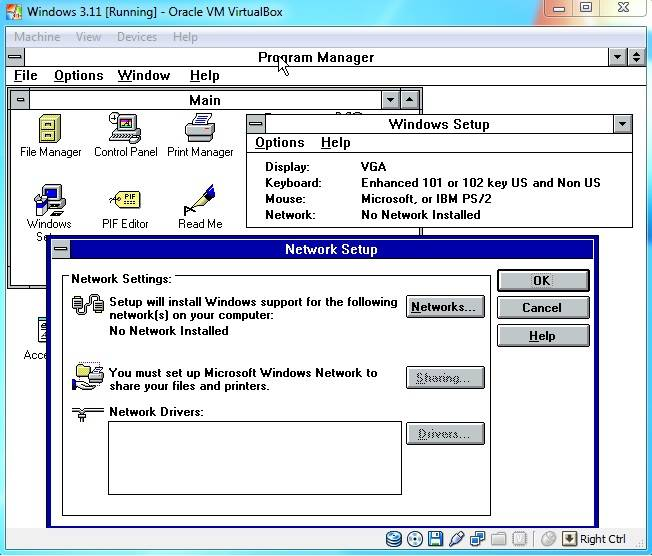
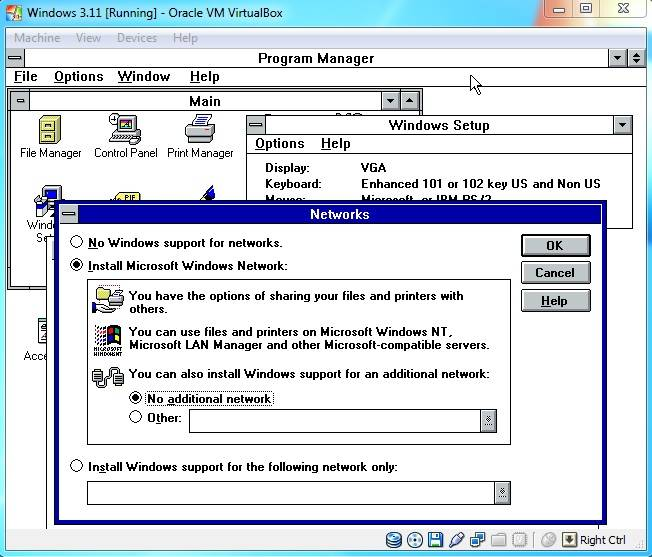
Boot into windows 3.11 and open the program group "Main". In "Main" open the program "Windows Setup", click "options" and then "Change Network Settings".
-

- networksetup.jpg (60.12 KiB) Viewed 90132 times
-

- networkinstallnetwork.jpg (65.24 KiB) Viewed 90132 times
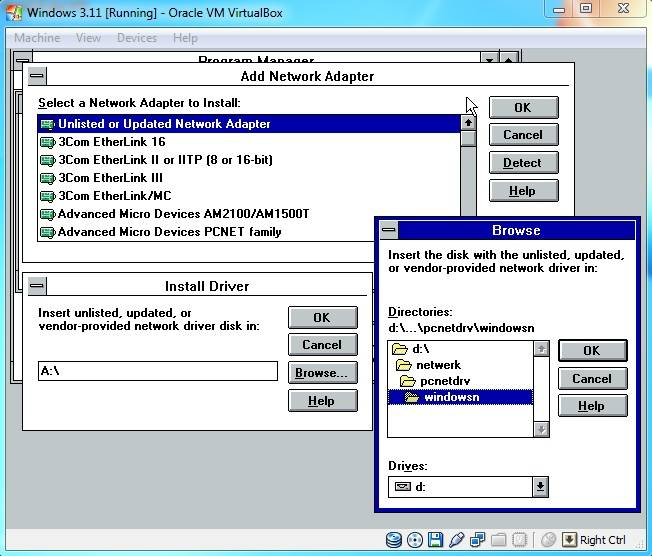
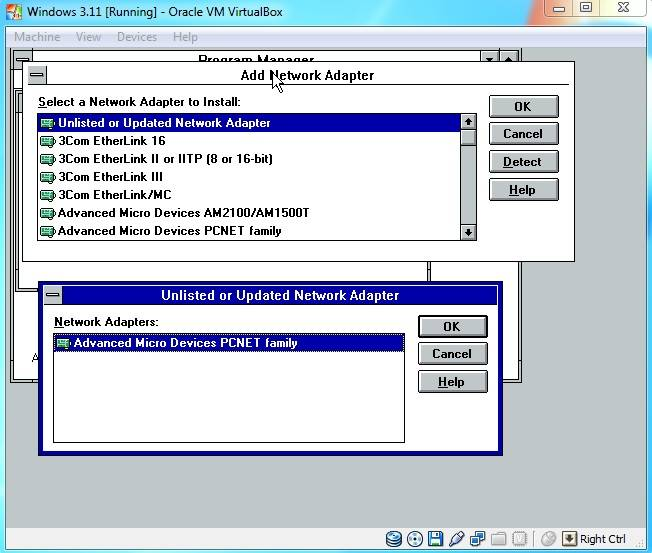
On the "Add Network Adapter" screen select the "Unlisted or Updated Network Adapter" option and click "OK".
-

- networksetupunlisted.jpg (51.35 KiB) Viewed 90132 times

Network Installation (Continued)
-

- networkdriverlocationse.jpg (61.76 KiB) Viewed 90132 times
-

- networkdriveramdselect.jpg (51.05 KiB) Viewed 90132 times
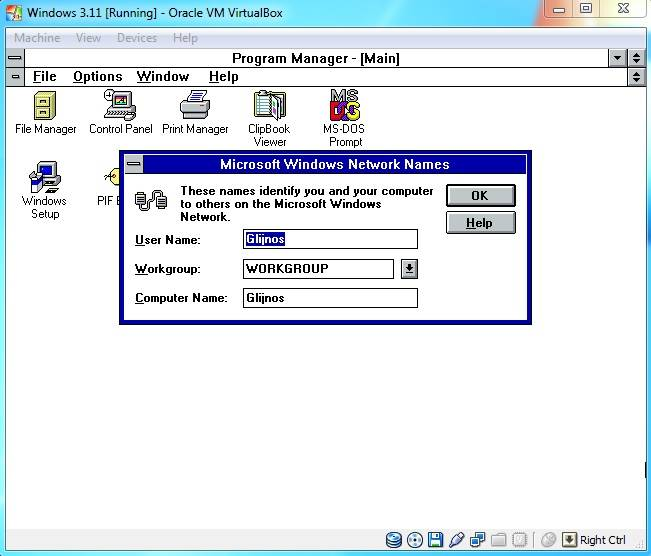
-

- networkcomputername.jpg (42.49 KiB) Viewed 90132 times
Network Installation (Continued)
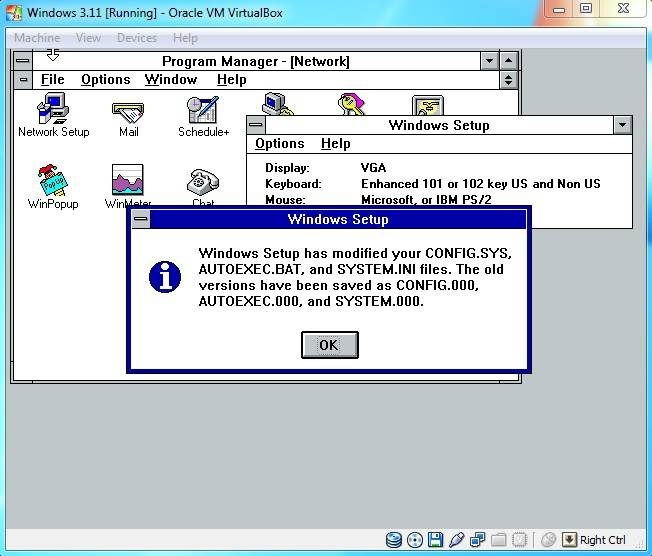
When the installation is complete click "OK" and then click "Restart Computer".
Don't forget to remove your windows 3.11 installation floppy!
-

- networksetupfinishmodif.jpg (50.58 KiB) Viewed 90086 times
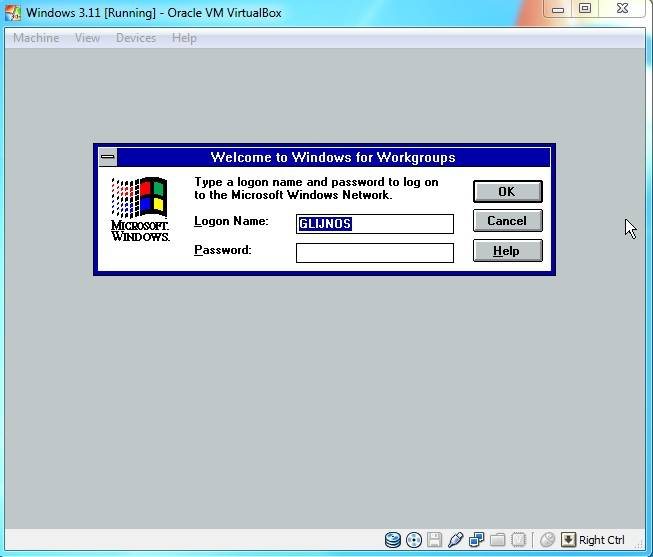
-

- welcomecq.jpg (31.09 KiB) Viewed 90086 times
-

- networkprotocolsetup.jpg (59.64 KiB) Viewed 90086 times
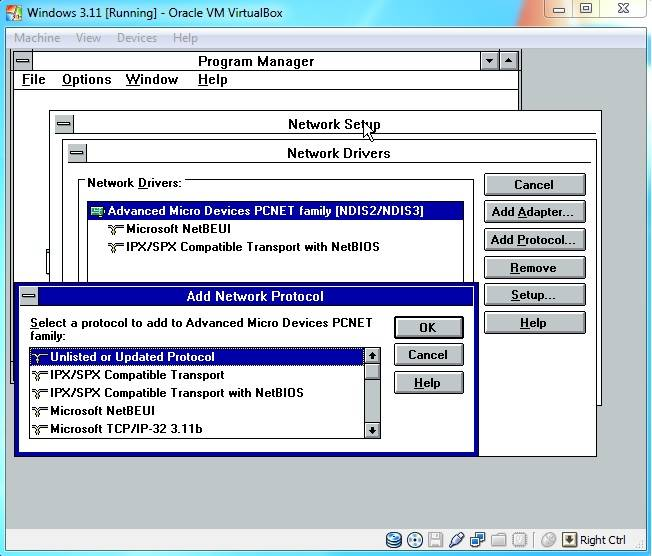
Network Installation (Continued)
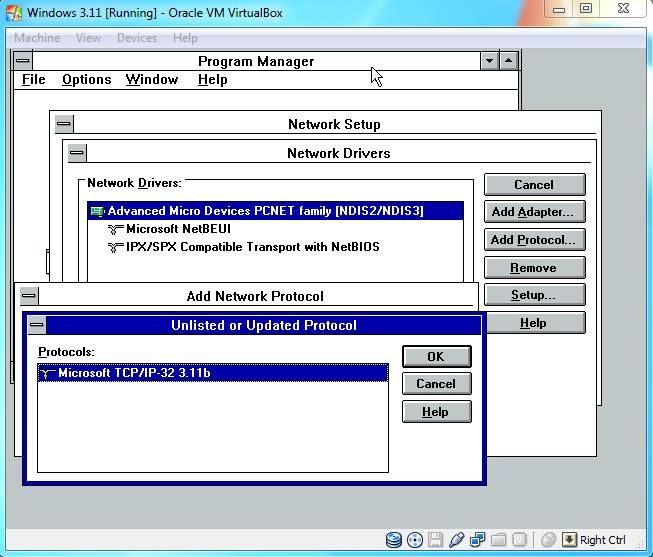
Select the Microsoft TCP/IP32 3.11b protocol and click "OK" again.
-

- networkmicrosoftprotoco.jpg (53.93 KiB) Viewed 89827 times
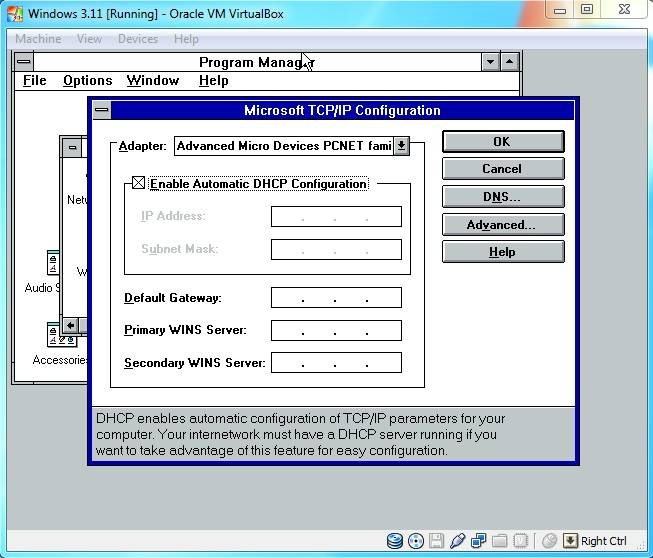
When the "Microsoft TCP/IP configuration" window pops up select "Enable Automatic DHCP configuration" or use your own configuration and hit "OK".
-

- networkdhcp.jpg (53.92 KiB) Viewed 89827 times
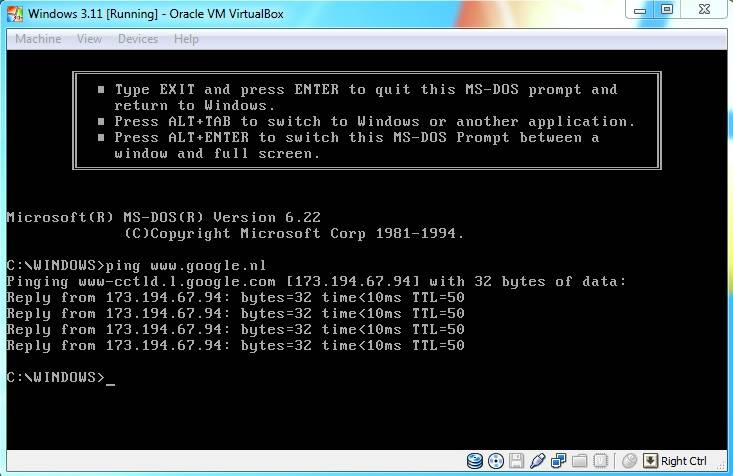
To confirm that networking is working at this stage, try opening a MS-DOS Prompt from the "Main" group and type "ping http://www.google.nl".
-

- networkping.jpg (54.55 KiB) Viewed 89827 times
Installing Internet Explorer 5.01
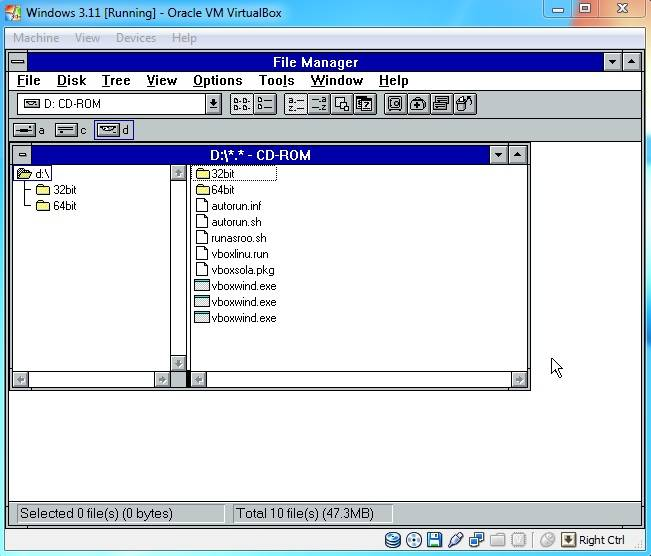
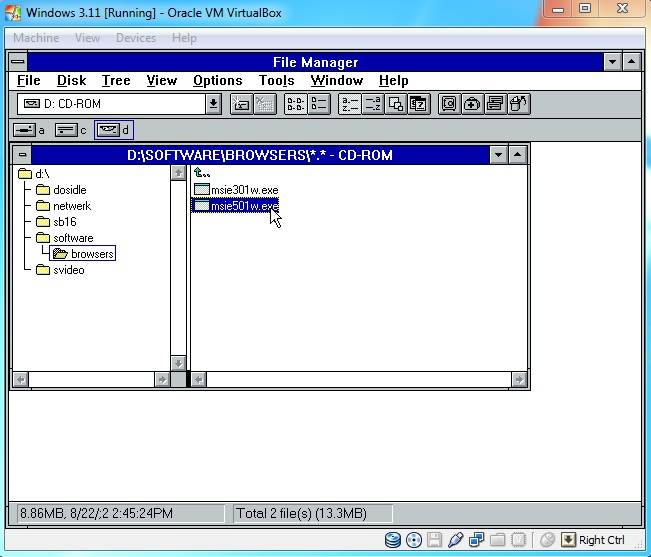
Search the web for the "Internet Explorer 5 (windows 3.11)" and copy the installer to a CD-ROM disk Image. You can also use the CD-ROM disk image that I made for you.
In windows open the File Manager, open your D:\ drive and run the msie501w311 installer.
-

- ie5setupbrowse.jpg (45.28 KiB) Viewed 89869 times
-

- ie5setup.jpg (58.7 KiB) Viewed 89869 times
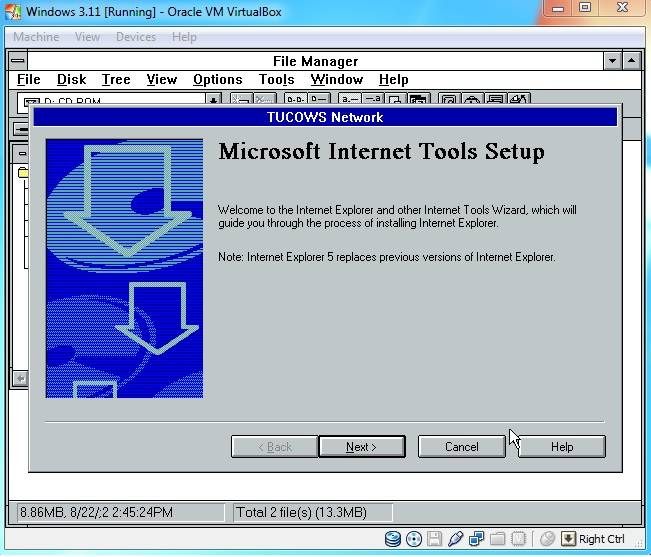
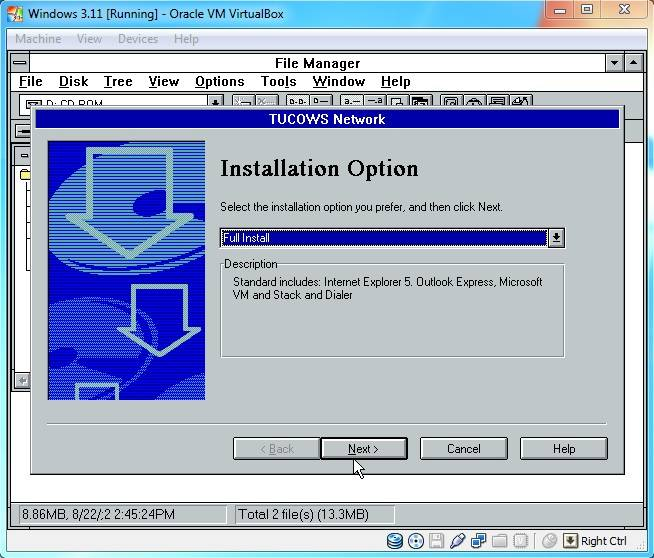
Use the default Full install and click "Next >".
-

- ie5setupfullinstall.jpg (61.88 KiB) Viewed 89869 times
Proxy setzen
Windows: Proxy-Server-Einstellungen per Skript setzen
Verwendet man einen Caching- oder Filtering-Proxy oder hat eine entsprechende Firewall bzw. UTM (z.B. von Securepoint) im Einsatz, so lautet die Best Practice auf den Computern die Einstellungen für den Proxy-Server vorzunehmen. Zwar geht es auch mit “Transparent Proxies”, also das die Firewall den Verkehr quasi umleitet, aber die Clients reagieren deutlich besser wenn sie von dem Proxy-Server Wissen.
Dieser Beitrag wurde durch eine Frage von meinem Kollegen Jörg (IT-Service Häcker e.K., Grüße an dieser Stelle) inspiriert. Vielen Dank für den Trigger.
Die Sache mit den Proxy-Einstellungen ist nicht so trivial wie man vielleicht meinen möchte. So gibt es unterschiedliche Schnittstellen (WinINET und WinHTTP) und zudem können Anwendungen noch dazu eigene Einstellungen haben. Das bedeutet es muss beachtet werden, ob man die Einstellung für die eine oder die anderen oder beide Schnittstellen setzen muss und ob diese pro Benutzer oder für den gesamten Computer greifen sollen und ob gegebenen falls auch noch gezielt Anwendungen konfiguriert werden müssen.
Für viele Anwendungen gilt in der Regel die Konfiguration von WinINET.
Gruppenrichtlinie
Der Klassiker in Active Directory-Umgebungen ist der Weg mittels Gruppenrichtlinie, aber darum soll es hier nicht gehen. Dennoch anbei ein paar Links hierzu und die Quellen (siehe ganz unten) sind ebenfalls interessant:
Windows Pro – Proxy-Server für IE11, Edge und Google Chrome über GPO konfigurieren
TheITBros.com – Configuring Proxy Settings via GPO on Windows
Befehl
Hat man es mit Systemen zu tun, die nicht Mitglied einer Domäne sind oder die entsprechenden Einstelllungen sollen bei der Erst-Einrichtung via Befehl oder Skript eingepflegt oder mittels RMM verteilt werden, ist es gut zu Wissen, welche Wege es gibt.
Ein Klassiker stellt dabei netsh dar, der WinHTTP konfiguriert:
- Einstellungen anzeigen: netsh winhttp show proxy
- Einstellungen zurücksetzen: netsh winhttp reset proxy
- Einen Proxy-Server setzen: netsh winhttp set proxy <IP oder FQDN>:<Port>
- Eine Ausnahme festlegen: netsh winhttp set proxy “<IP oder FQDN>:<Port>” bypass-list= “*.domain.local”
Diese Einstellungen greifen systemweit, aber nicht für Anwendungen die WinINET nutzen!
Man kann die Einstellungen aus “Systemsteuerung – Internetoptionen” bzw. “Einstellungen – Netzwerk und Internet – Proxy” (also WinINET) systemweit (für WinHTTP) mit nachfolgendem Befehl übernehmen:
netsh winhttp import proxy source=ie
Registry
Die relevanten Stellen für WinINET in der Registry sind
HKCU\Software\Microsoft\Windows\CurrentVersion\Internet Settings
und
HKLM\Software\Policies\Microsoft\Windows\CurrentVersion\Internet Settings
bzw. je nach verwendeten Methode dann noch jeweils die Unterschlüssel “Connections”.
Man könnte also die Einstellungen über die GUI so setzen wie man dies möchte und die Daten aus der Registry ex- und auf einem Zielsystem importieren.
Skript
Im Grunde ändert ein Befehl oder Skript nur die Registry entsprechend ab. In Form von PowerShell kann dies für WinINET so aussehen:
$ProxySettingsPath = "HKCU:\Software\Microsoft\Windows\CurrentVersion\Internet Settings" Set-ItemProperty -Path $ProxySettingsPath -Name ProxyEnable -Value 1 Set-ItemProperty -Path $ProxySettingsPath -Name ProxyServer -Value "<IP oder FQDN>:<Port>" Set-ItemProperty -Path $ProxySettingsPath -Name ProxyOverride -Value '*.domain.local' Set-ItemProperty -Path $ProxySettingsPath -Name AutoDetect -Value 0
So wird pro Benutzer die Einstellung gesetzt, die Änderung greift in der Regel sofort, je nach Anwendung muss diese einmal neu gestartet werden.
Möchte man unterschiedliche Proxy-Server pro Protokoll setzen, sieht die entsprechende Zeile wie folgt aus:
Set-ItemProperty -Path $proxy -Name ProxyServer -Value "http=<IP oder FQDN>:<Port>;https=<IP oder FQDN>:<Port>"
Weitere Protokolle sind ftp und socks. Ist man nicht sicher, wie die Werte aussehen müssen, kann man diese zunächst über die GUI konfigurieren und via regedit im genannten Pfad nachsehen.
Das System-weite setzen ist mitunter nicht so einfach, daher empfiehlt sich als Workaround die Kombination aus dem Ändern der Registry (für pro Benutzer) wie in diesem Abschnitt mittels PowerShell dargestellt und das anschließende Ausführen von
netsh winhttp import proxy source=ie
Auf diese Weise kann man WinINET und WinHTTP abdecken.
Weiteres
Mit .NET Core bzw. PowerShell Core gibt es die Option, durch das Festlegen von Umgebungsvariablen (HTTP_PROXY, HTTPS_PROXY, ALL_PROXY, NO_PROXY) die Nutzung eines Proxy-Servers zu konfigurieren. Das funktioniert natürlich nur, wenn man PowerShell 7.x oder neuer installiert hat. In Windows 11 ist z.B. PowerShell 5.1 von vornherein mit dabei.
Der Vollständigkeit halber: Mit zum Beispiel Batch oder VBScript (Visual Basic Script) und weiteren geht das auch. Da PowerShell der modernere Ansatz ist, belassen wir es an dieser Stelle dabei.
Automatisch per WPAD
Zwar nicht direkt auf dem System, aber automatisch lassen sich Proxy-Einstellungen auch per Web Proxy Autodiscovery Protocol (WPAD) verteilen. Allerdings müssen hierzu mehrere Voraussetzungen erfüllt sein und man benötigt unter anderem einen Web-Server der die entsprechende Datei bereitstellen kann. Im verlinkten Wikipedia-Artikel wird schnell deutlich, das dies unter Umständen mehr Aufwand bedeutet, als einfach ein paar Befehls- oder Skript-Zeilen.
Vorsicht Falle!
Wie eingangs erwähnt und ungeachtet dieser Einstellungen stellt eine Herausforderung dar, wenn Anwendungen wie manche Browser und weitere, eine eigene Proxy-Konfigurationsmöglichkeit mitbringen. In diesen Fällen nutzen die System- oder Benutzer-weiten Einstellungen wie sie hier genannt wurden leider nichts. Im Zweifelsfall muss man ermitteln wo und wie die jeweilige Anwendung die Einstellungen speichert um diese dann beispielsweise per PowerShell anpassen zu können.
Quellen
MSXFAQ – Windows Proxy Konfiguration
Der Windows Papst – Windows Proxy Server systemweit einstellen
IP loging – Windows proxy settings ultimate guide part II – configuring proxy settings
Windows 11-Installationsmedium mit Tiny11 abspecken
Mit Hilfe von Tiny11 kann man ein abgespecktes Windows 11-Installationsmedium erstellen, das quasi nur noch das eigentliche Betriebssystem enthält ohne alle (un)möglichen Store-Apps.
Die Voraussetzungen sind gering:
- PowerShell 5.1 oder neuer muss installiert sein.
- Die Original-Windows 11-ISO-Datei muss vorliegen und bereitgestellt sein.
Der Ablauf ist simple:
- Tiny11 herunterladen, entpacken und in der PowerShell wie folgt ausführen:
Set-ExecutionPolicy Bypass -Scope Process .\tiny11maker.ps1
- Den Laufwerksbuchstaben der bereitgestellten Windows-ISO angeben (nur den Buchstaben ohne “:\”!).
- Im weiteren Verlauf die SKU auswählen, für Windows 11 Pro wäre das die “5”
- Warten.
Sobald der Vorgang abgeschlossen ist, findet sich im Tiny11-Ordner eine tiny11.iso (die 1,31 GB kleiner ist als das Original) mit der man einen Computer neu installieren kann. Windows 11 sieht dann sehr aufgeräumt aus:
Aktivierung und Windows Updates klappen wie gewohnt, es fehlen viele Apps, falls man doch was vermisst kann man es aus dem Microsoft Store nachinstallieren. Ansonsten hat man ein sauberes Betriebssystem vor sich. Da so mancher Ballast fehlt läuft es etwas schneller und lässt sich zudem auf nicht unterstützter Hardware installieren.
Im Laufe der Zeit können allerdings durch Windows Updates und andere Kniffe von Microsoft wieder unerwünschte Apps und mehr auftauchen. Um dies zu Handhaben braucht es andere Tools.
Tiny11 demonstriert, das es mit Microsoft-Mitteln möglich ist, ein reines Windows ohne Schnickschnack zu erstellen.
Certutil
PS C:\Users\Book> certutil -enumstore
(CurrentUser: -user)
LocalMachine
(CurrentService: -service)
(Services: -service -service)
(Users: -user -user)
(CurrentUserGroupPolicy: -user -grouppolicy)
(LocalMachineGroupPolicy: -grouppolicy)
(LocalMachineEnterprise: -enterprise)
My "Eigene Zertifikate"
Root "Vertrauenswürdige Stammzertifizierungsstellen"
Trust "Organisationsvertrauen"
CA "Zwischenzertifizierungsstellen"
TrustedPublisher "Vertrauenswürdige Herausgeber"
Disallowed "Nicht vertrauenswürdige Zertifikate"
AuthRoot "Drittanbieter-Stammzertifizierungsstellen"
TrustedPeople "Vertrauenswürdige Personen"
ClientAuthIssuer "Clientauthentifizierungsaussteller"
FlightRoot "Stammelemente der Vorabversion"
TestSignRoot "Stämme testen"
AAD Token Issuer
CanaryCertStore
eSIM Certification Authorities
Homegroup Machine Certificates
InjectorCertStore
McAfee Trust
OemEsim "OEM-eSIM-Zertifizierungsstellen"
PasspointTrustedRoots "Vertrauenswürdige Passpoint-Stämme"
PolicyCertStore
Remote Desktop "Remotedesktop"
REQUEST "Zertifikatregistrierungsanforderungen"
SmartCardRoot "Smartcard vertrauenswürdige Stämme"
TrustedAppRoot "Autoritäten für die Installation vertrauenswürdiger verpackter Apps"
TrustedDevices "Vertrauenswürdige Geräte"
Windows Live ID Token Issuer
WindowsServerUpdateServices