Thinclient
- CPU-Vergleich
- Igel M340C
- Minimal OS (Kiosk)
- IGEL UD3 M350C: Technische Spezifikation
- HP T520
- Pi-hole Docker Howto
- IGEL 350c - SATA / NVME
- Openmediavault (NAS), auf einem IGEL 340C
CPU-Vergleich
Igel 350c Igel340C HP T520
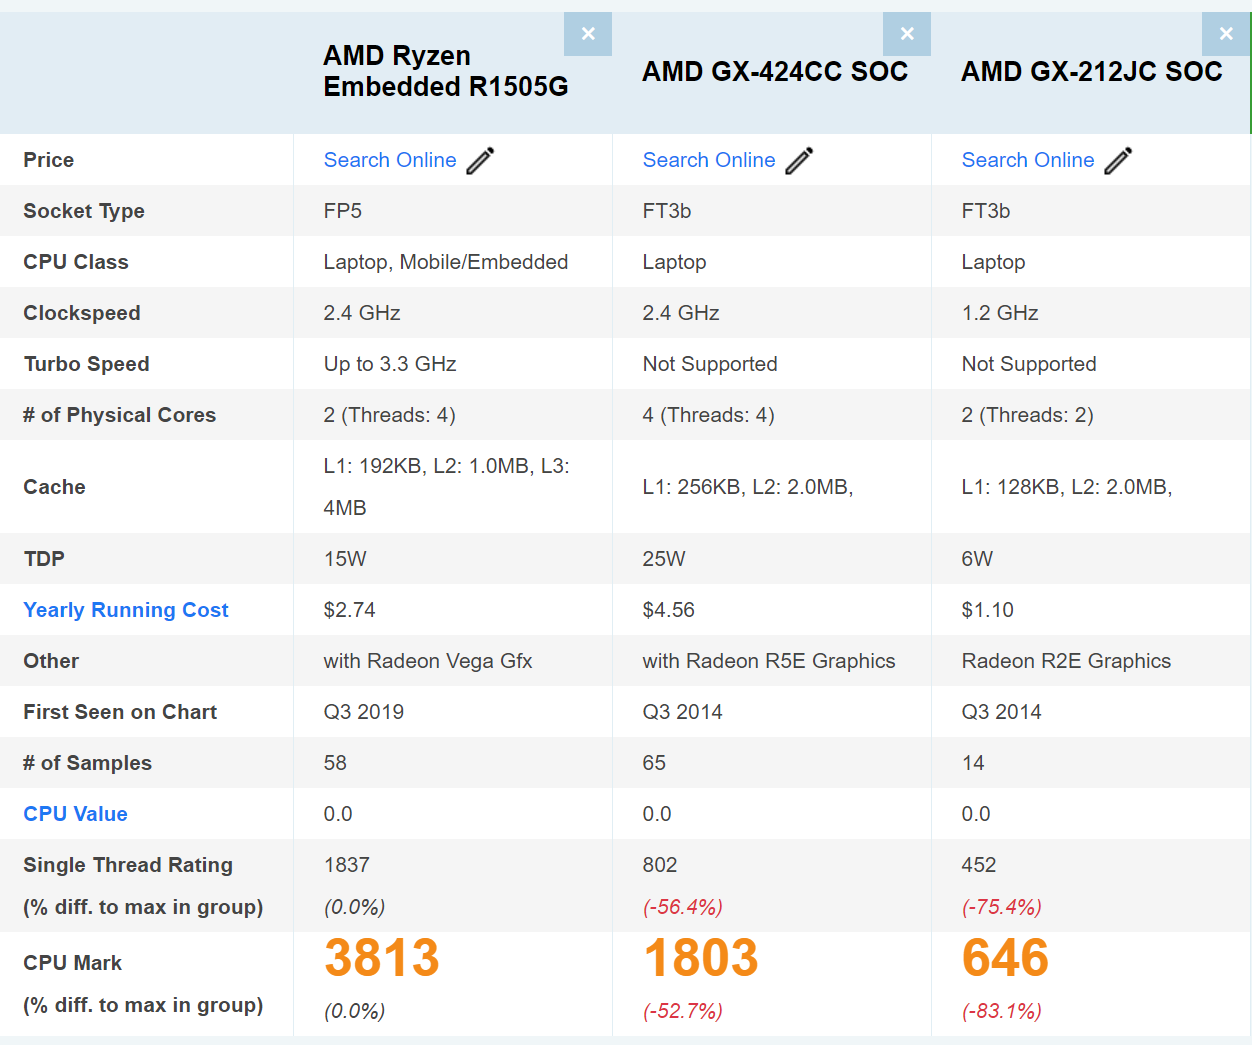

AMD Ryzen Embedded R1505G vs AMD GX-424CC

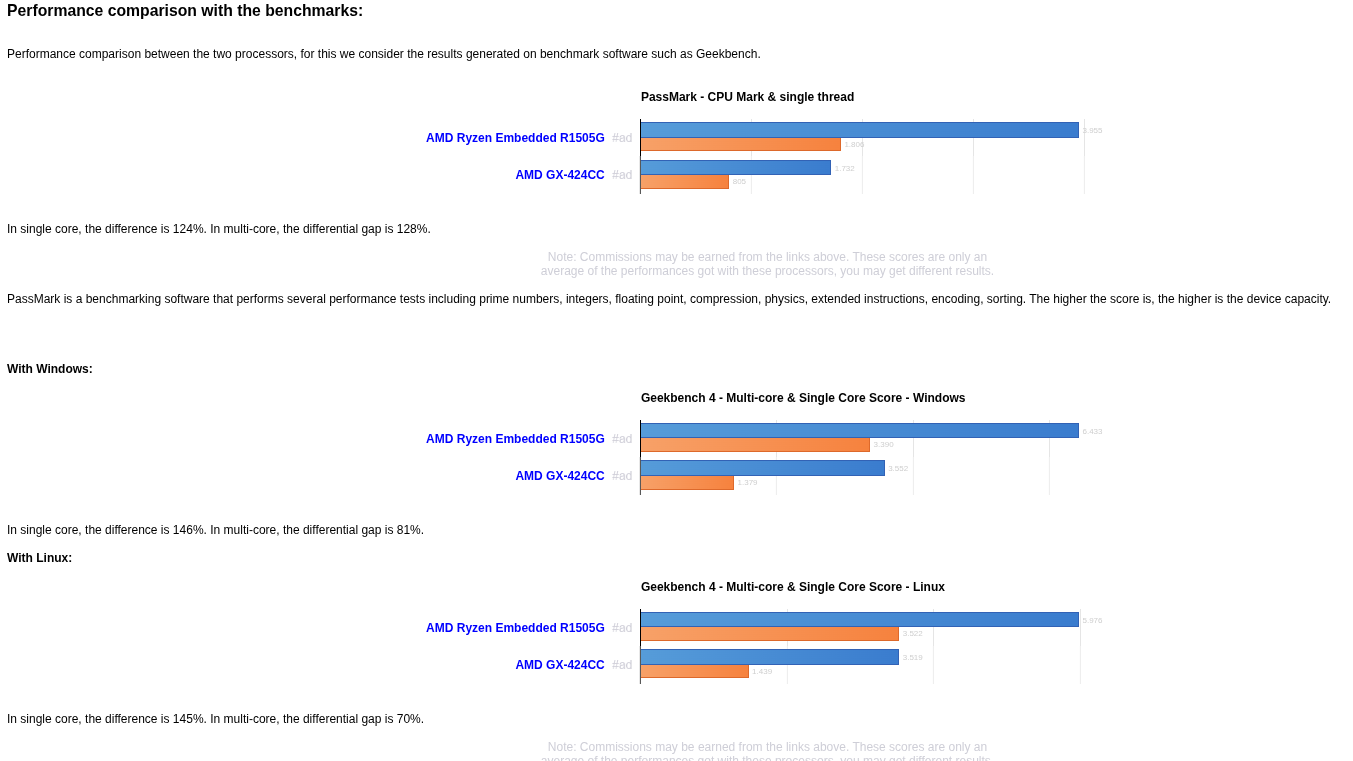
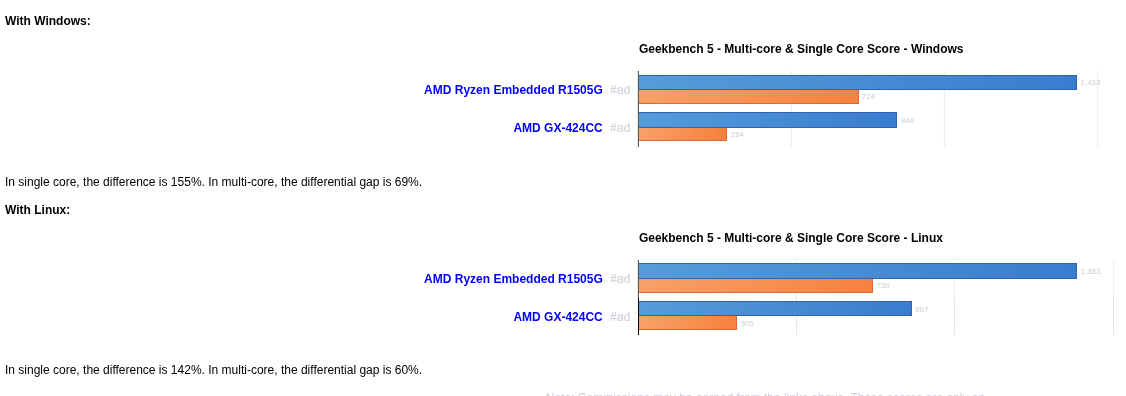
Comparison of the technical characteristics between the processors, with the AMD Ryzen Embedded R1505G on one side and the AMD GX-424CC on the other side, also their respective performances with the benchmarks. The first is dedicated to the mini desktop sector, It has 2 cores, 4 threads, a maximum frequency of 3,3GHz. The second is used on the mini desktop segment, it has a total of 4 cores, 4 threads, its turbo frequency is set to 2,4 GHz. The following table also compares the lithography, the number of transistors (if indicated), the amount of cache memory, the maximum RAM memory capacity, the type of memory accepted, the release date, the maximum number of PCIe lanes, the values obtained in Geekbench and Cinebench.
Specification comparison:
| Processor | AMD Ryzen Embedded R1505G | AMD GX-424CC | ||||||
| Market (main) | Mini desktop | Mini desktop | ||||||
| ISA | x86-64 (64 bit) | x86-64 (64 bit) | ||||||
| Microarchitecture | Zen+ | Puma | ||||||
| Core name | Banded Kestrel | Steppe Eagle | ||||||
| Family | Ryzen Embedded | AMD GX | ||||||
| Part number(s), S-Spec |
YE1505C4T2OFG |
GE424CIXJ44JB |
||||||
| Release date | Q2 2019 | Q2 2014 | ||||||
| Lithography | 14 nm | 28 nm | ||||||
| Cores | 2 | 4 | ||||||
| Threads | 4 | 4 | ||||||
| Base frequency | 2,4 GHz | 2,4 GHz | ||||||
| Turbo frequency | 3,3 GHz | - | ||||||
| High performance cores |
2 Cores 4 Threads @ 2,4 / 3,3 GHz |
4 Cores 4 Threads @ 2,4 GHz |
||||||
| Cache memory |
4 MB |
2 MB |
||||||
| Max memory capacity | 32 GB | 8 GB | ||||||
| Memory types |
DDR4-2400 |
DDR3-1866 |
||||||
| Max # of memory channels | 2 | 1 | ||||||
| Max PCIe lanes | 8 | 6 | ||||||
| TDP |
25 W |
25 W |
||||||
| GPU integrated graphics | AMD Radeon Vega 3 (Picasso) | AMD Radeon R5E | ||||||
| GPU cores | 3 | 2 | ||||||
| GPU shading units | 192 | 128 | ||||||
| GPU base clock | 300 MHz | 497 MHz | ||||||
| GPU boost clock | 1000 MHz | 497 MHz | ||||||
| GPU FP32 floating point | 384 GFLOPS | 167,6 GFLOPS | ||||||
| Socket(s) | FP5, BGA1140 | FT3b, BGA769 | ||||||
| Compatible motherboard | Socket FP5 Motherboard  |
- | ||||||
| Maximum temperature | 105°C | 90°C | ||||||
| Crypto engine |
AES Instructions, Secure Memory Encryption |
AES Instructions |
||||||
| Security |
Enhanced Virus Protection, Platform Secure Boot |
Enhanced Virus Protection |
||||||
| PassMark single thread | 1.806 | 805 | ||||||
| PassMark CPU Mark | 3.955 | 1.732 | ||||||
| (Windows) Geekbench 4 single core |
3.390 | 1.379 | ||||||
| (Windows) Geekbench 4 multi-core |
6.433 | 3.552 | ||||||
| (Windows) Geekbench 5 single core |
724 | 284 | ||||||
| (Windows) Geekbench 5 multi-core |
1.433 | 848 | ||||||
| (SGEMM) GFLOPS Performance |
66 GFLOPS | 26,8 GFLOPS | ||||||
| (Multi-core / watt performance) Performance / watt ratio |
257 pts / W | 142 pts / W |
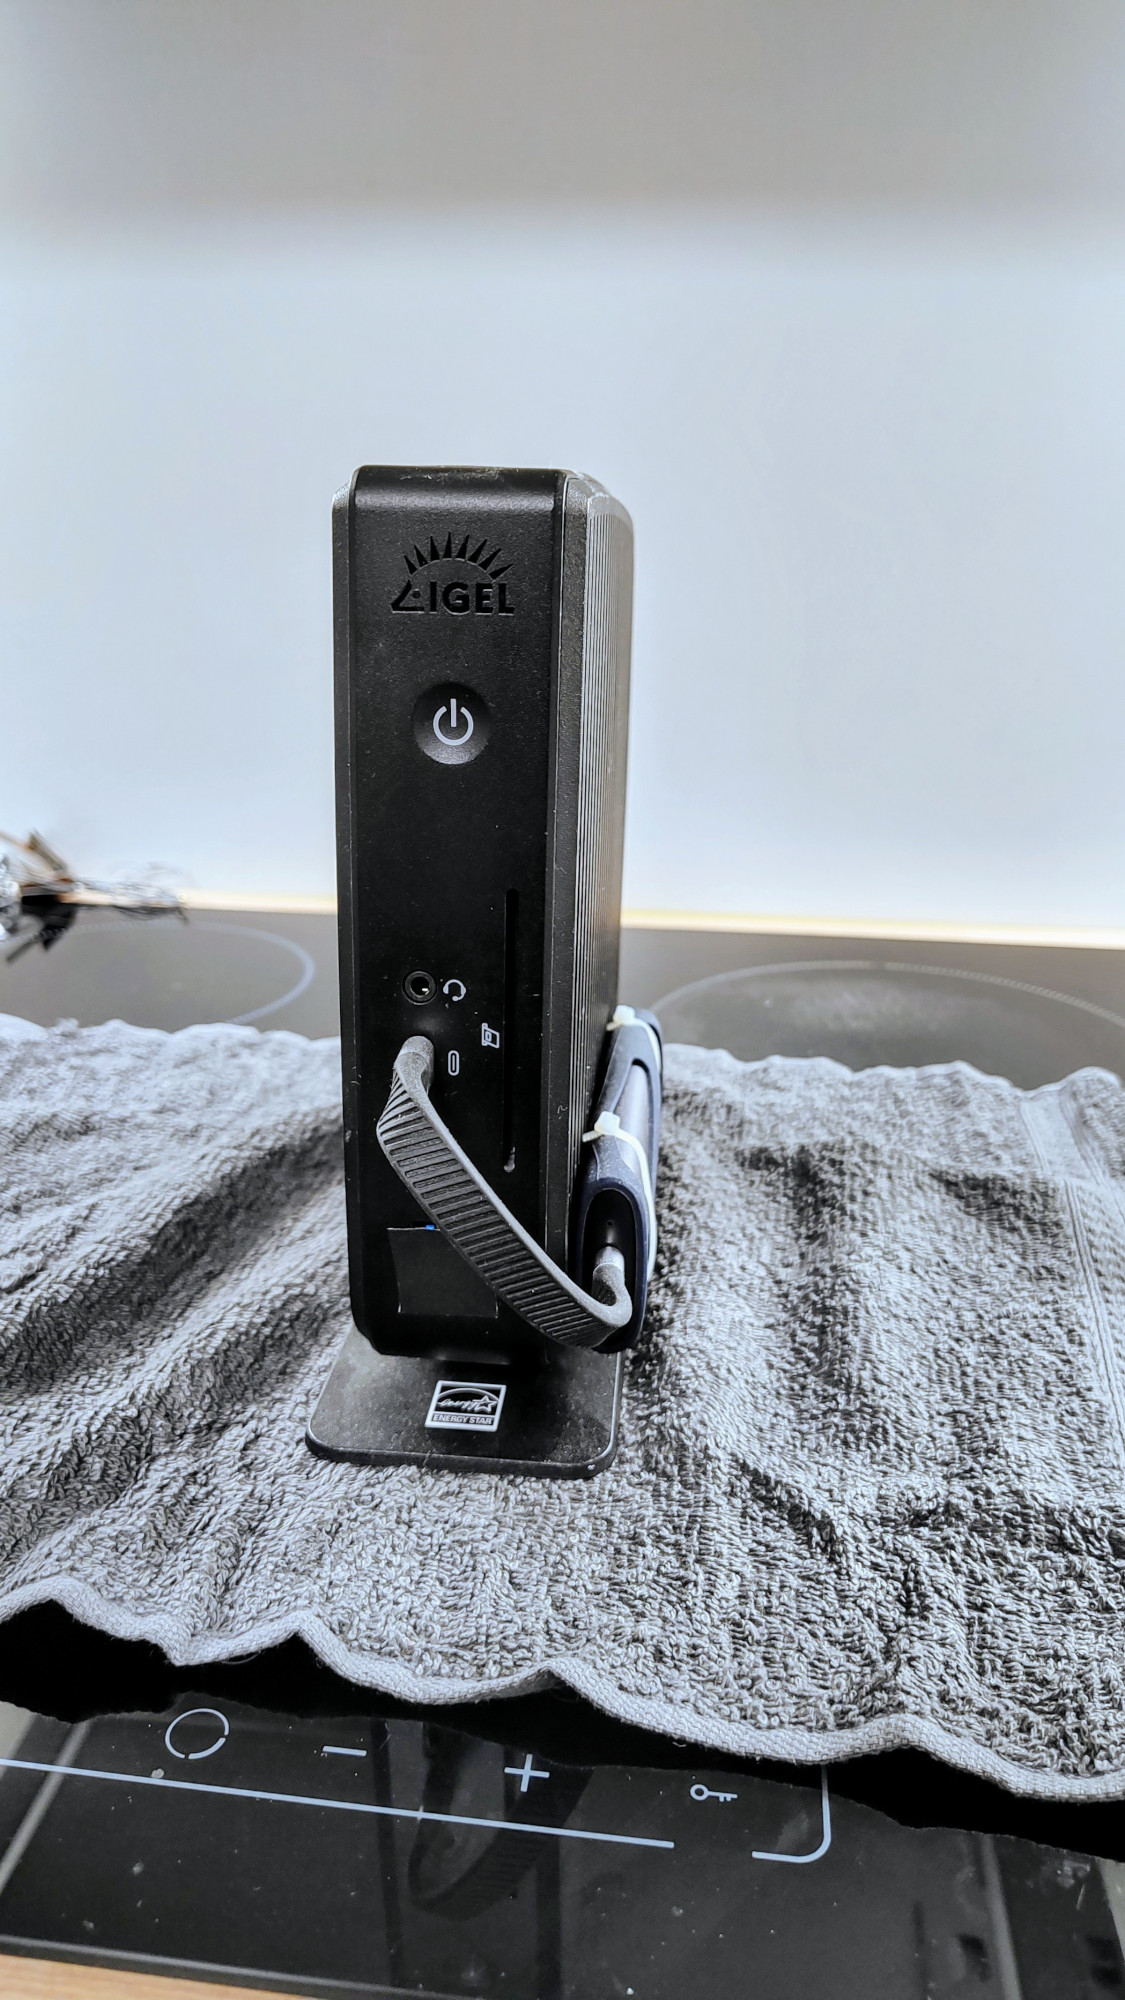
Igel M340C
My M340C came without a foot.
The M340C was part of Igel's UD3 line of thin clients.
For some unknown reason finding the launch date took some doing. I eventually found a blogger's column (dated 15th February 2016) that mentioned the imminent launch of what I believe to be the M340C. This ties in with a mention I found of the Igel Version of Windows 7 that was available on the M340C at launch. That software was released on 1st February 2016.
The UD3-LX 51 reached 'End-of Sales' in January 2021 and 'End of Maintenance' is due in January 2024.
Models
Shortly after I added the M340C to the site I heard from Bob who drew my attention to the fact that there were M340Cs around that were fitted with the less powerful AMD GX-412. I (well, Google if I'm honest) couldn't find any datasheet that tied the M340C and the GX412 SOC together. Any M340C specific datasheet I found only mentioned the GX-424CC.
Switching to searching on UD3 improved matters. I found a UD3 datasheet that had been created in October 2016. The picture of the thin client matches my M340C, the CPU is given as AMD Steppe Eagle GX-412HC 1,2 - 1,6 GHz (Quad-Core), but there is no mention of the hardware model number. By January 2019 the UD3 datasheet gives the CPU as AMD GX-424CC 2.4 GHz (Quad-Core).
Further searching found me an 'Igel Roadmap' which mentions the switch to the AMD GX-424 with availability from the end of February 2018.
The pull-out tab on Bob's M340C and my M340C match in that in each case the model name is given as IGEL-M340C. From a photo that Bob sent me it looks the motherboard and internal layout are identical.
From this we can see that, at launch, the M340C was fitted with an AMD GX-412HC (1.2GHz-1.6GHz, with Radeon R3E graphics). In early 2018 Igel upgraded the SOC in the M340C to an AMD GX-424CC (2.4GHz, Radeon R5E graphics) without any change to the model name.

How you determine exactly what you're getting I'm not too sure as there is just one obscure visual clue to help you. I found on close inspection of my M340C that it does have the words GX-424CC-QC on the reverse of the pull-out tab with the model number. (This is along with stuff like the serial number et al). Obviously a check of the information in the BIOS makes it clear but eBay vendors often provide few (or stock) photos and just cut-and-paste information they find on the Internet into their adverts. In fact, checking back, I see the M340C I bought was actually inaccurately advertised as having a 1.2GHz CPU.
What follows below are the details of my later model M340C. As to the earlier model two obvious differences are:
- CPU/Graphics are AMD GX-412HC and Radeon R3E.
- BIOS is a more conventional InsydeH20.
Specifications
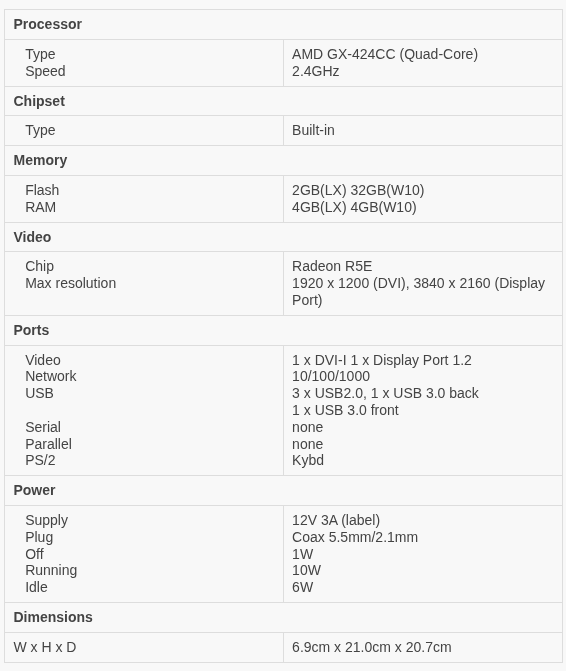
The basic specs are:
Processor Type
SpeedAMD GX-424CC (Quad-Core)
2.4GHzChipset Type Built-in Memory Flash
RAM2GB(LX) 32GB(W10)
4GB(LX) 4GB(W10) max. 1x 8GBVideo Chip
Max resolutionRadeon R5E
1920 x 1200 (DVI), 3840 x 2160 (Display Port)Ports Video
Network
USB
Serial
Parallel
PS/21 x DVI-I 1 x Display Port 1.2
10/100/1000
3 x USB2.0, 1 x USB 3.0 back
1 x USB 3.0 front
none
none
KybdPower Supply
Plug
Off
Running
Idle12V 3A (label)
Coax 5.5mm/2.1mm
1W
10W
6WDimensions W x H x D 6.9cm x 21.0cm x 20.7cm
There is an optional replacement 'foot' that includes 2 x serial ports.
The M340C is available in various guises and could be running Linux or Windows 10.
CPU
The GX-424CC is a quad core CPU clocked at 2.4GHz. For those to whom it matters here is some detail from Linux's /proc/cpuinfo
vendor_id : AuthenticAMD cpu family : 22 model : 48 model name : AMD GX-424CC SOC with Radeon(TM) R5E Graphics stepping : 1 flags : fpu vme de pse tsc msr pae mce cx8 apic sep mtrr pge mca cmov pat pse36 clflush mmx fxsr sse sse2 ht syscall nx mmxext fxsr_opt pdpe1gb rdtscp lm constant_tsc rep_good acc_power nonstop_tsc cpuid extd_apicid aperfmperf pni pclmulqdq monitor ssse3 cx16 sse4_1 sse4_2 movbe popcnt aes xsave avx f16c lahf_lm cmp_legacy svm extapic cr8_legacy abm sse4a misalignsse 3dnowprefetch osvw ibs skinit wdt topoext perfctr_nb bpext ptsc perfctr_llc hw_pstate ssbd vmmcall bmi1 xsaveopt arat npt lbrv svm_lock nrip_save tsc_scale flushbyasid decodeassists pausefilter pfthreshold overflow_recov
PCI
Power Supply
The IGEL M340C uses an external 12V supply with a conventional 5.5mm/2.1mm coaxial connector. The M340C data sheet gives it power consumption as 4.7W when idle and 0.42W in sleep mode.
Expansion
There is not much space inside the M340C for adding extras, but both the Flash memory and the RAM are easily replaceable.
Flash: The flash memory is a Transcend 4GB SATA DOM plugged into a socket - top left in the photograph. When fitted the edge of it is in contact with a square rubber pillar which I assume is there to help keep it in place. The SSD measures 34mm from the edge of the socket it plugs into to its edge against the rubber pillar. You've got about another 12mm before whatever SSD you are wanting to use hits the mounting screw of the heatsink. Also, if you're fitting a longer replacement that the standard SSD, you'll need to slightly reduce the height of the rubber pillar.
The board is tracked for a mSATA socket below the SATA DOM. As usual it looks like the capacitors in the data lines are missing should you wish to try your soldering skills and put this into service.
In November 2021 I heard from Erik who had the earlier model of the M340C. His example had the mSATA socket fitted. I don't know if this is the case with all early models.
RAM:There is a single DDR3L SODIMM socket for the RAM. The 2GB Transcend SODIMM supplied with my unit is labelled: TSIT3DDR3L-02G. I successfully tried an 8GB part from Crucial: CT102464BF160B.C.16FER.
There is a JBAT1 jumper close to the backup battery for clearing the CMOS.
The short RED lead (bottom left in the board photo) is the connector to the front panel USB 3.0 socket. (Although it looks to be a SATA data lead it's just being used as a convenient board connector).
Also on the board there is an unpopulated 2 x 5 socket (J3) whose purposes are unknown (at least to me).
Configured Voltage: 1.5 V
Umbauoptionen
Minimal OS (Kiosk)
Jean28518/minimalOS
README.md
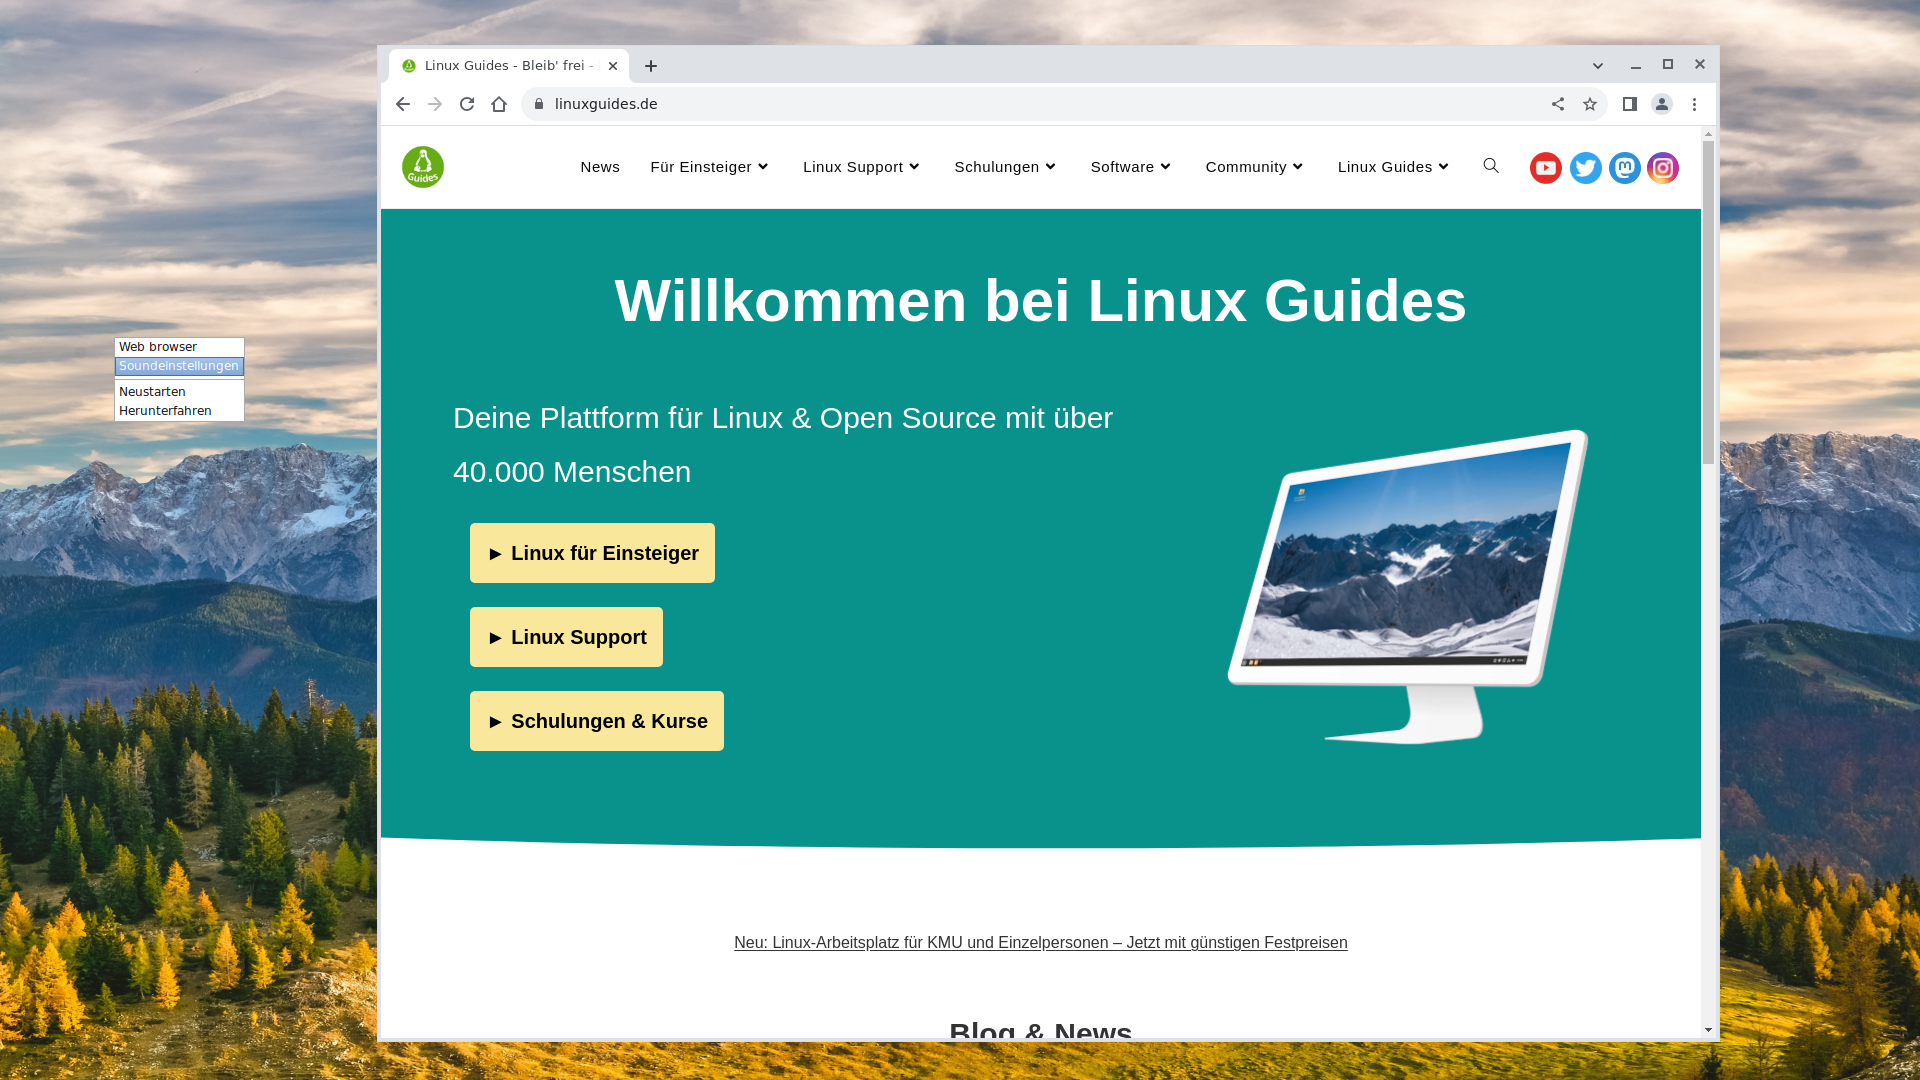
minimalOS
Einfaches Linux für Kiosks, Terminals oder sehr leichte Workstations, welches nahezu nur aus einem Webbrowser (startet optional im Vollbildmodus) besteht. Das System aktualisiert sich vollautomatisch und ist (fast) ausbruchsicher.
Alle noch vorhandenen Ausbruchstellen, lassen sich bei Bedarf entfernen.
Features
- Vollautomatische Installation und Einrichtung (Einstellungen werden in das Installationsmedium geschrieben)
- Chromium Browser geeignet für Anzeigen, Anmelde/Bestell/...-Terminals, Kiosks, Workstations, Multimedia-Station, ...
- Automatische Druckerkonfiguration (soweit von Linux unterstützt)
- Bildschirmeinstellungen über Kontextmenü (abschaltbar)
- Soundeinstellungen über Kontextmenü (abschaltbar)
- Netzwerkeinstellungen über Kontextmenü (abschaltbar)
- Sound-Steuerung über Multimedia-Tasten (abschaltbar)
- Bildschirmhelligkeit-Steuerung über entsprechende Tasten (abschaltbar)
- Touchpad/Touchscreen Support
- Vollautomatische Updates (abschaltbar)
- Neustart/Herunterfahren über Kontextmenü
- Adminkonsole für die Wartung mit Passwortschutz (Über Strg + Alt + F1 erreichbar)
- Möglichkeit zur weiteren Anpassung/Konfiguration des Systems (Debian, Openbox)
Achtung: !Das System installiert sich standardmäßig vollautomatisch auf den Rechner und löscht standardmäßig alle Partitionen!
Hardware Anforderungen
| Leerlauf | Empfohlene Mindestanforderungen | |
|---|---|---|
| RAM | 340 MB | 1 GB |
| Festplattenkapazität | 2.5 GB | 10 GB |
Unterstützte Architekturen: amd64, arm64, i386 (32bit)
.iso-Datei bauen
sudo apt install syslinux-utils git clone https://github.com/Jean28518/minimalOS.git cd minimalOS
- Unter
deb/usr/lib/minimal-os/openbox/autostartkönnen automatisch gestartete Anwendungen sowie ebenfalls der Link der Webseite, die sich standardmäßig öffnen sollen, definiert werden. - Ebenfalls kann das Hintergrundbild
deb/usr/share/backgrounds/minimal-os.jpgausgetauscht werden. - Außerdem kann das OpenBox Menü (Rechtsklick) unter
deb/usr/lib/minimal-os/menu.xmlangepasst werden. Standardmäßig ist das volle Applications-Menü deaktiviert. - In der
preseed.cfgDatei können Standard-Passwörter angepasst werden, weitere Software hinzugefügt werden (in der Zeiled-i pkgsel/include string), sowie die vollautomatische Installation unterbrochen werden (entsprechend in der Datei dokumentiert).
bash create-deb.sh
amd64
Die "normale" Architektur
bash download-debian-amd64.sh sudo bash build.sh amd
arm64
Beispielsweise für den Raspberry Pi.
bash download-debian-arm64.sh sudo bash build.sh arm
i386
Für ältere 32bit Systeme.
bash download-debian-i386.sh sudo bash build.sh 386
- Nun sollte eine minimalOS.iso Datei existieren, die wie jedes andere Linux vollautomatisch installiert werden kann (Bitte "Grafische Installation" auswählen). Das Gerät benötigt während der Installation eine Internetverbindung. Achtung: Das System formatiert (wenn nicht in der preseed-Datei auskommentiert) alle Festplatten auf dem System!
Benutzung
Gesteuert kann das System über einen Rechtsklick auf den Desktop, nachdem der Browser geschlossen wurde (Alt+F4).
Der Standard-Benutzer hat keine Root-Rechte und meldet sich vollautomatisch ohne Passworteingabe ein. Um Root zu werden, muss man auf eine andere Konsole wechseln (Beispiel: Strg + Alt + F1) und sich dann als root einloggen. Das Passwort dafür kann in der preseed.cfg konfiguriert werden und ist standardmäßig mei3eiN6.
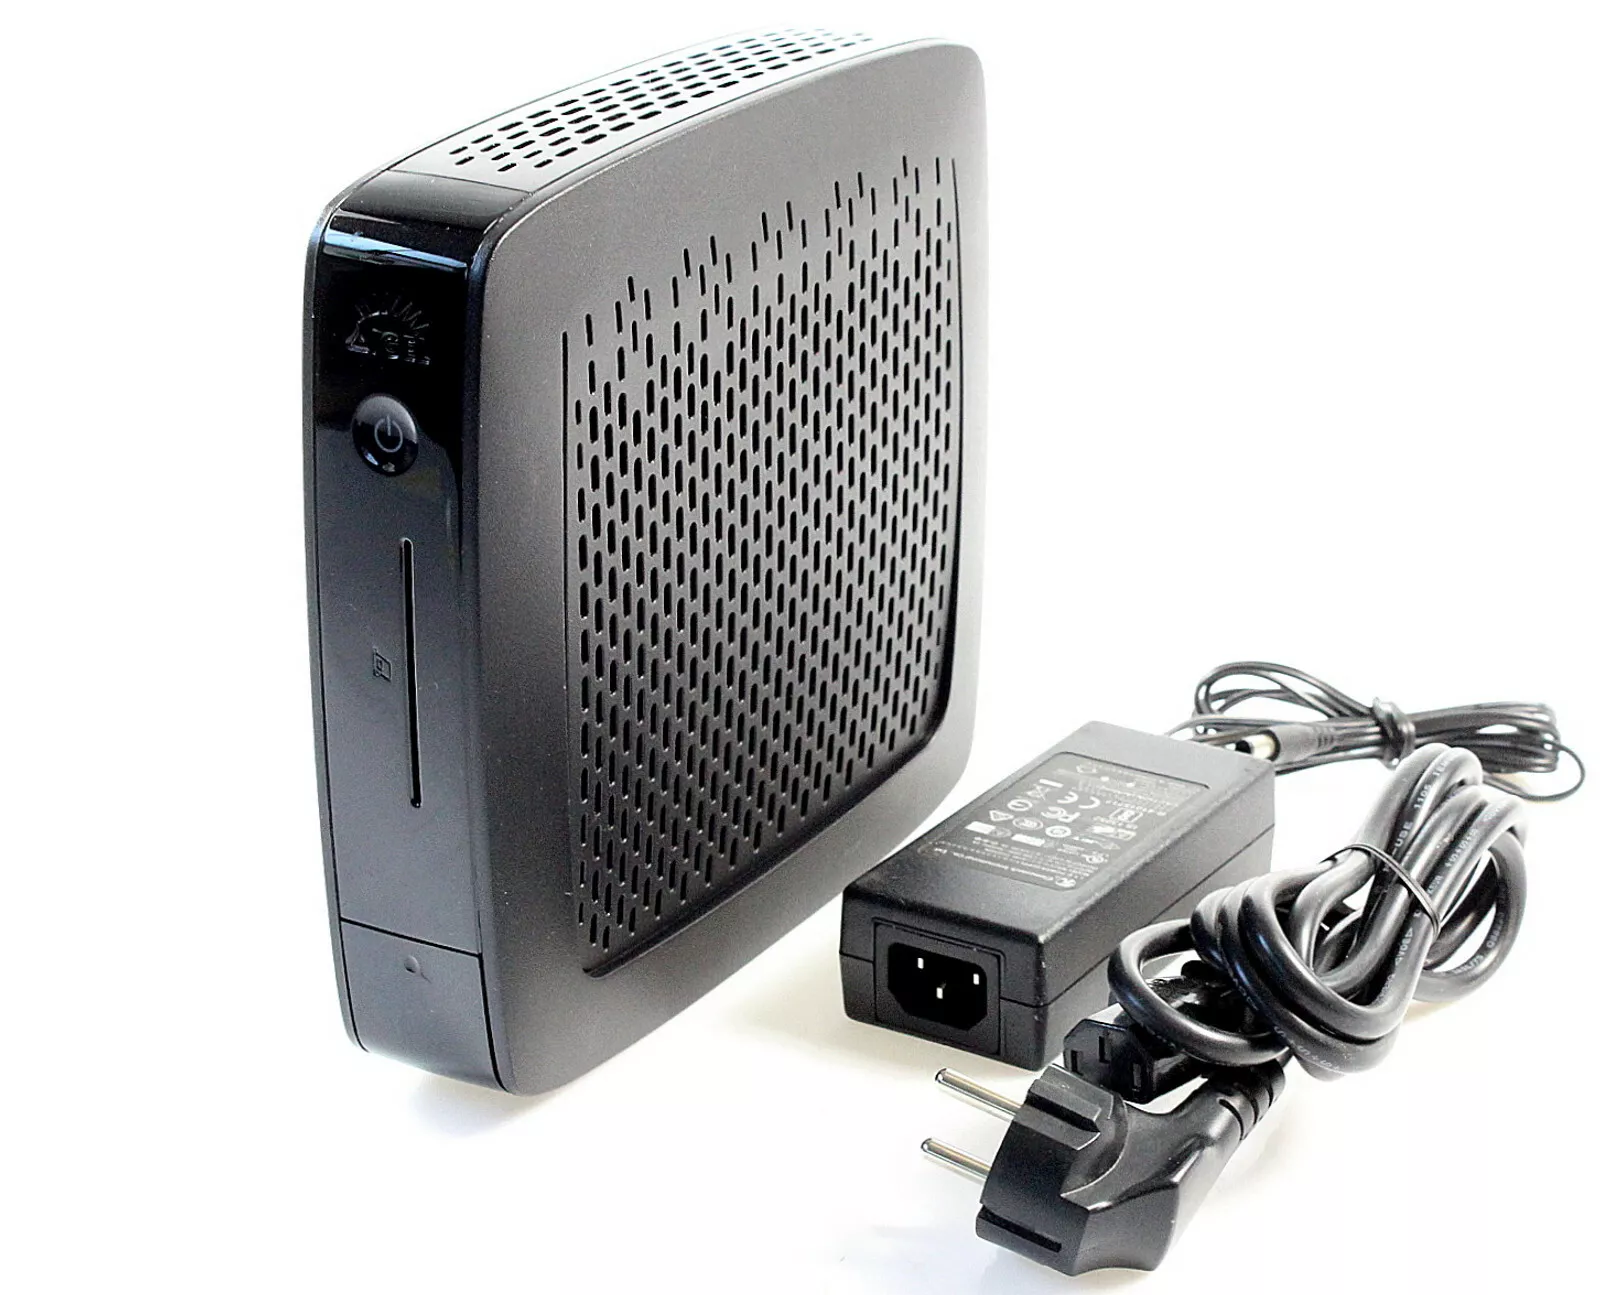
IGEL UD3 M350C: Technische Spezifikation
Im folgenden Artikel finden Sie technische Details zum IGEL UD3-Modell M350C, seinen typischen Energieverbrauch, die Betriebsbedingungen und die Montagemöglichkeiten.
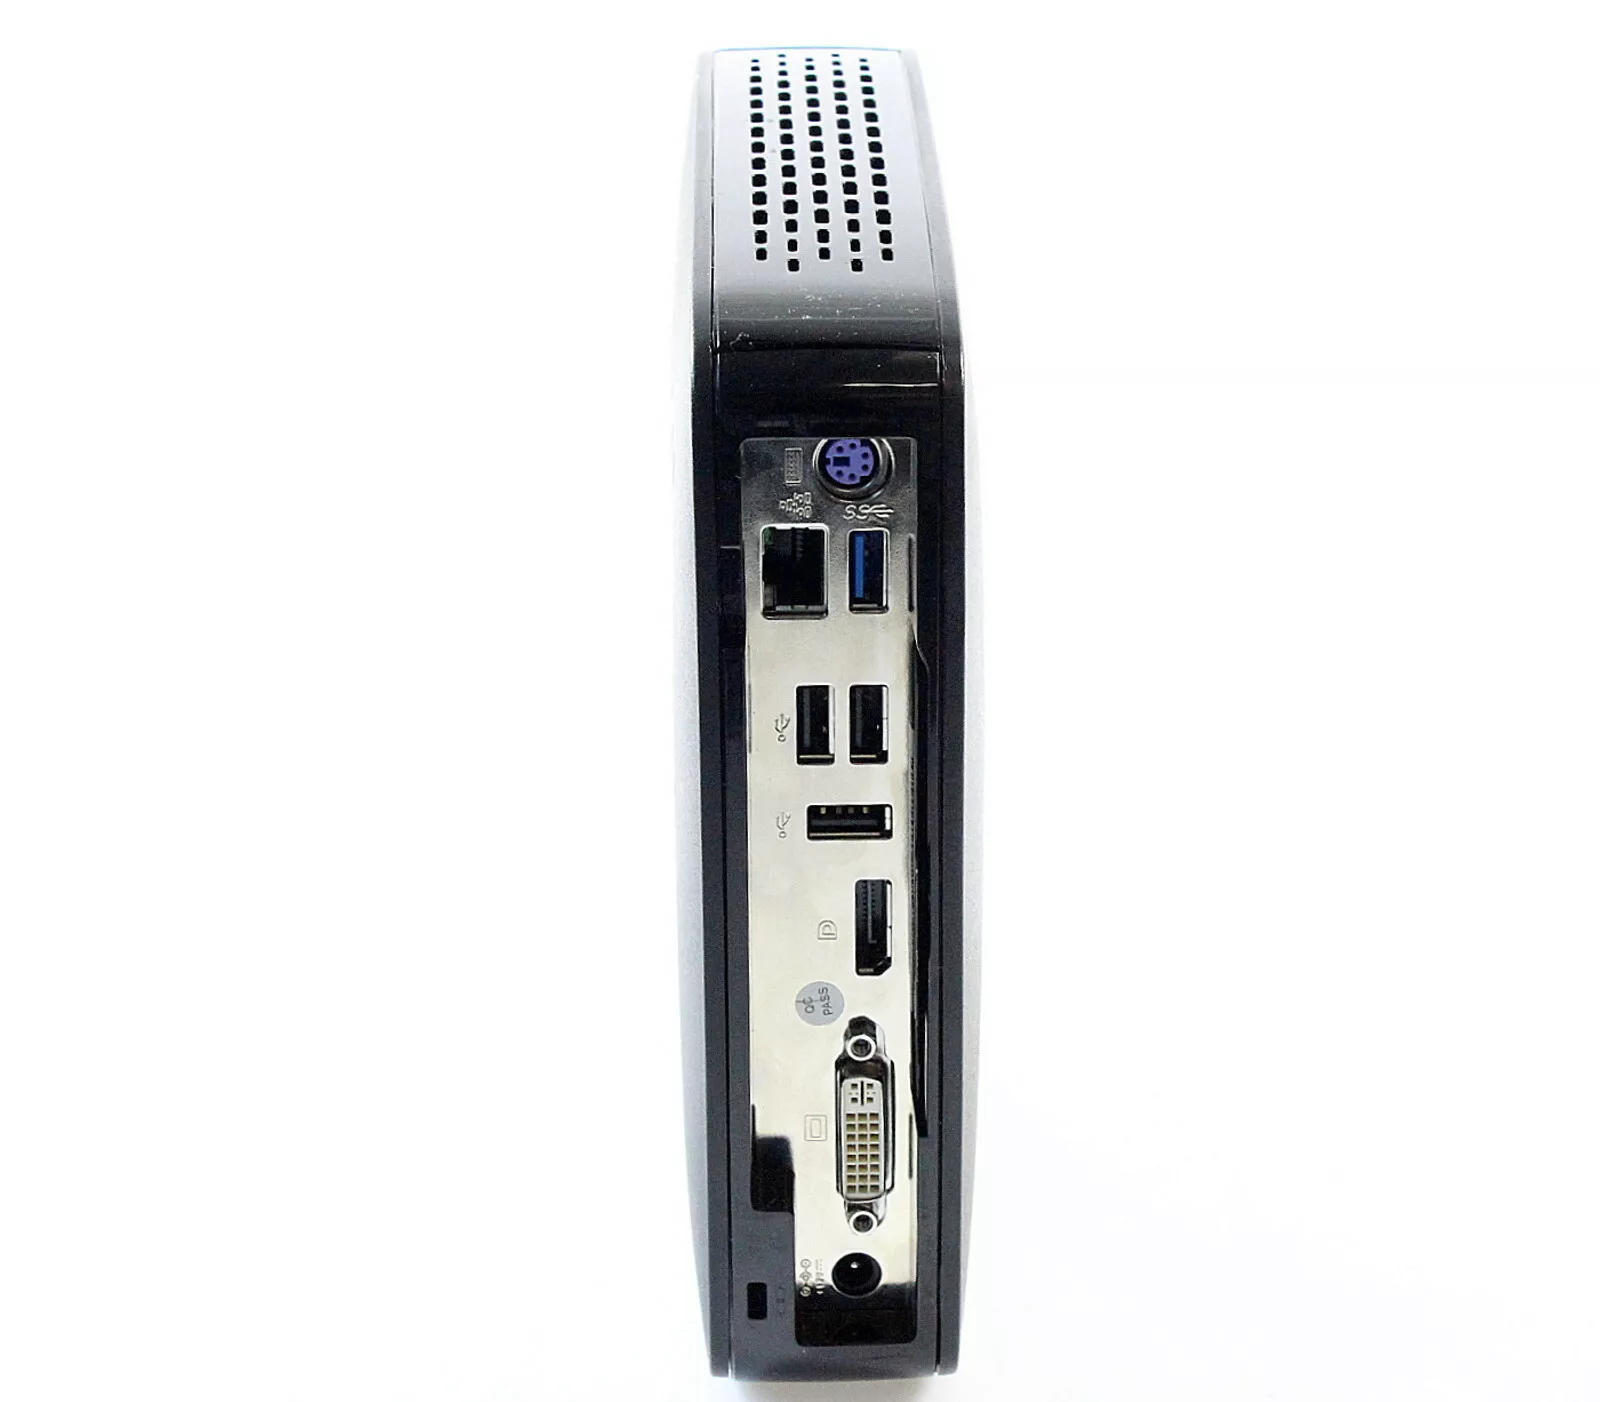
IGEL UD3 M350C Anschlüsse

Teileliste
- Endgerät
- Standfuß
- Netzteil mit integriertem DC-Kabel
- AC-Netzkabel
VORSICHT! Beachten Sie den folgenden Hinweis zur Stromversorgung:
- Schließen Sie alle Zubehörteile an, z. B. Maus, Tastatur, Bildschirm (nicht im Lieferumfang enthalten) und Ethernet.
- Schließen Sie das Netzkabel an die Buchse des Netzteils an.
- Verbinden Sie das DC-Kabel mit der DC-Buchse auf der Rückseite des Gerätes.
- Verbinden Sie das andere Ende des Netzkabels mit einer geeigneten Netzsteckdose.
- Schalten Sie das Gerät mit dem Tastsensor auf der Vorderseite ein.
IGEL UD3 M350C Technische Spezifikation
System
| Erhältliche Betriebssysteme | IGEL OS 11 |
| Management | IGEL Workspace Edition, Lizenzaktivierung nötig |
| Prozessor |
AMD Ryzen™ Embedded R1505G Dual-Core mit aktiviertem AMD Secure Prozessor und AMD Memory Guard |
Speicher
| RAM | 4 GB (2x 2GB SO-DIMM DDR4 2400 MHz) 2x32GB maximal |
|
Speicher |
8 GB (onboard eMMC) (verlötet) |
Grafik
| Chipsatz | AMD Radeon™ Vega 3 Graphics |
| Videospeicher | 512 MB Shared Memory |
| Anschlüsse |
2x DisplayPort 1.2 Multistream-Unterstützung: optional mit dem DP-MST-Adapter |
| Unterstützte Auflösungen |
2x 4K @60 Hz Unterstützt beschleunigte Videodekodierung für Auflösungen bis zu 2x 4K |
| Unterstützter Videokompressionsstandard |
H.264 |
Netzwerk
| Ethernet | 10/100/1000 Ethernet (RJ-45-Steckverbinder) |
| Drahtlos |
optional: |
Audio
| Chipsatz | Realtek ALC897 oder ALC888S HD Audio |
| Anschlüsse | 1x 3,5-mm-TRRS-Audiobuchse (CTIA-Standard) (Line-in / Line-out / Headset) |
| Lautsprecher |
1x intern |
Schnittstellen
| USB 3.2 Gen 1 oder Gen 2 (SuperSpeed USB) |
2x vorne |
| USB 3.2 Gen 1 Typ-C™ |
1x vorne Aufladen bis zu max. 7,5 W. Andere Alt-Modi (Alternate Modes) werden nicht unterstützt. |
| USB 2.0 |
2x hinten |
| DisplayPort 1.2 | 2x hinten |
| LAN | 1x hinten |
| Line-in / Line-out / Headset | 1x vorne |
| 12 V DC | 1x hinten |
| Diebstahlsicherung | 1x hinten |
| Smartcardleser | optional: 1x vorne (integrierter HID Omnikey 3121) |
| Seriell |
1x hinten (Chipsatz Prolific PL2303; inkl. 5 V-Spannungsversorgung) Hinweis: Die Reihenfolge der COM-Anschlüsse kann sich ändern, wenn ein USB-zu-Seriell-Adapter an UD3 M350C angeschlossen ist. |
Maße und Gewicht
| Gerät (TxBxH), stehend |
196 x 68 x 198 mm (mit Standfuß) |
| Gerätegewicht |
1,08 kg (mit Standfuß) |
| Verpackung (TxBxH), liegend |
225 x 275 x 95 mm |
| Verpackungsgewicht | 0,31 kg |
Betriebsumgebung
Beachten Sie unbedingt die Sicherheitshinweise und die Umgebungsbedingungen!
| Kühlung | lüfterlos |
| Betriebstemperatur |
vertikal (ohne VESA-Halterung): vertikal (mit VESA-Halterung): horizontal (nur mit optional erhältlichen Gummifüßen): |
| Luftfeuchtigkeit | 20 % – 80 %, nicht kondensierend |
Elektrische Daten
| Stromversorgung | extern |
| AC-Eingangsspannung | automatische Spannungsanpassung 100 – 240 V / 50 – 60 Hz |
| DC-Ausgangsspannung |
externes Netzteil 12 V / 4 A (48W) |
| Stromverbrauch |
5,45 W (idle) / 0,59 W (sleep) / < 0,48 W (aus) 5,32 W (idle) / 0,55 W (sleep) / < 0,48 W (aus) |
Typischer Energieverbrauch
(ENERGY STAR, 8.0)
| ETEC |
26,70 kWh (pro Jahr, @230 V) |
| ETEC, max | 33,0 kWh (pro Jahr, @230 / 115 V) |
Montagemöglichkeiten
| VESA-Halterung |
für Montage des Gerätes an der Monitorrückseite Wenn Sie zusätzlich eine Lösung für die Kabelmontage benötigen, siehe Mini-PC Cable-Caddy.* |
| Gummifüße | für horizontalen Betrieb |
Optional
| Integrierter Smartcardleser | für sichere Smartcard-basierte Authentifizierung |
| VESA-Halterung | für Montage an der Monitorrückseite |
| Gummifüße | für horizontalen Betrieb |
| USB-zu-Parallel-Adapter | zum Anschluss von Peripheriegeräten, die einen parallelen Port benötigen |
| USB-zu-Seriell-Adapter | zum Anschluss von Peripheriegeräten, die einen seriellen Port benötigen |
| Integriertes WLAN / Bluetooth | für drahtlose Konnektivität |
Umbauoptionen
HP T520
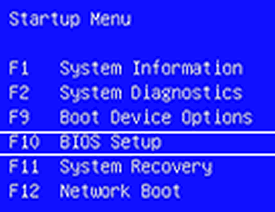
HP Desktop PCs – Informationen und Menüoptionen des BIOS Setup Utilitys
Hier erfahren Sie, wie Sie die allgemeinen BIOS-Menüs und -Einstellungen öffnen und dort navigieren. Bestimmte Menüs und Funktionen variieren je nach Computermodell.
Das BIOS (Basic Input/Output System) steuert die Kommunikation zwischen Systemgeräten wie Festplatte, Display und Tastatur. Es speichert auch Konfigurationsinformationen für Peripheriegerätetypen, die Startreihenfolge, die Größe des System- und des erweiterten Speichers und mehr. Jede BIOS-Version ist basierend auf der Hardwarekonfiguration der Computermodellreihe angepasst und enthält ein integriertes Setup Utility, das dazu dient, auf bestimmte Einstellungen des Computers zuzugreifen und diese zu ändern.
Wenn Sie das BIOS aktualisieren müssen, um ein spezifisches Problem zu beheben, die Leistung zu verbessern oder eine neue Hardwarekomponente oder ein Windows-Upgrade zu unterstützen, fahren Sie mit HP Consumer-Desktop PCs – Aktualisieren des BIOS (Basic Input/Output System) (Windows) fort. Sie können das BIOS unabhängig davon aktualisieren, ob Windows startet oder nicht startet.
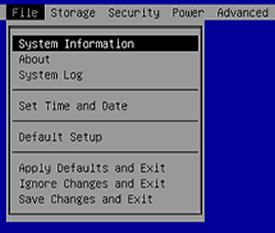
Öffnen des BIOS-Einrichtungsdienstprogramms
Sie können das BIOS-Einrichtungsdienstprogramm während des Startvorgangs öffnen, indem Sie beim Systemstart eine Reihe von Tasten drücken.
-
Drücken Sie F10, um das BIOS-Einrichtungsdienstprogramm zu öffnen.

Festplatte:
Pi-hole Docker Howto
Solved: Error starting userland proxy: listen tcp4 0.0.0.0:53: bind: address already in use
Published by
Problem
While configuring the Duo Network Gateway (DNG) on a Ubuntu device for RDP, I came across the following error while trying to configure a DNS service:

The error is presented because the Ubuntu system is using the UDP port 53 (DNS). This is because there is a network name resolution service called systemd-resolved running by default. This service provides name resolution to local applications using the loopback IP of the device and acts by default as a DNS stub listener. It can also validate DNS/DNSSEC and can be configured for Link-Local Multicast Name Resolution (LLMNR) which when enabled will become a full LLMNR responder and resolver. There are a few other things that systemd-resolved can do but for this article, we won’t discuss those as they’re not relevant. You can find out more about systemd-resolved here.
Solution
II’ve seen articles on the Internet recommending that systemd-resolved should be disabled if you encounter this issue. However, by disabling systemd-resolved, the name resolution will not work, so we need to take another approach. The approach that we’re going to take in this article is to modify the resolved.conf for systemd-resolved. We will modify the configuration so that it no longer listens for DNS requests but rather uses the configured DNS servers for that task.
Verify that port 53 is used on your DNG
Although you have experienced the aforementioned error that more than likely brought you here, let’s not jump the gun! We want to start by checking what is using port 53. Enter the following command to valid port 53 is indeed in use.
sudo lsof -i udp:53You should recieve a similar output to the one shown in the screenshot below. Here we confirm that systemd-resolved is indeed using UDP 53 (DNS).

We can further validate this by performing an NSLOOKUP to see what the system uses to resolve FQDN’s. Enter the following command.
sudo nslookup google.comThe results should be similar to the screenshot below. You can see that the DNG is using itself to cache and perform DNS lookups.

If you are using an Ubuntu or Fedora operating system to run the Pi-Hole Docker container, you may need to disable the DNS Stub listener that is built into the Systemd resolve service.
The operating system uses this service to provide network name resolution. As Pi-Hole will want to operate on the same part the resolve service does, we need to disable it.
To start this process, begin editing the “/etc/systemd/resolved.conf” configuration file by running the following command.
sudo nano /etc/systemd/resolved.confCopy8. Within this file, you will want to find the following line. This setting basically allows us to control whether the DNS stub listener is turned on.
#DNSStubListener=yesCopyAfter finding this line you will want to remove the hashtag (#) from the front of this line and change “yes” to “no“.
DNSStubListener=noCopy9. Once you have made this change, save and quit out of the file by pressing CTRL + X, Y, and then ENTER.
10. Our next step is to remove the existing “resolv.conf” file since it currently points your system’s network to use the now-disabled DNS stub resolver.
You can delete this file using the rm command as shown below.
sudo rm /etc/resolv.confCopy11. With the existing “resolv.conf” file removed, we will now create a symbolic link in its place pointing to the version setting in the “/run/systemd/resolve/” directory.
This version of the file is automatically updated using the DNS servers set within your Netplan.
sudo ln -s /run/systemd/resolve/resolv.conf /etc/resolv.confCopy12. The last thing we need to do is restart the “systemd-resolved” service so that all of our changes will be loaded in.
Once the service has finished restarting, Pi-hole should now be able to utilize the DNS ports on your system.
sudo systemctl restart systemd-resolvedsudo systemctl stop systemd-resolved
nslookup google.comComposefile:
IGEL 350c - SATA / NVME
Einbau einer Festplatte
Man kann das WLAN-/BT - Modul ausbauen und mit entsprechenden Adapterkarten den Mini-PCIE-Slot zum Anschluss einer Festplatte verwenden. So lässt sich entweder eine NVME oder SATA Festplatte verbauen. Beim Einbau einer SATA-Festplatte wird, um Platz zu sparen, das nackte Modul verbaut und an einen der freien Pfosten angeschraubt, die für den Kartenleser gedacht sind, der in unseren Geräten allerdings nicht eingebaut ist.
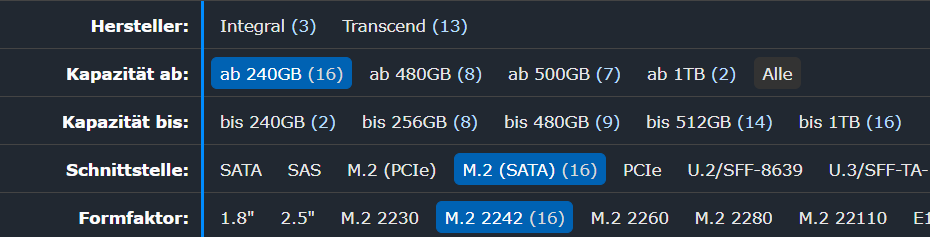
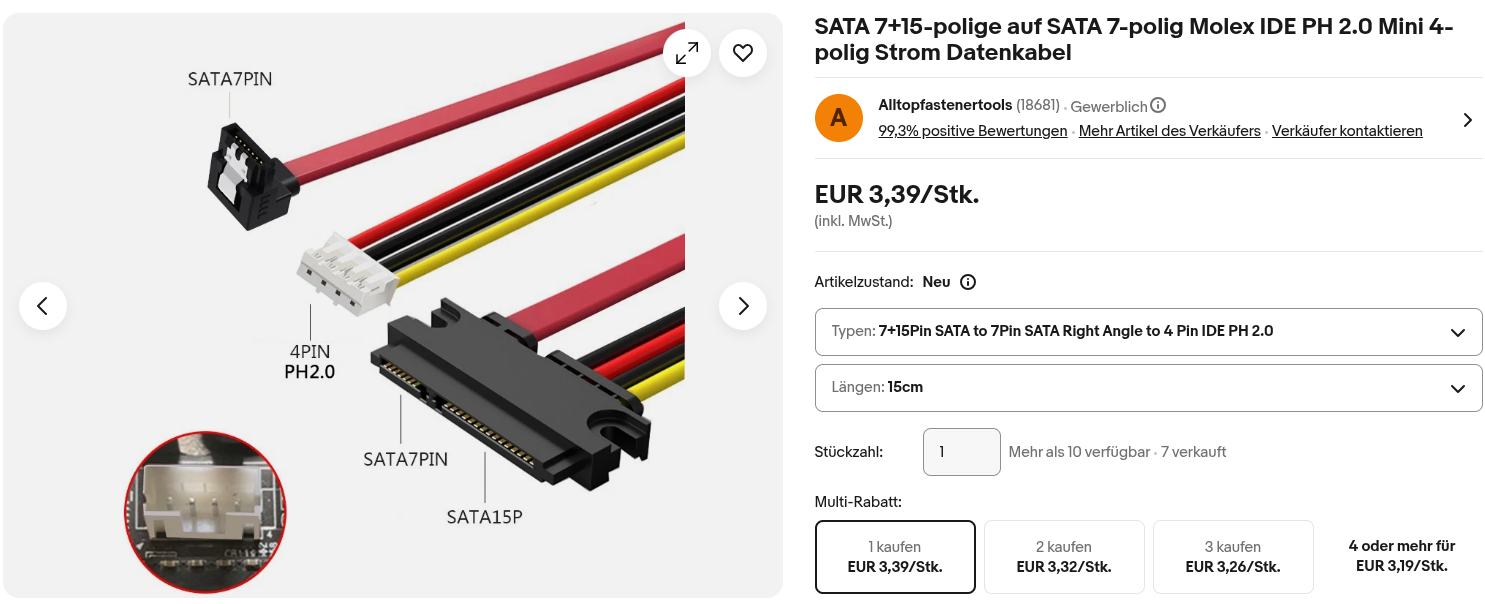
Teile für SATA:
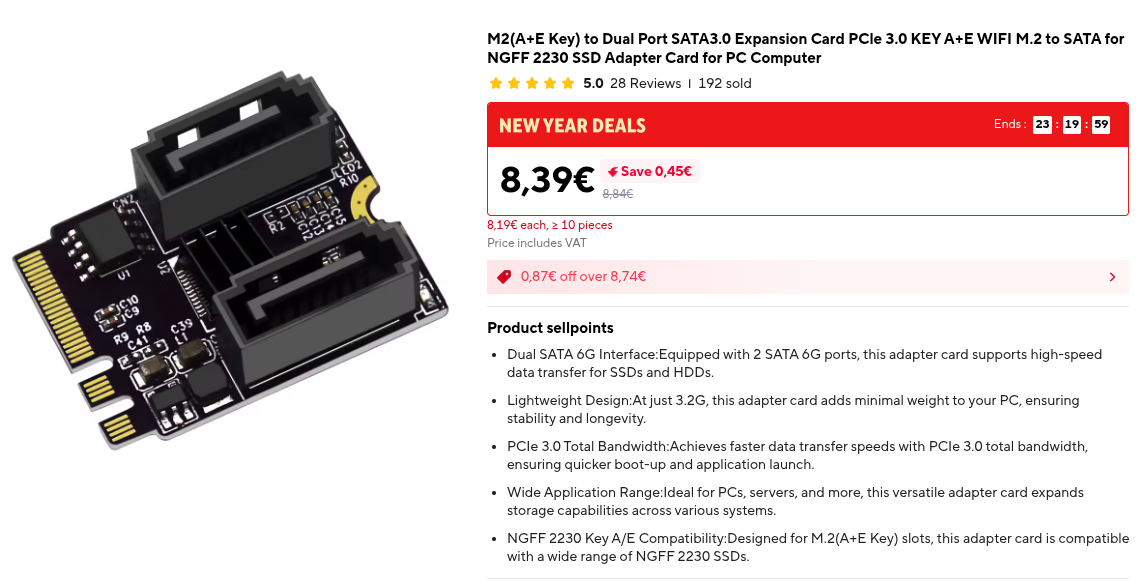
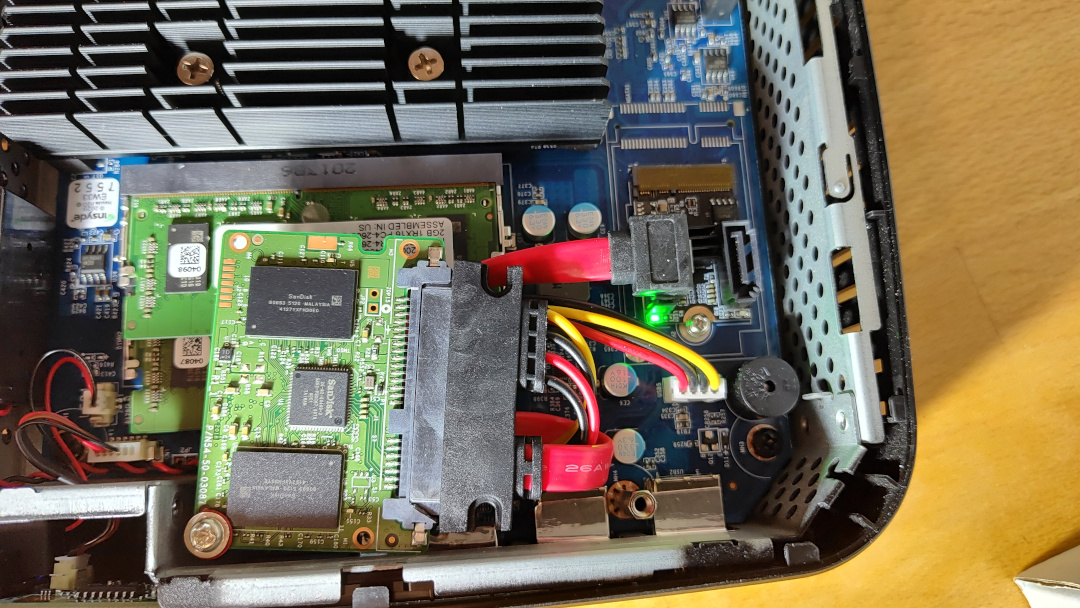
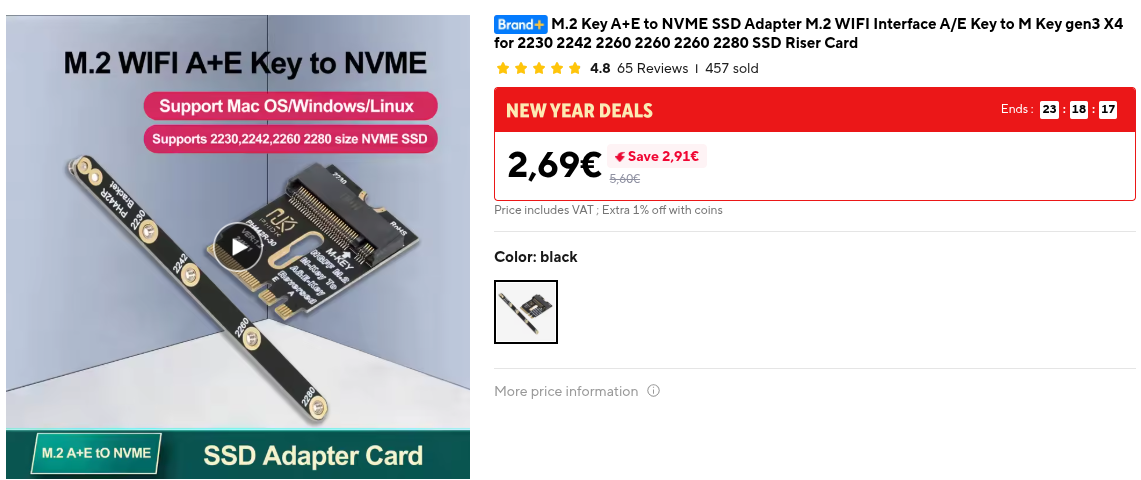
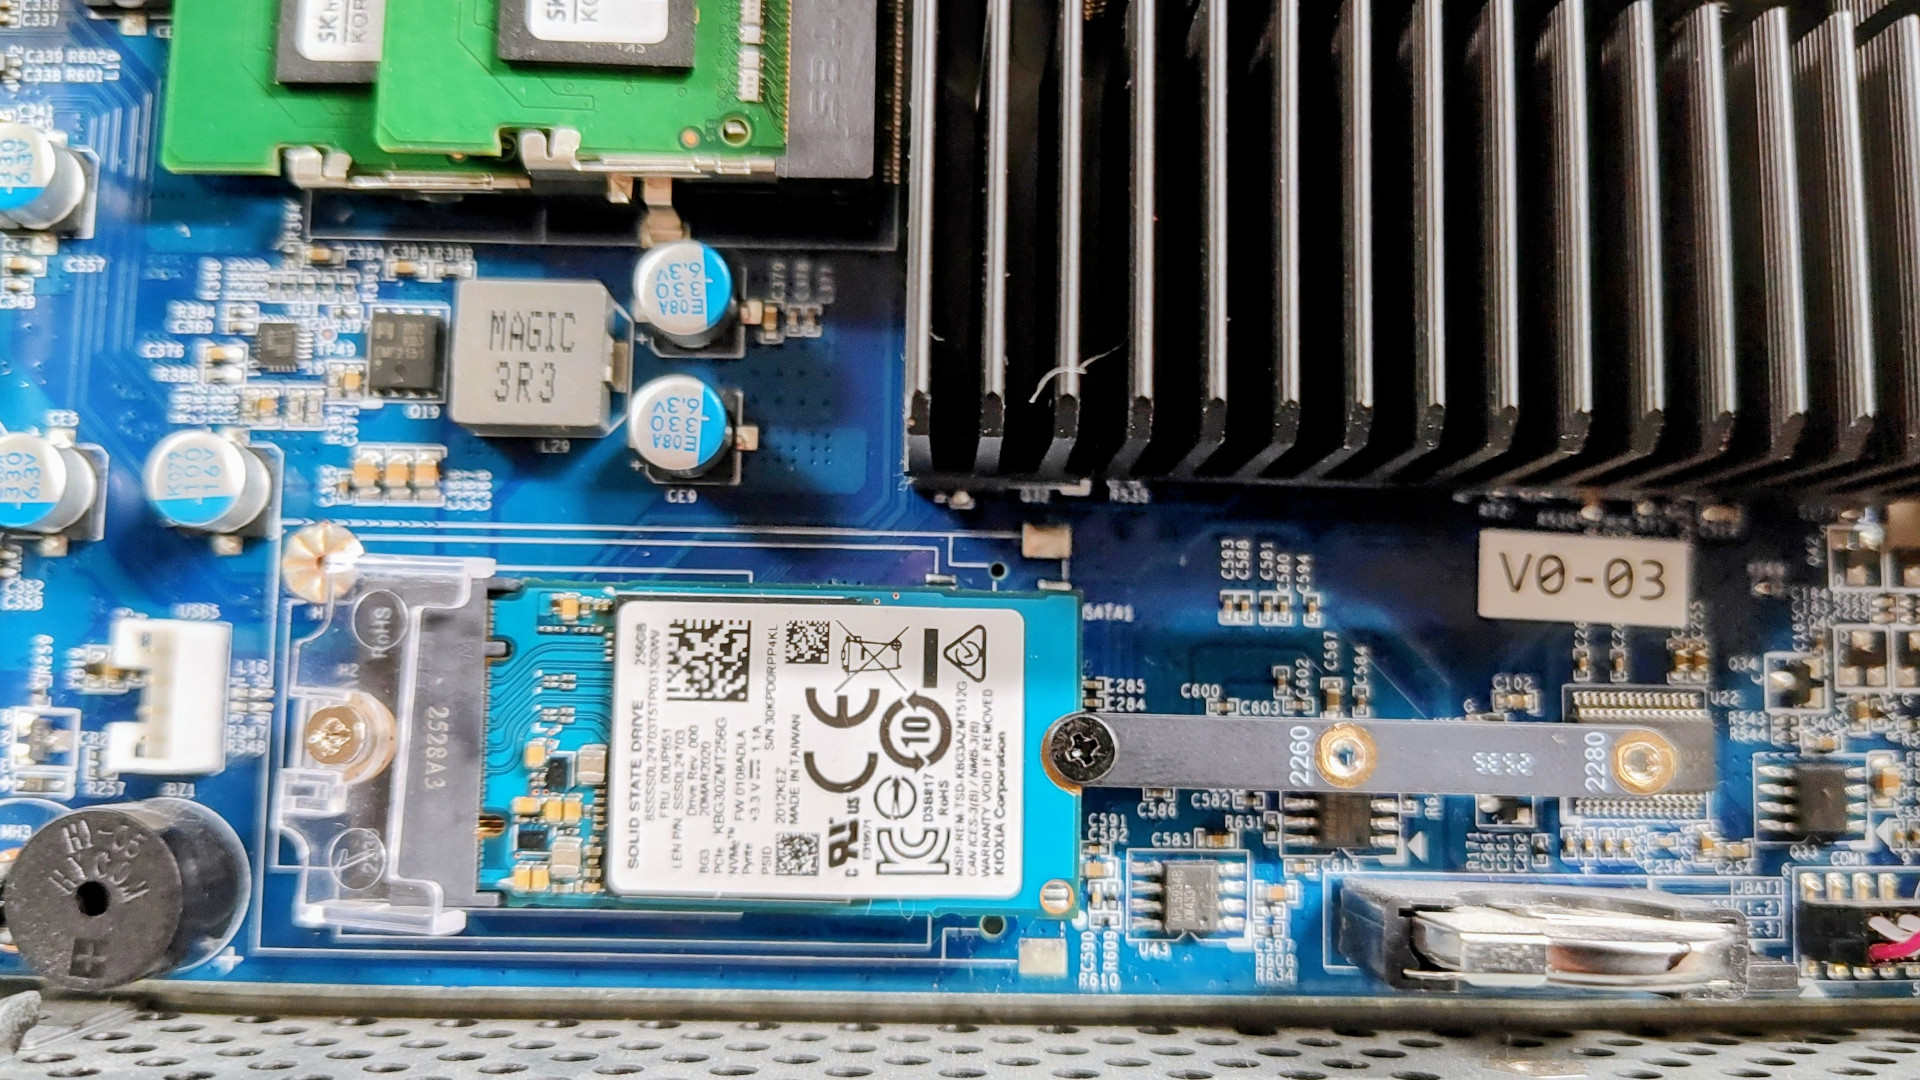
Teile für NVME:
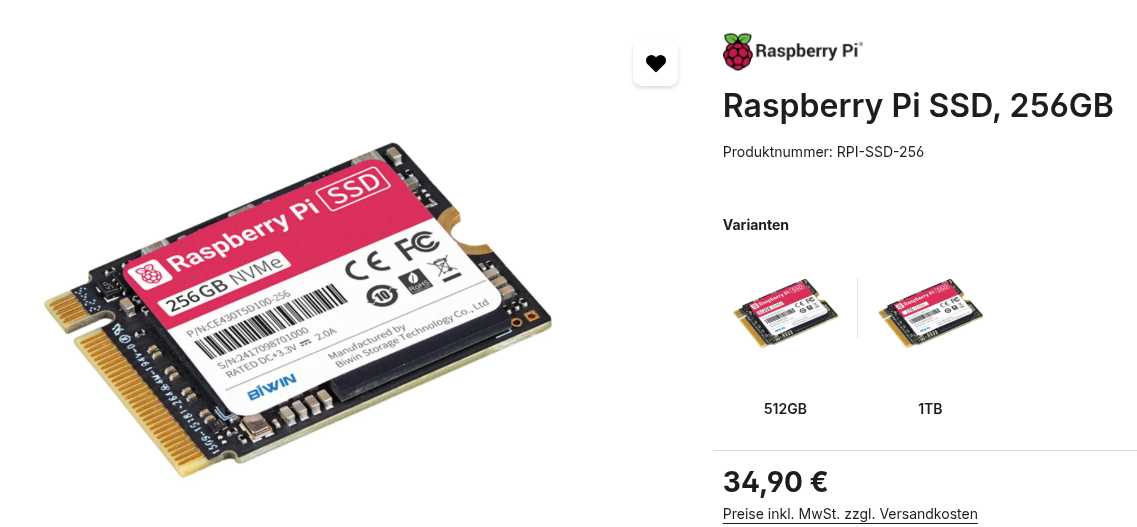
Formfaktor 2230, 2240
Geschwindigkeitstest SATA 3.0:
/dev/sda:
Timing O_DIRECT cached reads: 958 MB in 2.00 seconds = 478.59 MB/sec
Timing O_DIRECT disk reads: 1504 MB in 3.00 seconds = 500.72 MB/sec
Test Schreibgeschwindigkeit 1000 Blöcke a 1MB
1024+0 Datensätze ein
1024+0 Datensätze aus
1073741824 Byte (1,1 GB, 1,0 GiB) kopiert, 2,67673 s, 401 MB/s
2.Test Lesegeschwindigkeit 1000 Blöcke a 1MB
1024+0 Datensätze ein
1024+0 Datensätze aus
1073741824 Byte (1,1 GB, 1,0 GiB) kopiert, 1,95155 s, 550 MB/s
Geschwindigkeitstest NVME:
Test Schreibgeschwindigkeit 1000 Blöcke a 1MB
1024+0 records in
1024+0 records out
1073741824 bytes (1.1 GB, 1.0 GiB) copied, 1.49458 s, 718 MB/s
2.Test Lesegeschwindigkeit 1000 Blöcke a 1MB
1024+0 records in
1024+0 records out
1073741824 bytes (1.1 GB, 1.0 GiB) copied, 1.32354 s, 811 MB/s
Alternativ:
Openmediavault (NAS), auf einem IGEL 340C
Hardware: IGEL M340C :
Die Hardware ist sparsam, lautlos im Betrieb, standfest und eignet sich daher durchaus für den Dauerbetrieb.
Ohne großen Aufwand lässt sich aus den IGEL-Geräten ein ganz ordentliches NAS-System bauen. Die Basis ist die auf Debian-Linux basierende NAS-Software "Openmediavault". Die ist modular aufgebaut und vielseitig erweiterbar, je nachdem, was man damit machen möchte, belässt man es bei der Basisinstallation oder installiert einige der zahlreichen Erweiterungen, die verfügbar sind.
Für einen einfachen File-Server reicht die Basisinstallation schon aus und auch die 2 GB RAM, die im Default verbaut sind. Benötigt wird lediglich eine größere Festplatte ->s.u. .
Mit mehr RAM ( maximal 8Gb DDR3-SO-Dimm gehen in den einzigen Steckplatz) und einigen Erweiterungen .z.B. Docker ergeben sich sehr viele Möglichkeiten, Anwendungen oder Dienste auf dem Gerät laufen zu lassen. Die verbaute CPU mit vier Kernen bietet für die meisten Anwendungen genug Leistung an, um einen flüssigen Betrieb zu ermöglichen.
Demo
IGEL-NAS (Beispiel mit einigen installierten Containern und Portalseite).
Hint: Die Logins zu den einzelnen Anwendungen stehen im Mouseover-Text.
Nach der Anmeldung unter "Openmediavault" richtet man als erstes das Dashbord ein (oben rechts unter dem Usersymbol) und hat einen Überblick darüber, was so vor sich geht.
NAS: ->Handbuch

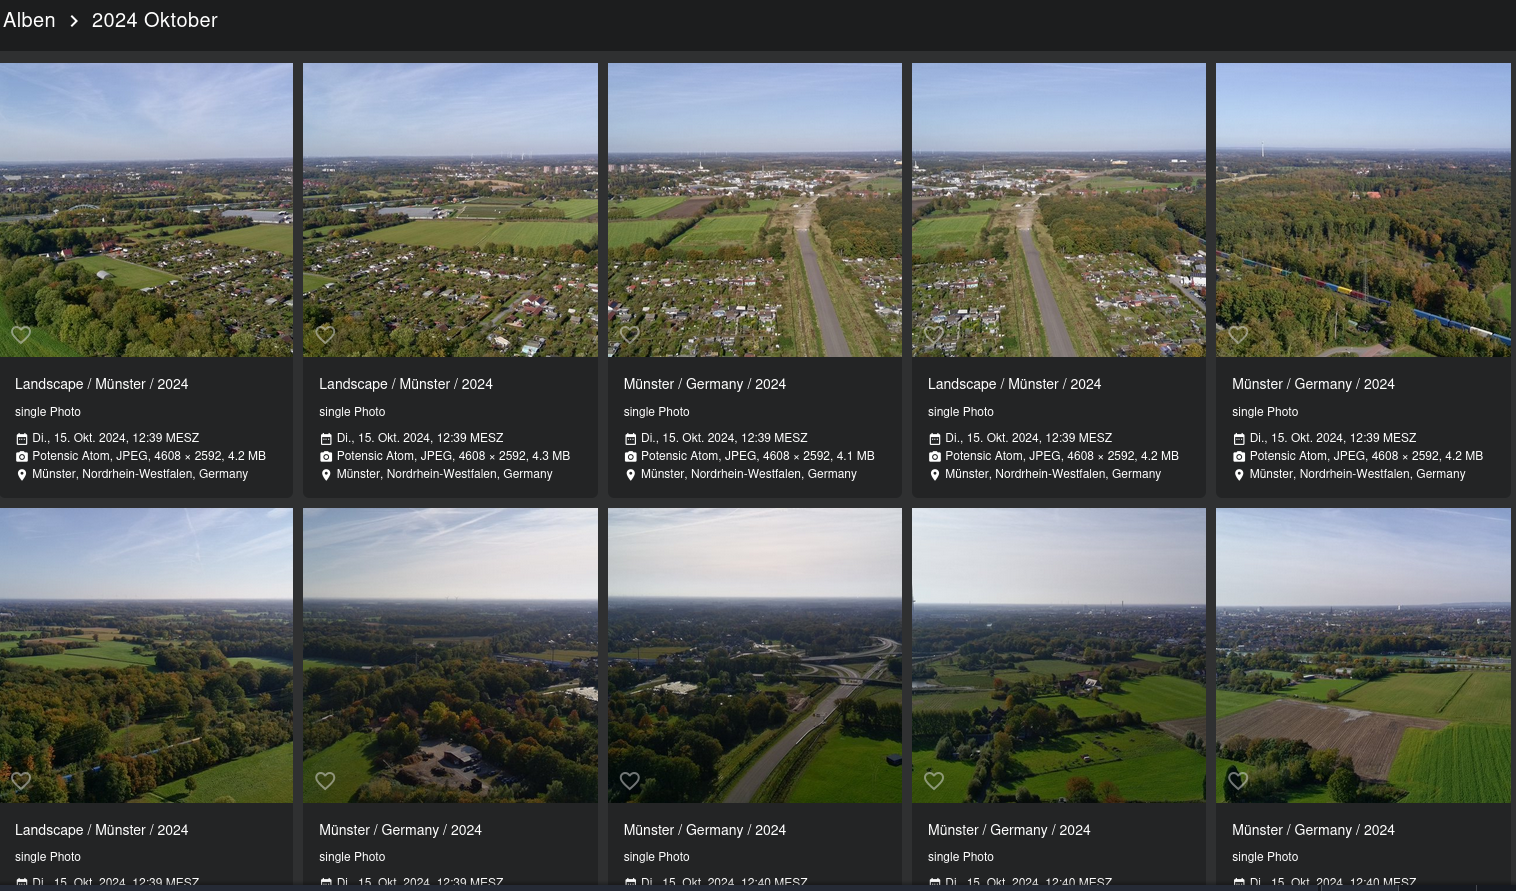
Zahlreiche Plugins zu Multimedia, Containerverwaltung wie Kubernetes oder Podman oder auch zur Verwaltung von Photos.
z.B : Photoprism (Bilderverwaltung)
Festplatte:
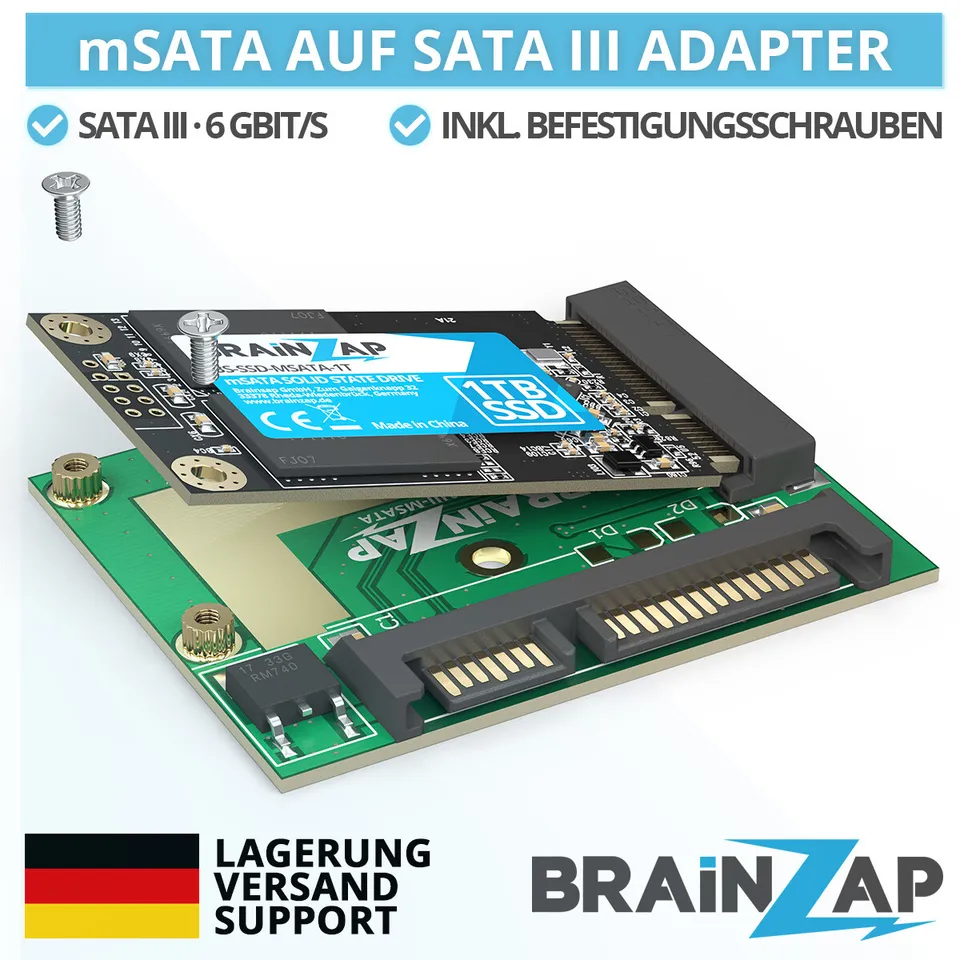
- Umrüstung: Adapterkarte SATA auf mSATA , mSATA MO-300
- Alternativ kann man auch eine 2,5" - SSD auseinander nehmen, da die meisten darin verwendeten Module exakt so aufgebaut sind gebaut sind wie die abgebildete Adapterkarte.
- Der IGEL-M430C verwendet DDR3 SO-Dimm Speicher, verfügt über einen Slot, der mit maximal 8 GB bestückt werden kann.
- Es sind 2 USB3-Anschlüsse vorhanden, an denen z.B. externe Festplatten angeschlossen werden können.
Openmediavault
- Defaultanmeldung beim NAS: user: admin pass: openmediavault
_____________________________________________________________________
In der Basisversion der Installation ist alles vorhanden, was nötig ist, um ein einfaches NAS als Datengrab damit zu betreiben. Die Software enthält per Default diverse Plugins und Erweiterungen (z.B. Photoprism), mit dem sich weitere Funktionen installieren lassen.
Darüberhinaus gibt es wie gesagt noch zahllose Erweiterungen wie Docker z.B., womit Container installiert und verwaltet werden können. Für den Einsteiger gibt's dazu zahlreiche Templates, die einfach angepasste werden können. Diese Erweiterungen sind in den OMV-Extra Repository enthalten und werden auf der Kommandozeile mit:
wget -O - https://github.com/OpenMediaVault-Plugin-Developers/packages/raw/master/install | bash
installiert.